
User`s guide


139 Copyright © Acronis, Inc., 2000-2010
Click Proceed to start the bootable media creation process.
Use the sidebar on the left to navigate through the wizard's steps for revision.
To cancel operation and quit Acronis Media Builder, click Cancel.
After you create a boot disc, mark it and keep it in a safe place.
Please keep in mind that the backups created by the later program version may be incompatible with
the previous program versions. Due to this reason, we strongly recommend that you create a new
bootable media after each Acronis True Image Home 2011 Netbook Edition upgrade. One more thing
you should remember – when booting from the rescue media and using a standalone version of
Acronis True Image Home 2011 Netbook Edition you cannot recover files and folders encrypted with
use of the encryption feature available in Windows XP and later operating systems. For more
information see File-level security settings for backup (p. 57). On the other hand, backups encrypted
using the Acronis True Image Home 2011 Netbook Edition encryption feature can be recovered.
When booting from the rescue media you cannot recover image backups to GPT disks using a standalone
version of Acronis True Image Home 2011 Netbook Edition.
7.3 Security and Privacy Tools
Acronis True Image Home 2011 Netbook Edition contains utilities for erasing individual files and
eliminating traces of user system activity.
Acronis True Image Home 2011 Netbook Edition provides for the destruction of confidential
information with the help of techniques that meet or exceed most national and state standards. You
can select an appropriate data destruction method depending on the importance of your confidential
information.
The System Clean-up wizard ensures elimination of all of the traces of your computer activities When
working on a PC, you leave thousands of bytes of evidence showing your actions. You may not even
be aware of these traces. This could include user names and passwords, as well as other personal
information that could be used to steal your identity if it fell into the wrong hands. This utility wipes
them all completely away from the disk drive.
The data destruction methods are described in detail in Hard Disk Wiping methods (p. 147) of this
guide.
In this section
File shredder .......................................................................................... 139
System Clean-up .................................................................................... 141
Hard Disk Wiping methods .................................................................... 147
7.3.1 File shredder
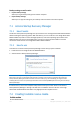
The File shredder enables quick, permanent destruction of selected files and folders.
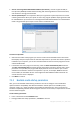
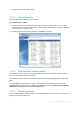
To permanently destroy files and folders:
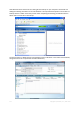
Click Tools & Utilities in the main menu and then click File shredder on the Tools & Utilities
screen.