
User`s guide
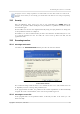
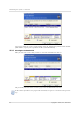
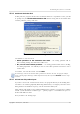
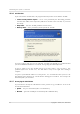
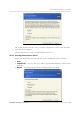
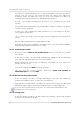
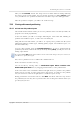
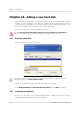
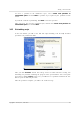
Table Of Contents
- END-USER LICENSE AGREEMENT
- Chapter 1. Introduction
- 1.1 Acronis® True Image Server for Linux– a complete solution for corporate users
- 1.2 Features of Acronis True Image Server for Linux
- 1.3 Technical support
- Chapter 2. Installation and operation
- Chapter 3. General information and proprietary Acronis technologies
- 3.1 The difference between file archives and disk/partition images
- 3.2 Full, incremental and differential backups
- 3.3 Acronis Secure Zone
- 3.4 Acronis Startup Recovery Manager
- 3.5 Working from a rescue CD
- 3.6 Working from a remote terminal
- 3.7 Backing up software and hardware RAID arrays
- 3.8 Support for LVM volumes
- 3.9 Backing up to tape drive
- Chapter 4. Main program interface under X Window System
- Chapter 5. Creating backup archives under X Window System
- Chapter 6. Restoring the backup data under X Window System
- 6.1 Network settings in rescue mode
- 6.2 Restoring files and folders from file archives
- 6.3 Restoring disks/partitions or files from images
- 6.3.1 Starting the Restore Data Wizard
- 6.3.2 Archive selection
- 6.3.3 Restoration type selection
- 6.3.4 Selecting a disk/partition to restore
- 6.3.5 Selecting a target disk/partition
- 6.3.6 Changing the restored partition type
- 6.3.7 Changing the restored partition file system
- 6.3.8 Changing the restored partition size and location
- 6.3.9 Restoring several partitions at once
- 6.3.10 Setting restore options
- 6.3.11 Restoration summary and executing restoration
- 6.4 Restoring data with a rescue CD
- 6.5 Setting restore options
- Chapter 7. Scheduling tasks
- Chapter 8. Managing Acronis Secure Zone
- Chapter 9. Mounting partition images
- Chapter 10. Creating bootable media
- Chapter 11. Console mode
- Chapter 12. Other operations
- Chapter 13. Transferring the system to a new disk
- 13.1 General information
- 13.2 Security
- 13.3 Executing transfers
- 13.3.1 Selecting transfer mode
- 13.3.2 Selecting the source disk
- 13.3.3 Selecting the destination disk
- 13.3.4 Partitioned destination disk
- 13.3.5 Old and new disk partition layout
- 13.3.6 Old disk data
- 13.3.7 Destroying the old disk data
- 13.3.8 Selecting partition transfer method
- 13.3.9 Partitioning the old disk
- 13.3.10 Old and new disk partition layouts
- 13.3.11 Cloning script
- 13.4 Cloning with manual partitioning
- Chapter 14. Adding a new hard disk

Transferring the system to a new disk
Copyright © Acronis, Inc., 2000-2007
85
After you click Proceed, Acronis True Image Server for Linux will start cloning, indicating
the progress in the special window. You can stop this procedure by clicking Cancel. In this
case, you will have to re-partition and format the new disk or repeat the cloning procedure.
After the operation is complete, you will see the results message.
13.4 Cloning with manual partitioning
13.4.1 Old and new disk partition layouts
The manual transfer method enables you to resize partitions on the new disk. By default, the
program resizes them proportionally.
In the next window, you will see rectangles indicating the source hard disk, including its
partitions and unallocated space, as well as the new disk layout.
Along with the hard disk number, you will see its capacity, label, partition and file system
information. Different partition types, including primary, logical, and unallocated space, are
all colored differently.
To resize either partition, check the Proceed Relayout box. If you are satisfied with the
partition layout shown, uncheck this box (if checked). Clicking Next, you will proceed to the
cloning script window.
Be careful! Clicking Back in this window will reset all size and location changes that you've selected, so
you will have to specify them again.
First, select a partition to resize. It will become underlined in red.
Resize and relocate it on the next step.
You can do this by entering values to Unallocated space before, Partition size,
Unallocated space after fields, by dragging partition borders, or the partition itself.
If the cursor turns to two vertical lines with left and right arrows, it's pointed at the partition
border and you can drag it. If the cursor turns to four arrows, it's pointed at the partition
and you can move it to the left or right (if there's unallocated space near it).
Having provided the new location and size, click Next. You will be taken two steps back to
the partition layout. You may have to perform some more resizing and relocation before you
get the layout you need.