
User`s guide
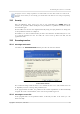
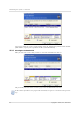
Table Of Contents
- END-USER LICENSE AGREEMENT
- Chapter 1. Introduction
- 1.1 Acronis® True Image Server for Linux– a complete solution for corporate users
- 1.2 Features of Acronis True Image Server for Linux
- 1.3 Technical support
- Chapter 2. Installation and operation
- Chapter 3. General information and proprietary Acronis technologies
- 3.1 The difference between file archives and disk/partition images
- 3.2 Full, incremental and differential backups
- 3.3 Acronis Secure Zone
- 3.4 Acronis Startup Recovery Manager
- 3.5 Working from a rescue CD
- 3.6 Working from a remote terminal
- 3.7 Backing up software and hardware RAID arrays
- 3.8 Support for LVM volumes
- 3.9 Backing up to tape drive
- Chapter 4. Main program interface under X Window System
- Chapter 5. Creating backup archives under X Window System
- Chapter 6. Restoring the backup data under X Window System
- 6.1 Network settings in rescue mode
- 6.2 Restoring files and folders from file archives
- 6.3 Restoring disks/partitions or files from images
- 6.3.1 Starting the Restore Data Wizard
- 6.3.2 Archive selection
- 6.3.3 Restoration type selection
- 6.3.4 Selecting a disk/partition to restore
- 6.3.5 Selecting a target disk/partition
- 6.3.6 Changing the restored partition type
- 6.3.7 Changing the restored partition file system
- 6.3.8 Changing the restored partition size and location
- 6.3.9 Restoring several partitions at once
- 6.3.10 Setting restore options
- 6.3.11 Restoration summary and executing restoration
- 6.4 Restoring data with a rescue CD
- 6.5 Setting restore options
- Chapter 7. Scheduling tasks
- Chapter 8. Managing Acronis Secure Zone
- Chapter 9. Mounting partition images
- Chapter 10. Creating bootable media
- Chapter 11. Console mode
- Chapter 12. Other operations
- Chapter 13. Transferring the system to a new disk
- 13.1 General information
- 13.2 Security
- 13.3 Executing transfers
- 13.3.1 Selecting transfer mode
- 13.3.2 Selecting the source disk
- 13.3.3 Selecting the destination disk
- 13.3.4 Partitioned destination disk
- 13.3.5 Old and new disk partition layout
- 13.3.6 Old disk data
- 13.3.7 Destroying the old disk data
- 13.3.8 Selecting partition transfer method
- 13.3.9 Partitioning the old disk
- 13.3.10 Old and new disk partition layouts
- 13.3.11 Cloning script
- 13.4 Cloning with manual partitioning
- Chapter 14. Adding a new hard disk

Transferring the system to a new disk
78
Copyright © Acronis, Inc., 2000-2007
Chapter 13. Transferring the system to a new
disk
13.1 General information
Sooner or later, most server administrators discover that they are out of free disk space. If
just more data storage space is needed, you can add a new disk, following instructions in
the next chapter.
Sometimes your hard disk can't provide enough space for the operating system and installed
applications, preventing you from updating your software. In this case, you have to transfer
the system to a larger-capacity hard disk.
When transferring an operating system to a new disk, don’t forget to add the disk first.
If the server has no more space for new disks, you can temporarily unplug a CD-ROM drive from the
IDE cable and use its connector for the new drive. If this option is unavailable, you can clone a disk by
creating an image of the old one and restoring it onto a higher-capacity new disk, resizing partitions as
needed.
There are two transfer modes available: automatic and manual.
In the automatic mode, you will merely have to take several simple actions to transfer all the
data, including partitions, folders and files, to a newer disk, making it bootable (if the
original was bootable as well).
There will be only one difference between these disks — partitions on the newer disk will be
larger. Everything else, including the installed operating systems, data and disk labels, will
remain the same.
Note that you can not clone, add or replace mounted disks, so you will have to run Acronis True Image
Server for Linux from a rescue CD in such cases. How to create a rescue CD see in
Chapter 10 Creating
bootable media
.
Of course, this is the only result available in the automatic mode. The program can only duplicate the
older disk layout to the new one. To obtain a different result, you will have to answer additional questions
about cloning parameters.
The manual mode will provide more data transfer flexibility.
1. You will be able to select the method of partitions and data transfer:
• As is
• New disk space is proportionally distributed among the old disk partitions
• New disk space is distributed manually
2. You will also be able to select operations to perform on the old disk:
• Leave partitions (and data!) on the old disk
• Remove all information from the old disk
• Create new partitions on the old disk (and remove all the older information.)