
User`s guide
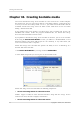

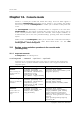
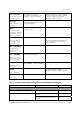
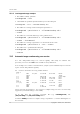
Table Of Contents
- END-USER LICENSE AGREEMENT
- Chapter 1. Introduction
- 1.1 Acronis® True Image Server for Linux– a complete solution for corporate users
- 1.2 Features of Acronis True Image Server for Linux
- 1.3 Technical support
- Chapter 2. Installation and operation
- Chapter 3. General information and proprietary Acronis technologies
- 3.1 The difference between file archives and disk/partition images
- 3.2 Full, incremental and differential backups
- 3.3 Acronis Secure Zone
- 3.4 Acronis Startup Recovery Manager
- 3.5 Working from a rescue CD
- 3.6 Working from a remote terminal
- 3.7 Backing up software and hardware RAID arrays
- 3.8 Support for LVM volumes
- 3.9 Backing up to tape drive
- Chapter 4. Main program interface under X Window System
- Chapter 5. Creating backup archives under X Window System
- Chapter 6. Restoring the backup data under X Window System
- 6.1 Network settings in rescue mode
- 6.2 Restoring files and folders from file archives
- 6.3 Restoring disks/partitions or files from images
- 6.3.1 Starting the Restore Data Wizard
- 6.3.2 Archive selection
- 6.3.3 Restoration type selection
- 6.3.4 Selecting a disk/partition to restore
- 6.3.5 Selecting a target disk/partition
- 6.3.6 Changing the restored partition type
- 6.3.7 Changing the restored partition file system
- 6.3.8 Changing the restored partition size and location
- 6.3.9 Restoring several partitions at once
- 6.3.10 Setting restore options
- 6.3.11 Restoration summary and executing restoration
- 6.4 Restoring data with a rescue CD
- 6.5 Setting restore options
- Chapter 7. Scheduling tasks
- Chapter 8. Managing Acronis Secure Zone
- Chapter 9. Mounting partition images
- Chapter 10. Creating bootable media
- Chapter 11. Console mode
- Chapter 12. Other operations
- Chapter 13. Transferring the system to a new disk
- 13.1 General information
- 13.2 Security
- 13.3 Executing transfers
- 13.3.1 Selecting transfer mode
- 13.3.2 Selecting the source disk
- 13.3.3 Selecting the destination disk
- 13.3.4 Partitioned destination disk
- 13.3.5 Old and new disk partition layout
- 13.3.6 Old disk data
- 13.3.7 Destroying the old disk data
- 13.3.8 Selecting partition transfer method
- 13.3.9 Partitioning the old disk
- 13.3.10 Old and new disk partition layouts
- 13.3.11 Cloning script
- 13.4 Cloning with manual partitioning
- Chapter 14. Adding a new hard disk

Console mode
70
Copyright © Acronis, Inc., 2000-2007
11.1.4 Trueimagecmd usage examples
• This will list available partitions:
trueimagecmd --list
• This will list the partitions (and their indices) saved in backup.tib:
trueimagecmd --list --filename:backup.tib
• This will create an image named backup.tib of partition 1-1:
trueimagecmd --partition:1-1 --filename:backup.tib \
--create
• This will create an incremental image of the partition above:
trueimagecmd --partition:1-1 --filename:backup.tib \
--create --incremental
• This will create an image of partition 1-1 in the Acronis Secure Zone:
trueimagecmd --partition:1-1 --asz --create
• This will restore a partition from backup.tib:
trueimagecmd --partition:1-1 --filename:backup.tib \
--restore
11.2 Automatic image creation using cron service
As a rule, disk/partition images are created regularly, often daily. To automate this
operation, you can use the cron service familiar to many UNIX users.
As an example, let’s consider a situation where you (the system administrator) need to back
up one or more disk partitions regularly.
Use --list to obtain the necessary partition number:
Disk 1:
1-1 hda1 Pri,Act 31.35 MB 26.67 MB FAT16
Table Table
1-2 hda5 980.5 MB Linux Swap
1-3 hda6 4.887 GB 135.9 MB Ext2
1-4 hda7 9.767 GB 1.751 GB Ext2
1-5 hda8 3.462 GB 1.3 GB Ext2
Disk 2:
2-1 (/1) hdd1 Pri,Act 4.806 GB 4.627 GB Ext3
Table Table
2-2 hdd5 3 GB 1.319 GB Ext3
2-3 hdd6 3.906 GB Ext3
You need to back up partition 2-1. Let’s suppose a complete image has to be created weekly
supported by incremental images created daily.
To do this, place the respective executable files (e.g. trueimage.cron) into
/etc/cron.daily and /etc/cron.weekly folders.
To initiate weekly creation of a complete image of partition 2-1, add the following line to
the above file: