
User`s guide

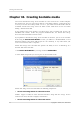

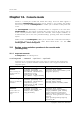
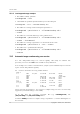
Table Of Contents
- END-USER LICENSE AGREEMENT
- Chapter 1. Introduction
- 1.1 Acronis® True Image Server for Linux– a complete solution for corporate users
- 1.2 Features of Acronis True Image Server for Linux
- 1.3 Technical support
- Chapter 2. Installation and operation
- Chapter 3. General information and proprietary Acronis technologies
- 3.1 The difference between file archives and disk/partition images
- 3.2 Full, incremental and differential backups
- 3.3 Acronis Secure Zone
- 3.4 Acronis Startup Recovery Manager
- 3.5 Working from a rescue CD
- 3.6 Working from a remote terminal
- 3.7 Backing up software and hardware RAID arrays
- 3.8 Support for LVM volumes
- 3.9 Backing up to tape drive
- Chapter 4. Main program interface under X Window System
- Chapter 5. Creating backup archives under X Window System
- Chapter 6. Restoring the backup data under X Window System
- 6.1 Network settings in rescue mode
- 6.2 Restoring files and folders from file archives
- 6.3 Restoring disks/partitions or files from images
- 6.3.1 Starting the Restore Data Wizard
- 6.3.2 Archive selection
- 6.3.3 Restoration type selection
- 6.3.4 Selecting a disk/partition to restore
- 6.3.5 Selecting a target disk/partition
- 6.3.6 Changing the restored partition type
- 6.3.7 Changing the restored partition file system
- 6.3.8 Changing the restored partition size and location
- 6.3.9 Restoring several partitions at once
- 6.3.10 Setting restore options
- 6.3.11 Restoration summary and executing restoration
- 6.4 Restoring data with a rescue CD
- 6.5 Setting restore options
- Chapter 7. Scheduling tasks
- Chapter 8. Managing Acronis Secure Zone
- Chapter 9. Mounting partition images
- Chapter 10. Creating bootable media
- Chapter 11. Console mode
- Chapter 12. Other operations
- Chapter 13. Transferring the system to a new disk
- 13.1 General information
- 13.2 Security
- 13.3 Executing transfers
- 13.3.1 Selecting transfer mode
- 13.3.2 Selecting the source disk
- 13.3.3 Selecting the destination disk
- 13.3.4 Partitioned destination disk
- 13.3.5 Old and new disk partition layout
- 13.3.6 Old disk data
- 13.3.7 Destroying the old disk data
- 13.3.8 Selecting partition transfer method
- 13.3.9 Partitioning the old disk
- 13.3.10 Old and new disk partition layouts
- 13.3.11 Cloning script
- 13.4 Cloning with manual partitioning
- Chapter 14. Adding a new hard disk

Creating bootable media
Copyright © Acronis, Inc., 2000-2007
63
Does not include USB, PC Card, or SCSI drivers. Recommended for use in case of problems
with running Full version.
3. Select the type of bootable media (CD-R/RW or 3.5” diskettes) to create. If your BIOS has
this feature, you can create other bootable media such as removable USB flash drives. You
can also choose to create a bootable disk ISO image.
Having created an ISO disk image, you will be able to burn it onto any kind of DVD recordable, using
DVD recording software. Creating a bootable DVD directly from Bootable Media Builder is impossible.
When using 3.5” diskettes, you will be able to write on a diskette (or a set of the diskettes) only one
component at a time (for example, Acronis True Image Server for Linux full version). To write another
component, start Bootable Media Builder once again.
4. If you are creating diskettes or removable media other than CD, insert the blank disk so
the program can determine its capacity. If you chose to create a bootable disk ISO image,
specify the ISO file name and the folder where to place it.
5. Next, the program will calculate how many blank disks are required (in case you have not
chosen ISO) and give you time to prepare them. When you are finished, click Proceed.
After you create a boot disk, identify it and keep it in a safe place.