
User`s guide
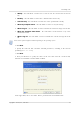
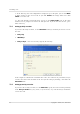
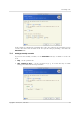
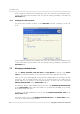
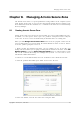
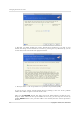
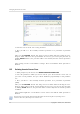
Table Of Contents
- END-USER LICENSE AGREEMENT
- Chapter 1. Introduction
- 1.1 Acronis® True Image Server for Linux– a complete solution for corporate users
- 1.2 Features of Acronis True Image Server for Linux
- 1.3 Technical support
- Chapter 2. Installation and operation
- Chapter 3. General information and proprietary Acronis technologies
- 3.1 The difference between file archives and disk/partition images
- 3.2 Full, incremental and differential backups
- 3.3 Acronis Secure Zone
- 3.4 Acronis Startup Recovery Manager
- 3.5 Working from a rescue CD
- 3.6 Working from a remote terminal
- 3.7 Backing up software and hardware RAID arrays
- 3.8 Support for LVM volumes
- 3.9 Backing up to tape drive
- Chapter 4. Main program interface under X Window System
- Chapter 5. Creating backup archives under X Window System
- Chapter 6. Restoring the backup data under X Window System
- 6.1 Network settings in rescue mode
- 6.2 Restoring files and folders from file archives
- 6.3 Restoring disks/partitions or files from images
- 6.3.1 Starting the Restore Data Wizard
- 6.3.2 Archive selection
- 6.3.3 Restoration type selection
- 6.3.4 Selecting a disk/partition to restore
- 6.3.5 Selecting a target disk/partition
- 6.3.6 Changing the restored partition type
- 6.3.7 Changing the restored partition file system
- 6.3.8 Changing the restored partition size and location
- 6.3.9 Restoring several partitions at once
- 6.3.10 Setting restore options
- 6.3.11 Restoration summary and executing restoration
- 6.4 Restoring data with a rescue CD
- 6.5 Setting restore options
- Chapter 7. Scheduling tasks
- Chapter 8. Managing Acronis Secure Zone
- Chapter 9. Mounting partition images
- Chapter 10. Creating bootable media
- Chapter 11. Console mode
- Chapter 12. Other operations
- Chapter 13. Transferring the system to a new disk
- 13.1 General information
- 13.2 Security
- 13.3 Executing transfers
- 13.3.1 Selecting transfer mode
- 13.3.2 Selecting the source disk
- 13.3.3 Selecting the destination disk
- 13.3.4 Partitioned destination disk
- 13.3.5 Old and new disk partition layout
- 13.3.6 Old disk data
- 13.3.7 Destroying the old disk data
- 13.3.8 Selecting partition transfer method
- 13.3.9 Partitioning the old disk
- 13.3.10 Old and new disk partition layouts
- 13.3.11 Cloning script
- 13.4 Cloning with manual partitioning
- Chapter 14. Adding a new hard disk

Scheduling tasks
54
Copyright © Acronis, Inc., 2000-2007
If the computer is off when the scheduled time comes, the task won’t be performed, but you
can force the missed task to launch at the next system startup by checking a box under the
Start time fields.
7.1.4 Setting up one-time execution
If you select the one-time execution, set the Start time and date on which to execute the
task:
If the computer is off when the scheduled time comes, the task won’t be performed, but you
can force the missed task to launch at the next system startup by checking a box under the
Start time fields.
7.2 Managing scheduled tasks
The task Status, Schedule, Last Run Time and Last Result are shown on the Active
tasks pane of the main window. To view the other task details, right-click on its name.
There are two ways of changing the task parameters. Editing allows you to change any task
parameters. This is performed in the same way as creation, however, the earlier selected
options will be set, so you have to enter only the changes. To edit a task, select it and click
Edit the Selected Task on the Active tasks toolbar.
If you want to change only periodicity and/or start time, click Schedule the Selected Task
on the Active tasks toolbar. Then you will have to perform only scheduling steps, leaving
the backup settings the same.
To delete a task with confirmation, select it and click Delete the Selected Task on the
Active tasks toolbar.
To rename a task, select it, click Rename the Selected Task on the Active tasks toolbar,
enter the new task name and press Enter.