
User's Manual
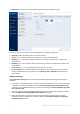
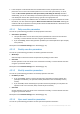
Table Of Contents
- 1 Introduction
- 1.1 What is Acronis® True Image™?
- 1.2 New in this version
- 1.3 Backups created in Acronis True Image 2020 or later
- 1.4 System requirements and supported media
- 1.5 Installing Acronis True Image 2021
- 1.6 Activating Acronis True Image 2021
- 1.7 Trial version information
- 1.8 Upgrading Acronis True Image 2021
- 1.9 Technical Support
- 2 Getting started
- 3 Basic concepts
- 3.1 Basic concepts
- 3.2 The difference between file backups and disk/partition images
- 3.3 Full, incremental and differential backups
- 3.4 Deciding where to store your backups
- 3.5 Using Acronis Nonstop Backup
- 3.6 Backup file naming
- 3.7 Integration with Windows
- 3.8 Wizards
- 3.9 FAQ about backup, recovery and cloning
- 4 Backing up data
- 4.1 Backing up disks and partitions
- 4.2 Backing up files and folders
- 4.3 Backing up mobile devices
- 4.4 Backing up Office 365 data
- 4.5 Backup options
- 4.5.1 Scheduling
- 4.5.2 Backup schemes
- 4.5.3 Notifications for backup operation
- 4.5.4 Excluding items from backup
- 4.5.5 Image creation mode
- 4.5.6 Backup protection
- 4.5.7 Pre/Post commands for backup
- 4.5.8 Backup splitting
- 4.5.9 Backup validation option
- 4.5.10 Backup reserve copy
- 4.5.11 Removable media settings
- 4.5.12 Error handling
- 4.5.13 File-level security settings for backup
- 4.5.14 Computer shutdown
- 4.5.15 Acronis Cloud cleanup
- 4.5.16 Online backup protection
- 4.5.17 Performance of backup operation
- 4.5.18 Selecting a data center for backup
- 4.5.19 Laptop power settings
- 4.5.20 Wi-Fi networks for backup to Acronis Cloud
- 4.6 Operations with backups
- 4.6.1 Backup operations menu
- 4.6.2 Backup activity and statistics
- 4.6.3 Sorting backups in the list
- 4.6.4 Replicating backups to Acronis Cloud
- 4.6.5 Validating backups
- 4.6.6 Backup to various places
- 4.6.7 Adding an existing backup to the list
- 4.6.8 Cleaning up backups, backup versions, and replicas
- 4.6.9 Removing data from Acronis Cloud
- 5 Recovering data
- 5.1 Recovering disks and partitions
- 5.2 Recovering files and folders
- 5.3 Searching backup content
- 5.4 Recovery from Acronis Cloud
- 5.5 Recovering Office 365 data
- 5.6 Recovery options
- 6 Archiving data
- 7 Protecting family data
- 8 Antivirus and antimalware protection
- 9 Synchronizing data
- 10 Disk cloning and migration
- 11 Tools
- 11.1 Acronis Media Builder
- 11.2 Making sure that your bootable media can be used when needed
- 11.3 Acronis Startup Recovery Manager
- 11.4 Try&Decide
- 11.5 Acronis Secure Zone
- 11.6 Adding a new hard disk
- 11.7 Security and Privacy Tools
- 11.8 Mounting an image
- 11.9 Unmounting an image
- 11.10 Working with .vhd(x) files
- 11.11 Importing and exporting backup settings
- 11.12 Acronis Universal Restore
- 12 Troubleshooting
- 13 Glossary of Terms
- Acronis Active Protection
- Acronis Drive
- Acronis Notary
- Acronis Secure Zone
- Acronis Startup Recovery Manager
- Archive
- Archiving operation
- Backup
- Backup operation
- Backup settings
- Backup version
- Backup version chain
- Bootable media
- Data synchronization
- Differential backup
- Differential backup version
- Disk backup (Image)
- Full backup
- Full backup version
- Image
- Incremental backup
- Incremental backup version
- Mobile backup
- Nonstop backup
- Nonstop protection
- Notarization
- Notarized backup
- Notarized file
- Online backup
- Recovery
- Suspicious process
- Sync
- Validation
- Version of synced file

53 Copyright © Acronis International GmbH, 2003-2020
2. Tap a plus icon to create a backup. Note that this step does not occur the first time you back
up your mobile device.
3. Select computer as a backup destination.
4. Tap Scan QR code, point your camera at the QR code on the computer screen, and then wait
until the mobile device is connected to the computer.
5. Select the data categories that you want to back up, or tap Confirm if you want to back up all
of them.
6. Allow Acronis Mobile to access to your personal data.
7. [optional step] Enter a password to encrypt the backup and protect it. Otherwise, tap Skip
Encryption.
8. Tap Start Backup.
When the backup is started, you can track the progress in any application - on the computer or
mobile device, but the errors and warning messages are displayed in the mobile app only.
You can close both Acronis True Image 2021 on your computer and the Acronis Mobile app. The
backup will continue in the background mode.
If you want data changes (for example, new photographs) to be backed up automatically, make sure
the Continuous backup setting is turned on. If this setting is turned off, the new data is backed up
only when you tap Back up.
The connection between your computer and mobile device may be lost because of an error. To
restore it, select the mobile backup in the backup list of Acronis True Image, click Reconnect, and
then scan the QR code with your mobile device. After that, the backup will continue normally with
the same settings.
4.3.1 Acronis Mobile
Acronis Cloud might be unavailable in your region. For more information, click here:
https://kb.acronis.com/content/4541
Acronis Mobile allows you to back up your data to Acronis Cloud, to local storage on your computer,
or to an NAS device, and then recover it in case of loss or corruption. Note that backup to the cloud
storage requires an Acronis account and Acronis Cloud subscription.
For more information about Acronis Mobile key features and supported devices, refer to Acronis
Mobile documentation.
Where can I find these apps?
You can view additional information and download Acronis Mobile from the Apple App Store or
Google Play:
Acronis Mobile for iOS devices: https://go.acronis.com/atimobile/download/iOS
Acronis Mobile for Android devices: https://go.acronis.com/atimobile/download/Android
4.3.2 Local destination of mobile backups
When you back up your mobile data to a computer, Acronis Mobile stores the backups in the default
folder C:\ProgramData\Acronis Mobile Backup Data\acronis-local-data\. When you change the
default folder, the acronis-local-data folder is moved to the location that you selected. All new
mobile data will be backed up to the new location.