
User's Manual
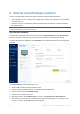
Table Of Contents
- 1 Introduction
- 1.1 What is Acronis® True Image™?
- 1.2 New in this version
- 1.3 Backups created in Acronis True Image 2020 or later
- 1.4 System requirements and supported media
- 1.5 Installing Acronis True Image 2021
- 1.6 Activating Acronis True Image 2021
- 1.7 Trial version information
- 1.8 Upgrading Acronis True Image 2021
- 1.9 Technical Support
- 2 Getting started
- 3 Basic concepts
- 3.1 Basic concepts
- 3.2 The difference between file backups and disk/partition images
- 3.3 Full, incremental and differential backups
- 3.4 Deciding where to store your backups
- 3.5 Using Acronis Nonstop Backup
- 3.6 Backup file naming
- 3.7 Integration with Windows
- 3.8 Wizards
- 3.9 FAQ about backup, recovery and cloning
- 4 Backing up data
- 4.1 Backing up disks and partitions
- 4.2 Backing up files and folders
- 4.3 Backing up mobile devices
- 4.4 Backing up Office 365 data
- 4.5 Backup options
- 4.5.1 Scheduling
- 4.5.2 Backup schemes
- 4.5.3 Notifications for backup operation
- 4.5.4 Excluding items from backup
- 4.5.5 Image creation mode
- 4.5.6 Backup protection
- 4.5.7 Pre/Post commands for backup
- 4.5.8 Backup splitting
- 4.5.9 Backup validation option
- 4.5.10 Backup reserve copy
- 4.5.11 Removable media settings
- 4.5.12 Error handling
- 4.5.13 File-level security settings for backup
- 4.5.14 Computer shutdown
- 4.5.15 Acronis Cloud cleanup
- 4.5.16 Online backup protection
- 4.5.17 Performance of backup operation
- 4.5.18 Selecting a data center for backup
- 4.5.19 Laptop power settings
- 4.5.20 Wi-Fi networks for backup to Acronis Cloud
- 4.6 Operations with backups
- 4.6.1 Backup operations menu
- 4.6.2 Backup activity and statistics
- 4.6.3 Sorting backups in the list
- 4.6.4 Replicating backups to Acronis Cloud
- 4.6.5 Validating backups
- 4.6.6 Backup to various places
- 4.6.7 Adding an existing backup to the list
- 4.6.8 Cleaning up backups, backup versions, and replicas
- 4.6.9 Removing data from Acronis Cloud
- 5 Recovering data
- 5.1 Recovering disks and partitions
- 5.2 Recovering files and folders
- 5.3 Searching backup content
- 5.4 Recovery from Acronis Cloud
- 5.5 Recovering Office 365 data
- 5.6 Recovery options
- 6 Archiving data
- 7 Protecting family data
- 8 Antivirus and antimalware protection
- 9 Synchronizing data
- 10 Disk cloning and migration
- 11 Tools
- 11.1 Acronis Media Builder
- 11.2 Making sure that your bootable media can be used when needed
- 11.3 Acronis Startup Recovery Manager
- 11.4 Try&Decide
- 11.5 Acronis Secure Zone
- 11.6 Adding a new hard disk
- 11.7 Security and Privacy Tools
- 11.8 Mounting an image
- 11.9 Unmounting an image
- 11.10 Working with .vhd(x) files
- 11.11 Importing and exporting backup settings
- 11.12 Acronis Universal Restore
- 12 Troubleshooting
- 13 Glossary of Terms
- Acronis Active Protection
- Acronis Drive
- Acronis Notary
- Acronis Secure Zone
- Acronis Startup Recovery Manager
- Archive
- Archiving operation
- Backup
- Backup operation
- Backup settings
- Backup version
- Backup version chain
- Bootable media
- Data synchronization
- Differential backup
- Differential backup version
- Disk backup (Image)
- Full backup
- Full backup version
- Image
- Incremental backup
- Incremental backup version
- Mobile backup
- Nonstop backup
- Nonstop protection
- Notarization
- Notarized backup
- Notarized file
- Online backup
- Recovery
- Suspicious process
- Sync
- Validation
- Version of synced file

127 Copyright © Acronis International GmbH, 2003-2020
Protect network shares and NAS – Acronis True Image 2021 will monitor and protect the
network shares and NAS devices you have access to. You can also specify a recovery location
for files affected by a ransomware attack.
Protect your computer from illicit cryptomining – Select this check box to defend your
computer from cryptomining malware.
3. Click OK.
To configure Real-time Protection:
1. Switch on the Real-time Protection toggle to enable Real-time Protection.
When enabled, Real-time Protection checks for malware all the files you interact with.
2. Select when the files should be checked.
Smart on-access – all system activities are monitored, and the files are scanned once you
access them.
On execution – only executable files are scanned as they are launched to make sure that
they will not damage your machine.
3. Select what to do with detected objects.
Block and notify– The process suspected of malware activity will be blocked, and you will get
a notification.
Quarantine – The process suspected of malware activity will be blocked, and the executable
file will be moved to the quarantine folder.
4. Enable the additional protection options.
Detect malicious behavior in processes – enables Active Protection to detect new malware
by its typical behavior and block it.
Detect and prevent malicious processes from exploiting the software vulnerabilities on the
system – enables Active protection to detect and block processes that try to exploit bugs and
vulnerabilities of other processes on the system.
Note All detected objects are blocked immediately. They will not be moved to quarantine, nor added
to the detected issues list.
To configure the Web filtering:
1. Switch on the Web filtering toggle to enable Web filtering.
When enabled, Web filtering helps to protect you from potentially harmful websites and
untrusted web resource.s by blocking the access when you try to open them.
2. From the Action on malicious URL detection drop-down menu, select what to do with detected
malicious URLs.
Complete block – The access to the website will be completely blocked.
Block and notify – The website will be blocked with the ability to proceed.
3. To configure the list of trusted or blocked websites, click Manage URLs.
1. To add a new URL to the list, click Add URL.
2. Enter a valid domain name.
Note All addresses from the domain that you entered will be treated as trusted or blocked. For example, if
you entered xyz.com as a trusted domain, all paths or sub-domains under xyz.com are treated as trusted.
3. From the drop-down menu, select Allowed or Blocked.
4. Click Add URL.