
User guide


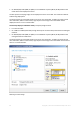

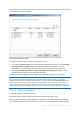

Table Of Contents
- 1 Introducing Acronis Snap Deploy 5
- 1.1 Overview
- 1.2 What's new in Acronis Snap Deploy 5
- 1.3 What you can do with Acronis Snap Deploy 5
- 1.3.1 Taking an image of the master system
- 1.3.2 Deployment to specific machines (immediate, manual, and scheduled deployment)
- 1.3.3 Deployment to any ready machines (event-driven deployment)
- 1.3.4 Stand-alone deployment
- 1.3.5 Deployment with individual deployment settings
- 1.3.6 User-initiated deployment (custom deployment)
- 1.3.7 Deployment of a disk volume and MBR
- 1.3.8 Command-line mode and scripting under WinPE
- 1.4 Features of Acronis Snap Deploy 5
- 1.4.1 List of machines
- 1.4.2 List of deployment tasks
- 1.4.3 Per-deployment licensing
- 1.4.4 Support for the VHD format
- 1.4.5 Graphical user interface in WinPE
- 1.4.6 E-mail notifications about deployment
- 1.4.7 Compatibility with images created by other Acronis products
- 1.4.8 Support for multiple network adapters
- 1.4.9 Multicast TTL and network bandwidth throttling
- 1.4.10 Falling back to unicast
- 1.4.11 Encrypted communication
- 1.4.12 Password protection
- 1.5 Supported operating systems for imaging and deployment
- 1.6 Licensing policy
- 1.7 Upgrading to Acronis Snap Deploy 5
- 1.8 Technical Support
- 2 Understanding Acronis Snap Deploy 5
- 3 Getting started with Acronis Snap Deploy 5
- 4 Installation of Acronis Snap Deploy 5
- 4.1 Supported operating systems
- 4.2 System requirements
- 4.3 Used ports and IP addresses
- 4.4 Typical installation
- 4.5 Custom installation
- 4.5.1 Installation procedure
- 4.5.2 Common installation configurations
- 4.5.3 Installation of components
- 4.5.3.1 Installation of Acronis Snap Deploy 5 Management Console
- 4.5.3.2 Installation of Acronis Snap Deploy 5 License Server
- 4.5.3.3 Installation of Acronis Snap Deploy 5 OS Deploy Server
- 4.5.3.4 Installation of Acronis PXE Server
- 4.5.3.5 Installation of Acronis Wake-on-LAN Proxy
- 4.5.3.6 Installation of Acronis Snap Deploy 5 Management Agent
- 4.6 Other ways of installation
- 4.7 Upgrading Acronis Snap Deploy 5
- 4.8 Uninstalling Acronis Snap Deploy 5
- 5 Using Acronis Snap Deploy 5 Management Console
- 6 Using Acronis Snap Deploy 5 License Server
- 7 Deployment tools
- 8 Creating a master image
- 9 Validating a master image
- 10 Deploying a master image
- 10.1 Files supported as master images
- 10.2 Licenses for deployment
- 10.3 Deployment templates
- 10.4 Deployment through a deployment task
- 10.5 Stand-alone deployment
- 10.6 User-initiated deployment (custom deployment)
- 10.7 Deploying BIOS-based systems to UEFI-based and vice versa
- 11 Managing the list of machines (the Machines view)
- 12 Individual deployment settings
- 13 Managing deployment tasks (the Deployment tasks view)
- 14 Command-line mode and scripting under WinPE
- 15 Collecting system information
88 Copyright © Acronis International GmbH, 2002-2014
If the disk you selected contains more than one volume, specify the volumes that you want to deploy.
You can select one or more volumes.
Selecting disk volumes to deploy
The further steps will depend on how many volumes you select.
If you deploy only one volume, it is assumed that the target disk has volumes, so you can select
the target volume, to deploy over it. Other volumes will remain untouched in this case.
Alternatively, you can choose to delete all volumes that currently exist on the target disk.
Deploying more than one volume will delete all volumes on the target disk. Only the newly
deployed volumes will exist on the disk after deployment.
The master boot record (MBR) is always deployed from the image regardless of your choice.
Important: An operating system includes a loader: a small program that loads the main part of the operating
system. The loader and the rest of the operating system may reside on different volumes. For example,
Windows 7 and Windows Server 2008 R2 place the loader on a hidden volume called System Reserved. If your
operating system and its loader reside on different volumes, always include both volumes in the image. A
volume with the loader is usually marked as the active volume and is shown with the Act. flag in the list. The
volumes must also be deployed together; otherwise, there is a high risk that the operating system will not start.
10.3.1.3 Deployment settings
In this step, specify the deployment settings.
The default values for these settings are taken from the default settings (p. 101).
Most settings are related to configuring the operating system of the target machine. Such settings
are unavailable if the volumes you selected do not contain an operating system for which changing