
User guide


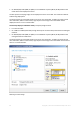

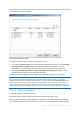

Table Of Contents
- 1 Introducing Acronis Snap Deploy 5
- 1.1 Overview
- 1.2 What's new in Acronis Snap Deploy 5
- 1.3 What you can do with Acronis Snap Deploy 5
- 1.3.1 Taking an image of the master system
- 1.3.2 Deployment to specific machines (immediate, manual, and scheduled deployment)
- 1.3.3 Deployment to any ready machines (event-driven deployment)
- 1.3.4 Stand-alone deployment
- 1.3.5 Deployment with individual deployment settings
- 1.3.6 User-initiated deployment (custom deployment)
- 1.3.7 Deployment of a disk volume and MBR
- 1.3.8 Command-line mode and scripting under WinPE
- 1.4 Features of Acronis Snap Deploy 5
- 1.4.1 List of machines
- 1.4.2 List of deployment tasks
- 1.4.3 Per-deployment licensing
- 1.4.4 Support for the VHD format
- 1.4.5 Graphical user interface in WinPE
- 1.4.6 E-mail notifications about deployment
- 1.4.7 Compatibility with images created by other Acronis products
- 1.4.8 Support for multiple network adapters
- 1.4.9 Multicast TTL and network bandwidth throttling
- 1.4.10 Falling back to unicast
- 1.4.11 Encrypted communication
- 1.4.12 Password protection
- 1.5 Supported operating systems for imaging and deployment
- 1.6 Licensing policy
- 1.7 Upgrading to Acronis Snap Deploy 5
- 1.8 Technical Support
- 2 Understanding Acronis Snap Deploy 5
- 3 Getting started with Acronis Snap Deploy 5
- 4 Installation of Acronis Snap Deploy 5
- 4.1 Supported operating systems
- 4.2 System requirements
- 4.3 Used ports and IP addresses
- 4.4 Typical installation
- 4.5 Custom installation
- 4.5.1 Installation procedure
- 4.5.2 Common installation configurations
- 4.5.3 Installation of components
- 4.5.3.1 Installation of Acronis Snap Deploy 5 Management Console
- 4.5.3.2 Installation of Acronis Snap Deploy 5 License Server
- 4.5.3.3 Installation of Acronis Snap Deploy 5 OS Deploy Server
- 4.5.3.4 Installation of Acronis PXE Server
- 4.5.3.5 Installation of Acronis Wake-on-LAN Proxy
- 4.5.3.6 Installation of Acronis Snap Deploy 5 Management Agent
- 4.6 Other ways of installation
- 4.7 Upgrading Acronis Snap Deploy 5
- 4.8 Uninstalling Acronis Snap Deploy 5
- 5 Using Acronis Snap Deploy 5 Management Console
- 6 Using Acronis Snap Deploy 5 License Server
- 7 Deployment tools
- 8 Creating a master image
- 9 Validating a master image
- 10 Deploying a master image
- 10.1 Files supported as master images
- 10.2 Licenses for deployment
- 10.3 Deployment templates
- 10.4 Deployment through a deployment task
- 10.5 Stand-alone deployment
- 10.6 User-initiated deployment (custom deployment)
- 10.7 Deploying BIOS-based systems to UEFI-based and vice versa
- 11 Managing the list of machines (the Machines view)
- 12 Individual deployment settings
- 13 Managing deployment tasks (the Deployment tasks view)
- 14 Command-line mode and scripting under WinPE
- 15 Collecting system information

81 Copyright © Acronis International GmbH, 2002-2014
Alternatively, you can click Always, into the files of fixed size and type the desired file size or
select it from the list. The image will then be split into multiple files of the specified size. This
comes in handy when creating an image that you plan to burn to multiple discs later on.
You can enter the file size in bytes (B), kilobytes (KB), megabytes (MB), gigabytes (GB), or
terabytes (TB).
Note: Creating images directly on CD-R/RW, DVD-R/RW, DVD+R/RW, or recordable Blu-ray Discs usually
takes more time than it would on a hard disk.
Error handling
Defines how to handle errors that may occur during imaging.
Ignore bad sectors
The preset is: Disabled
When the option is disabled, the software will display a pop-up window each time it comes
across a bad sector and ask for a user decision as to whether to continue or stop imaging.
Enable silent mode (no prompts during imaging)
The preset is: Disabled
With the silent mode enabled, the software will automatically handle situations requiring
user interaction (except handling bad sectors, which is defined by the Ignore bad sectors
option). If an operation cannot continue without user interaction, it will fail. Details of the
operation, including errors, if any, can be found in the operation log.
In case of error, re-attempt in (minutes)
The preset is: 5
When a recoverable error occurs, the software re-attempts to perform the unsuccessful
operation. You can set the time interval between attempts. The attempts will be stopped as
soon as the operation succeeds.
For example, if the location of the image on the network becomes unavailable or not
reachable, the software will attempt to reach the destination every five minutes. The
attempts will be stopped as soon as the connection is resumed.
Additional settings
Check the image when it is created
The preset is: Disabled
If enabled, the program will check the integrity of the just-created image.
You can perform this check after imaging (p. 83).
8.5.4 Comments and summary
We recommend providing a comment for easy identification of the master image.
After you click Next, the summary of the imaging procedure appears. Check the settings and then
click Proceed.