
User guide
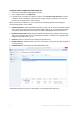


Table Of Contents
- 1 Introducing Acronis Snap Deploy 5
- 1.1 Overview
- 1.2 What's new in Acronis Snap Deploy 5
- 1.3 What you can do with Acronis Snap Deploy 5
- 1.3.1 Taking an image of the master system
- 1.3.2 Deployment to specific machines (immediate, manual, and scheduled deployment)
- 1.3.3 Deployment to any ready machines (event-driven deployment)
- 1.3.4 Stand-alone deployment
- 1.3.5 Deployment with individual deployment settings
- 1.3.6 User-initiated deployment (custom deployment)
- 1.3.7 Deployment of a disk volume and MBR
- 1.3.8 Command-line mode and scripting under WinPE
- 1.4 Features of Acronis Snap Deploy 5
- 1.4.1 List of machines
- 1.4.2 List of deployment tasks
- 1.4.3 Per-deployment licensing
- 1.4.4 Support for the VHD format
- 1.4.5 Graphical user interface in WinPE
- 1.4.6 E-mail notifications about deployment
- 1.4.7 Compatibility with images created by other Acronis products
- 1.4.8 Support for multiple network adapters
- 1.4.9 Multicast TTL and network bandwidth throttling
- 1.4.10 Falling back to unicast
- 1.4.11 Encrypted communication
- 1.4.12 Password protection
- 1.5 Supported operating systems for imaging and deployment
- 1.6 Licensing policy
- 1.7 Upgrading to Acronis Snap Deploy 5
- 1.8 Technical Support
- 2 Understanding Acronis Snap Deploy 5
- 3 Getting started with Acronis Snap Deploy 5
- 4 Installation of Acronis Snap Deploy 5
- 4.1 Supported operating systems
- 4.2 System requirements
- 4.3 Used ports and IP addresses
- 4.4 Typical installation
- 4.5 Custom installation
- 4.5.1 Installation procedure
- 4.5.2 Common installation configurations
- 4.5.3 Installation of components
- 4.5.3.1 Installation of Acronis Snap Deploy 5 Management Console
- 4.5.3.2 Installation of Acronis Snap Deploy 5 License Server
- 4.5.3.3 Installation of Acronis Snap Deploy 5 OS Deploy Server
- 4.5.3.4 Installation of Acronis PXE Server
- 4.5.3.5 Installation of Acronis Wake-on-LAN Proxy
- 4.5.3.6 Installation of Acronis Snap Deploy 5 Management Agent
- 4.6 Other ways of installation
- 4.7 Upgrading Acronis Snap Deploy 5
- 4.8 Uninstalling Acronis Snap Deploy 5
- 5 Using Acronis Snap Deploy 5 Management Console
- 6 Using Acronis Snap Deploy 5 License Server
- 7 Deployment tools
- 8 Creating a master image
- 9 Validating a master image
- 10 Deploying a master image
- 10.1 Files supported as master images
- 10.2 Licenses for deployment
- 10.3 Deployment templates
- 10.4 Deployment through a deployment task
- 10.5 Stand-alone deployment
- 10.6 User-initiated deployment (custom deployment)
- 10.7 Deploying BIOS-based systems to UEFI-based and vice versa
- 11 Managing the list of machines (the Machines view)
- 12 Individual deployment settings
- 13 Managing deployment tasks (the Deployment tasks view)
- 14 Command-line mode and scripting under WinPE
- 15 Collecting system information

73 Copyright © Acronis International GmbH, 2002-2014
8 Creating a master image
To be able to deploy a system, you need to create the desired system configuration and then to save
an image of the system’s hard disk or volume to a network folder, detachable media (such as a USB
drive) or removable media (such as a DVD).
This section describes how to create a master image by using Acronis Snap Deploy 5.
In addition, Acronis Snap Deploy 5 can use any of the following files as a master image:
Backups created by Acronis True Image, Acronis Backup & Recovery 10, Acronis Backup &
Recovery 11, or Acronis Backup 11.5, including password-protected backups
Virtual Hard Disk (VHD) files
8.1 Preparation of the master operating system
In the Acronis environment and Windows Preinstallation Environment (any case except the
command-line mode (p. 134)), Acronis Snap Deploy 5 automatically configures each of the deployed
systems by using the deployment settings you specify.
Alternatively, you can prepare a master operating system by using the Microsoft System Preparation
Tool (Sysprep) before creating the image of the system. Acronis Snap Deploy 5 does not configure
the deployed systems in this case.
The Sysprep tool is designed for corporate system administrators, original equipment manufacturers
(OEMs), and others who need to deploy and automatically configure operating systems on multiple
machines.
After an operating system that was prepared with Sysprep is deployed to machines, Sysprep
configures settings that are normally unique to each machine. In particular, Sysprep does the
following:
Generates a unique security identifier (SID) for the new machines
Initiates Windows mini-setup for Plug and Play devices
Applies the machine name, domain or workgroup membership, and other settings specified in
the Sysprep.inf answer file
You can either download Sysprep from the Microsoft Web site, or extract it from the deploy.cab file,
which is located on the installation disk of Windows NT, Windows 2000, Windows XP, and Windows
Server 2003. In Windows Vista, Windows 2008, and Windows 7, the Sysprep tool is located in the
folder Windows\System32.
Important: If you are planning to use Sysprep, we strongly recommend that you read articles about Sysprep and
disk duplication in the Microsoft Knowledge Base.
8.2 Online vs. offline imaging
You can create the master image in either of these ways:
In Windows, by using Acronis Snap Deploy 5 Management Agent installed on the master machine.
This type of imaging is called online imaging.