
User guide
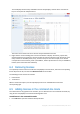


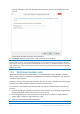

Table Of Contents
- 1 Introducing Acronis Snap Deploy 5
- 1.1 Overview
- 1.2 What's new in Acronis Snap Deploy 5
- 1.3 What you can do with Acronis Snap Deploy 5
- 1.3.1 Taking an image of the master system
- 1.3.2 Deployment to specific machines (immediate, manual, and scheduled deployment)
- 1.3.3 Deployment to any ready machines (event-driven deployment)
- 1.3.4 Stand-alone deployment
- 1.3.5 Deployment with individual deployment settings
- 1.3.6 User-initiated deployment (custom deployment)
- 1.3.7 Deployment of a disk volume and MBR
- 1.3.8 Command-line mode and scripting under WinPE
- 1.4 Features of Acronis Snap Deploy 5
- 1.4.1 List of machines
- 1.4.2 List of deployment tasks
- 1.4.3 Per-deployment licensing
- 1.4.4 Support for the VHD format
- 1.4.5 Graphical user interface in WinPE
- 1.4.6 E-mail notifications about deployment
- 1.4.7 Compatibility with images created by other Acronis products
- 1.4.8 Support for multiple network adapters
- 1.4.9 Multicast TTL and network bandwidth throttling
- 1.4.10 Falling back to unicast
- 1.4.11 Encrypted communication
- 1.4.12 Password protection
- 1.5 Supported operating systems for imaging and deployment
- 1.6 Licensing policy
- 1.7 Upgrading to Acronis Snap Deploy 5
- 1.8 Technical Support
- 2 Understanding Acronis Snap Deploy 5
- 3 Getting started with Acronis Snap Deploy 5
- 4 Installation of Acronis Snap Deploy 5
- 4.1 Supported operating systems
- 4.2 System requirements
- 4.3 Used ports and IP addresses
- 4.4 Typical installation
- 4.5 Custom installation
- 4.5.1 Installation procedure
- 4.5.2 Common installation configurations
- 4.5.3 Installation of components
- 4.5.3.1 Installation of Acronis Snap Deploy 5 Management Console
- 4.5.3.2 Installation of Acronis Snap Deploy 5 License Server
- 4.5.3.3 Installation of Acronis Snap Deploy 5 OS Deploy Server
- 4.5.3.4 Installation of Acronis PXE Server
- 4.5.3.5 Installation of Acronis Wake-on-LAN Proxy
- 4.5.3.6 Installation of Acronis Snap Deploy 5 Management Agent
- 4.6 Other ways of installation
- 4.7 Upgrading Acronis Snap Deploy 5
- 4.8 Uninstalling Acronis Snap Deploy 5
- 5 Using Acronis Snap Deploy 5 Management Console
- 6 Using Acronis Snap Deploy 5 License Server
- 7 Deployment tools
- 8 Creating a master image
- 9 Validating a master image
- 10 Deploying a master image
- 10.1 Files supported as master images
- 10.2 Licenses for deployment
- 10.3 Deployment templates
- 10.4 Deployment through a deployment task
- 10.5 Stand-alone deployment
- 10.6 User-initiated deployment (custom deployment)
- 10.7 Deploying BIOS-based systems to UEFI-based and vice versa
- 11 Managing the list of machines (the Machines view)
- 12 Individual deployment settings
- 13 Managing deployment tasks (the Deployment tasks view)
- 14 Command-line mode and scripting under WinPE
- 15 Collecting system information

69 Copyright © Acronis International GmbH, 2002-2014
7.2.2.1 Components included in the bootable media
Each WinPE-based bootable media contains the following bootable components (p. 64):
Acronis Snap Deploy 5 Agent
Acronis Snap Deploy 5 Master Image Creator
Acronis Snap Deploy 5 Command-Line Utility
7.2.2.2 Acronis Snap Deploy 5 PE Builder
Acronis Snap Deploy 5 PE Builder is a dedicated tool for creating a WinPE-based bootable media. The
PE Builder is installed with Acronis Snap Deploy 5 Management Console.
The PE builder creates the bootable media by adding components of Acronis Snap Deploy 5 to a
source file called a PE image.
The term “image” in “PE image” is unrelated to the notion of “master image.”
A PE image is normally a .wim file. The PE builder can create a PE image automatically or use a PE
image you provide.
The PE builder supports WinPE distributions that are based on any the following kernels:
Windows Vista (PE 2.0)
Windows Vista SP1 and Windows Server 2008 (PE 2.1)
Windows 7 (PE 3.0) with or without the supplement for Windows 7 SP1 (PE 3.1)
Windows 8 (PE 4.0)
The PE builder supports both 32-bit and 64-bit WinPE distributions. The 32-bit WinPE distributions
can also work on 64-bit hardware. However, you need a 64-bit distribution to boot a machine that
uses Unified Extensible Firmware Interface (UEFI).
PE images based on WinPE 4 require approximately 1 GB of RAM to work.
7.2.2.3 Preparation: WinPE 2.x and 3.x
To be able to create or modify PE 2 or 3 images, install Acronis Snap Deploy 5 Management Console
on a machine where Windows Automated Installation Kit (AIK) is installed. If you do not have a
machine with AIK, prepare it as follows.
To prepare a machine with AIK
1. Download and install Windows Automated Installation Kit.
Automated Installation Kit (AIK) for Windows Vista (PE 2.0):
http://www.microsoft.com/Downloads/details.aspx?familyid=C7D4BC6D-15F3-4284-9123-67983
0D629F2&displaylang=en
Automated Installation Kit (AIK) for Windows Vista SP1 and Windows Server 2008 (PE 2.1):
http://www.microsoft.com/downloads/details.aspx?FamilyID=94bb6e34-d890-4932-81a5-5b50c
657de08&DisplayLang=en
Automated Installation Kit (AIK) for Windows 7 (PE 3.0):