
User guide
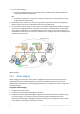
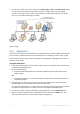
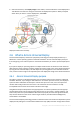


Table Of Contents
- 1 Introducing Acronis Snap Deploy 5
- 1.1 Overview
- 1.2 What's new in Acronis Snap Deploy 5
- 1.3 What you can do with Acronis Snap Deploy 5
- 1.3.1 Taking an image of the master system
- 1.3.2 Deployment to specific machines (immediate, manual, and scheduled deployment)
- 1.3.3 Deployment to any ready machines (event-driven deployment)
- 1.3.4 Stand-alone deployment
- 1.3.5 Deployment with individual deployment settings
- 1.3.6 User-initiated deployment (custom deployment)
- 1.3.7 Deployment of a disk volume and MBR
- 1.3.8 Command-line mode and scripting under WinPE
- 1.4 Features of Acronis Snap Deploy 5
- 1.4.1 List of machines
- 1.4.2 List of deployment tasks
- 1.4.3 Per-deployment licensing
- 1.4.4 Support for the VHD format
- 1.4.5 Graphical user interface in WinPE
- 1.4.6 E-mail notifications about deployment
- 1.4.7 Compatibility with images created by other Acronis products
- 1.4.8 Support for multiple network adapters
- 1.4.9 Multicast TTL and network bandwidth throttling
- 1.4.10 Falling back to unicast
- 1.4.11 Encrypted communication
- 1.4.12 Password protection
- 1.5 Supported operating systems for imaging and deployment
- 1.6 Licensing policy
- 1.7 Upgrading to Acronis Snap Deploy 5
- 1.8 Technical Support
- 2 Understanding Acronis Snap Deploy 5
- 3 Getting started with Acronis Snap Deploy 5
- 4 Installation of Acronis Snap Deploy 5
- 4.1 Supported operating systems
- 4.2 System requirements
- 4.3 Used ports and IP addresses
- 4.4 Typical installation
- 4.5 Custom installation
- 4.5.1 Installation procedure
- 4.5.2 Common installation configurations
- 4.5.3 Installation of components
- 4.5.3.1 Installation of Acronis Snap Deploy 5 Management Console
- 4.5.3.2 Installation of Acronis Snap Deploy 5 License Server
- 4.5.3.3 Installation of Acronis Snap Deploy 5 OS Deploy Server
- 4.5.3.4 Installation of Acronis PXE Server
- 4.5.3.5 Installation of Acronis Wake-on-LAN Proxy
- 4.5.3.6 Installation of Acronis Snap Deploy 5 Management Agent
- 4.6 Other ways of installation
- 4.7 Upgrading Acronis Snap Deploy 5
- 4.8 Uninstalling Acronis Snap Deploy 5
- 5 Using Acronis Snap Deploy 5 Management Console
- 6 Using Acronis Snap Deploy 5 License Server
- 7 Deployment tools
- 8 Creating a master image
- 9 Validating a master image
- 10 Deploying a master image
- 10.1 Files supported as master images
- 10.2 Licenses for deployment
- 10.3 Deployment templates
- 10.4 Deployment through a deployment task
- 10.5 Stand-alone deployment
- 10.6 User-initiated deployment (custom deployment)
- 10.7 Deploying BIOS-based systems to UEFI-based and vice versa
- 11 Managing the list of machines (the Machines view)
- 12 Individual deployment settings
- 13 Managing deployment tasks (the Deployment tasks view)
- 14 Command-line mode and scripting under WinPE
- 15 Collecting system information

27 Copyright © Acronis International GmbH, 2002-2014
2.6.2 Acronis Universal Deploy in Windows
Automatic HAL and mass-storage drivers selection
Acronis Universal Deploy searches the Windows default driver storage folders (in the master image
being deployed) for HAL and mass-storage device drivers and installs drivers that better fit the target
hardware. You can specify a custom driver repository (a network folder or a CD) which will also be
used for driver searches.
Tip: The Windows default driver storage folder is determined by the DevicePath value in the
HKEY_LOCAL_MACHINE\SOFTWARE\Microsoft\Windows\CurrentVersion registry key. This storage folder is
usually WINDOWS\inf.
Manual selection of mass-storage device driver
If the target hardware has a specific mass-storage controller (such as a SCSI, RAID, or Fibre Channel
adapter) for the hard disk, you can install the appropriate driver manually, bypassing the automatic
driver search-and-install procedure.
Installing drivers for Plug and Play devices
Acronis Universal Deploy relies on built-in Plug and Play discovery and configuration process to
handle hardware differences in devices that are not critical for the deployed system startup, such as
video, audio and USB. Windows takes control over this process during the logon phase, and if some
of the new hardware is not detected, you will have a chance to install drivers for it later manually.
2.6.3 Acronis Universal Deploy in Linux
Acronis Universal Deploy can be applied to Linux operating systems with a kernel version of 2.6.8 or
later.
When Acronis Universal Deploy is applied to a Linux operating system, it updates a temporary file
system known as the initial RAM disk (initrd). This ensures that the operating system can boot on the
new hardware.
Acronis Universal Deploy adds modules for the new hardware (including device drivers) to the initial
RAM disk. As a rule, it finds the necessary modules in the /lib/modules directory of the operating
system you are deploying. If Acronis Universal Deploy cannot find a module it needs, it logs the
module’s file name.
Acronis Universal Deploy may modify the configuration of the GRUB boot loader. This may be
required, for example, to ensure the system bootability when the new machine has a different
volume layout than the original machine.
Acronis Universal Deploy never modifies the Linux kernel.
Reverting to the original initial RAM disk
You can revert to the original initial RAM disk if necessary.
The initial RAM disk is stored on the machine in a file. Before updating the initial RAM disk for the
first time, Acronis Universal Deploy saves a copy of it to the same directory. The name of the copy is
the name of the file, followed by the _acronis_backup.img suffix. This copy will not be overwritten if
you run Acronis Universal Deploy more than once (for example, after you have added missing
drivers).