Acronis Snap Deploy 5 USER GUIDE
Copyright Statement Copyright © Acronis International GmbH, 2002-2014. All rights reserved. “Acronis” and “Acronis Secure Zone” are registered trademarks of Acronis International GmbH. "Acronis Compute with Confidence", “Acronis Startup Recovery Manager”, “Acronis Active Restore”, “Acronis Instant Restore” and the Acronis logo are trademarks of Acronis International GmbH. Linux is a registered trademark of Linus Torvalds. VMware and VMware Ready are trademarks and/or registered trademarks of VMware, Inc.
Table of contents 1 Introducing Acronis Snap Deploy 5 ...................................................................................7 1.1 Overview ....................................................................................................................................7 1.1.1 1.1.2 1.1.3 1.2 What's new in Acronis Snap Deploy 5 .......................................................................................7 1.3 What you can do with Acronis Snap Deploy 5 ........................
2.5.3 2.6 2.6.1 2.6.2 2.6.3 2.6.4 Acronis Universal Deploy purpose ............................................................................................................... 26 Acronis Universal Deploy in Windows ......................................................................................................... 27 Acronis Universal Deploy in Linux ................................................................................................................
8 Creating a master image ................................................................................................ 73 8.1 Preparation of the master operating system ..........................................................................73 8.2 Online vs. offline imaging ........................................................................................................73 8.3 Performing online imaging .......................................................................................
13 Managing deployment tasks (the Deployment tasks view) ...................................... 132 13.1 List of deployment tasks ........................................................................................................132 13.2 Actions on deployment tasks.................................................................................................132 13.3 States and results for deployment tasks ...............................................................................
1 Introducing Acronis Snap Deploy 5 1.1 1.1.1 Overview What is Acronis Snap Deploy 5 Acronis Snap Deploy 5 is a flexible, efficient software solution for deployment of a fully configured operating system (with or without application software and any other data) to multiple machines. Because the product uses disk imaging technology, it is ideal for rapid bare-metal installations and flexible centralized provisioning. 1.1.
Support for stand-alone deployment to Microsoft Surface Pro and Microsoft Surface Pro 2 tablets. Compatibility with backups created by Acronis Backup 11.5. Deployment of Linux to UEFI machines (no BIOS <-> UEFI migration). The Acronis Universal Deploy feature is now included in all Acronis Snap Deploy 5 licenses. The Acronis Universal Deploy feature is now available for Linux. New Linux kernel version (3.11.6) in Linux-based bootable media. The new kernel makes for better hardware support.
Machines that do not support Wake-on-LAN can be booted into the Acronis environment manually before the deployment starts. Such machines will also be deployed, provided that they are listed for deployment. Scenarios Scenario 1. An organization receives a shipment of machines from a manufacturer along with the list of their MAC addresses. The IT department has to deploy the operating system to the new hardware. Scenario 2. An Internet café, school or university lab has 100 machines with known MAC addresses.
Scenarios Scenario 1 You want to perform deployment to several machines. For each machine, you want to assign a specific name, rather than an automatically-generated name. 1. You enter the MAC addresses of the machines so that they all appear in the list of machines. 2. You select each machine in the list and specify an individual setting: the machine name. 3. You set up a deployment operation. Other deployment settings will be the same for all machines.
When deploying a system volume, Acronis Snap Deploy 5 will automatically repair the bootability of the deployed system. 1.3.8 Command-line mode and scripting under WinPE Acronis Snap Deploy 5 provides a command-line utility that can be added to a bootable media based on Windows Preinstallation Environment (WinPE). The administrator can create such media on a physical drive or place it to the PXE server.
Set up deployment for one or more machines. Organize machines into groups. 1.4.2 List of deployment tasks Centralized deployment is performed by a deployment task. Acronis Snap Deploy 5 provides a list of deployment tasks in the Deployment tasks (p. 132) view. In this view, you can: View and edit the list of tasks, including scheduled tasks and tasks that perform deployment when a specified number of machines are ready.
By using the GUI, you can take a master image and perform deployment. You may want to use a WinPE-based media if the Acronis media cannot recognize a specific device, such as an exotic storage device. A WinPE-based bootable media also provides a command-line utility (p. 11) for performing imaging and deployment. 1.4.6 E-mail notifications about deployment When using the command-line mode (p. 11), you can set up e-mail notifications about the result of each deployment operation.
1.4.9 Multicast TTL and network bandwidth throttling Deployment configuration has a parameter that specifies time to live (TTL) for multicast packets. By using this setting, you can limit the distribution of multicast packets via gateways. By setting the permitted bandwidth, you can limit the network usage during deployment. 1.4.
Deploying an operating system requires a license. Depending on the type of an operating system, you need a server license or a workstation license. For details about licensing, see “Licensing policy” (p. 16).
Operating system Imaging and deployment Changing settings License type (No Service Pack or Service Pack 1) Windows Vista Home Basic (x86, x64) (No Service Pack, Service Pack 1, or Service Pack 2) Yes Yes Workstation Windows Vista Home Premium (x86, x64) (No Service Pack, Service Pack 1, or Service Pack 2) Yes Yes Workstation Windows Vista Business (x86, x64) (No Service Pack, Service Pack 1, or Service Pack 2) Yes Yes Workstation Windows Vista Ultimate (x86, x64) (No Service Pack, Service Pa
A machine license enables an unlimited number of deployments to a particular machine. You may want to use this type of license if you perform deployment to the same machine on a regular basis. A deployment license enables a single successful deployment to a machine. You may want to use this type of license if you perform deployment to the same machine once or infrequently. If deployment under a deployment license fails, you can perform another deployment under the same license.
You should obtain one upgrade license for Acronis Snap Deploy 5 (ASD5) per each license for Acronis Snap Deploy 4 (ASD4) that you have. After you import the upgrade licenses to the license server, you will be able to perform deployment to any machine by using Acronis Snap Deploy 5. It does not matter whether the ASD4 license is itself an upgrade license for an even earlier version. The following table illustrates how the various combinations of licenses will be upgraded.
the product. See Registering Acronis Products at the Website (http://kb.acronis.com/content/4834) and Acronis Website User Guide (http://kb.acronis.com/content/8128).
2 Understanding Acronis Snap Deploy 5 This section describes the components of the Acronis Snap Deploy 5 infrastructure and their interaction. 2.1 Terminology The following table lists the common terms and descriptions used in this document. Master system The system to be deployed. Master image (Image) A file that contains the master system in a packaged form. The file has the .tib extension.
Administrator The person who has rights to manage the Acronis Snap Deploy 5 infrastructure. User-initiated deployment mode The mode when deployment can be initiated on the side of the target machine. User The person on the side of the target machine who starts the user-initiated deployment. This term relates to the user-initiated deployment mode only. 2.
Acronis Snap Deploy 5 Standalone Utility is a bootable component that enables fully-functional deployment with a GUI on a stand-alone machine (a machine isolated from the network or included in a network without Acronis Snap Deploy 5 infrastructure). The only way to load Acronis Snap Deploy 5 Standalone Utility is from an Acronis bootable media. Acronis System Report is a bootable component that collects information about the machine and saves this information to a locally-attached USB drive.
On USB and FireWire (IEEE-1394) storage devices (hard drives, flash drives) attached to the deployment server. On DVD+R/RW, DVD-R/RW, CD-R/RW, or recordable Blu-ray Discs (BD-R, BD-RE) loaded in the media drive of the deployment server. The best practice is keeping images on the deployment server’s hard disk. This minimizes network traffic during deployment. The image created on removable media has to fit into one media disk.
3. Do one of the following: Create a bootable media (either an Acronis media or a WinPE-based media) with Acronis Snap Deploy 5 Master Image Creator. OR Install Acronis PXE Server, connect the console to the PXE server and upload Acronis Snap Deploy 5 Master Image Creator. 4. Depending on your choice in the previous step, boot the machine into Acronis Snap Deploy 5 Master Image Creator from the bootable media or from the PXE server. 5.
4. Connect the console to the master system, click Create image -> Next -> A master image. Follow the instructions of the Master Image Creator wizard to configure and launch the imaging operation. The image can be saved in a network folder, on detachable media (such as an USB drive) or on removable media (such as a DVD). Online imaging 2.5.3 Deployment This section illustrates the Acronis components functionality by the example of deployment that you start manually.
6. Select the machines, click Deploy image on the toolbar, and then follow the Create Deployment Task Wizard instructions to configure and launch the deployment operation. When prompted about when you want to run the deployment, select Now. Deployment that starts manually 2.6 What is Acronis Universal Deploy Acronis Universal Deploy is the Acronis proprietary technology that helps deploy and boot up a Windows or a Linux operating system on dissimilar hardware.
2.6.2 Acronis Universal Deploy in Windows Automatic HAL and mass-storage drivers selection Acronis Universal Deploy searches the Windows default driver storage folders (in the master image being deployed) for HAL and mass-storage device drivers and installs drivers that better fit the target hardware. You can specify a custom driver repository (a network folder or a CD) which will also be used for driver searches.
To revert to the original initial RAM disk, do any of the following: Rename the copy accordingly. For example, run a command similar to the following: mv initrd-2.6.16.60-0.21-default_acronis_backup.img initrd-2.6.16.60-0.21-default Specify the copy in the initrd line of the GRUB boot loader configuration. 2.6.4 Acronis Universal Deploy and Microsoft Sysprep Acronis Universal Deploy is not a system preparation tool.
3 Getting started with Acronis Snap Deploy 5 This section describes how to install Acronis Snap Deploy 5 and perform a simple deployment. By following the procedures in this section, you will: a) Install and start Acronis Snap Deploy 5. b) Create a master image of a machine. c) Deploy the master image to the same or a different machine. Step 1. Installing Acronis Snap Deploy 5 In this step, you will install Acronis Snap Deploy 5 in a typical configuration.
4. Click Typical.
5. Click Add license, and then specify the license keys. You can type the license keys manually or import them from a text file. 6. Specify whether the machine will participate in the Customer Experience Program (CEP). 7. Click Install. Step 2. Starting Acronis Snap Deploy 5 On the machine where you installed Acronis Snap Deploy 5: 31 On the desktop, click Acronis Snap Deploy 5.
When Acronis Snap Deploy 5 starts, the welcome screen appears. Step 3. Creating a bootable media In this step, you will create a bootable media that enables creating master images and performing deployment. On the machine where you installed and started Acronis Snap Deploy 5, do the following: 1. On the Tools menu, click Create bootable media.
2. In the list of components, select Acronis Snap Deploy 5 Agent and Acronis Snap Deploy 5 Master Image Creator. 3. In Network settings, in Server name/IP, specify the name of the machine where you installed Acronis Snap Deploy 5. 4. Choose to create the media on a CD or DVD. Insert a blank CD-R/RW or DVD-R/RW. Tip. If no CD-RW, DVD-RW, or a similar optical disc drive is present on the machine, you can choose to create an ISO file that you can later burn to an optical disc on another machine.
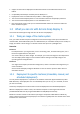
1. Make sure that the CD or DVD drive has a higher boot priority than the hard disk drive. You may need to open the BIOS setup utility of the machine and adjust the boot priority setting, similarly to what is shown in the following picture. 2. Attach the USB hard disk drive to the machine. Tip. Alternatively, you will be able to save the image to a network folder, as described later in this procedure. 3. Boot the machine from the bootable media you created. 4.
5. In the pop-up window, click Cancel or wait until that window closes. 6. Select the volumes that you want to include in the master image. You can leave the default selection, which normally includes the volumes that contain the operating system. 7. Specify a folder on the USB hard disk where you want to save the image. Alternatively, specify a network folder, and the user name and password to access that folder. 8. Keep clicking Next until the summary screen appears. Click Create in that screen.
Acronis Snap Deploy 5 starts creating the image. After the image is created, the machine will restart. Step 5. Performing deployment In this step, you will deploy the created master image to a single machine (the target machine). Tip: For getting started, we recommend performing deployment to the same machine from which you created the image, or to a machine with identical hardware. This way, no extra steps, such as using the Universal Deploy option, are required.
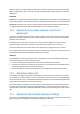
3. On the boot menu, click Acronis Snap Deploy 5 Agent. 4. In the pop-up window, click Cancel or wait until that window closes. 5. Make sure that the machine is ready for deployment. The window should look similar to the following picture.
Details. The target machine becomes ready for deployment when it connects to Acronis Snap Deploy 5 OS Deploy Server. This server is part of Acronis Snap Deploy 5. If the machine does not connect to the server, you may need to adjust network settings, as described in “Booting the target machines” (p. 110). After the target machine is ready, you can deploy the master image to it. Deploying the master image On the machine where you installed Acronis Snap Deploy 5, do the following: 1.
Note. If you imaged a machine running a workstation operating system (such as Windows 7) but you only have server licenses (such as Acronis Snap Deploy 5 for Server – Trial License), you may want to allow the software to use this type of license to deploy the machine. To do so, click Licensing in the deployment settings window, and then click Use a server license automatically.
9. Select the deployment template you created, and then click Next. 10. When asked about when to run the deployment, select Now and type the user name and password that you use to log on to Windows. 11. Keep clicking Next until the summary window appears. Click Create in that window.
You can view the progress of the deployment both on the machine where you installed Acronis Snap Deploy 5 and on the target machine.
What you can do next In the navigation pane, you can open the corresponding views to navigate across the software. To run the deployment again, open the Deployment tasks view, select the task you created, and then click Run on the toolbar. For details about the Deployment tasks view, see “Managing deployment tasks” (p. 132). To add more machines, open the Machines view and then click Add machines. You can add machines by their physical addresses, known as MAC addresses.
4 Installation of Acronis Snap Deploy 5 4.1 Supported operating systems This section lists the operating systems where components of Acronis Snap Deploy 5 can be installed. It does not matter which Service Pack (if any) is installed in the operating system.
4.
UDP port: 67, 68, 69 Broadcast address: 255.255.255.255 For a remote installation (p. 51), the TCP port 25001 is used. If you are using a firewall, you may need to set the appropriate access options. 4.4 Typical installation With typical installation, all components of Acronis Snap Deploy 5 that are needed for deployment and offline imaging will be installed on the same machine.
You may want to use custom installation in the following cases: Installing Acronis Snap Deploy 5 Management Agent to take a master image of a machine without restarting it (p. 24) Installing Acronis Wake-on-LAN Proxy to wake up machines that are located in another subnet Installing different components on different machines, such as installing Acronis Snap Deploy 5 OS Deploy Server on one machine and Acronis PXE Server on another. For examples, see “Common installation configurations” (p. 47). 4.
4.5.2 Common installation configurations Acronis Snap Deploy 5 components can be installed in various configurations, to distribute various components and features among the machines on the network. a) The minimal configuration that enables only offline imaging (p. 23) and stand-alone deployment (p.
the network (not necessarily on the master machine) makes sense. You will be able to validate (check) the integrity of your images (p. 83) by using the management agent. e) To add to Acronis Snap Deploy 5 OS Deploy Server an ability to perform deployment in another subnet (across a network switch) in configuration (b) or (c), install Acronis Wake-on-LAN Proxy on any server in the subnet where the target machines are. No additional actions are required.
Wake-on-LAN Proxy The list of components 4.5.3.1 Installation of Acronis Snap Deploy 5 Management Console Acronis Snap Deploy 5 Management Console is an administrative tool for local and remote access to Acronis servers and Acronis Snap Deploy 5 Management Agent. Install Acronis Snap Deploy 5 Management Console on any machine from which you prefer to operate.
Note: If you have already installed a license server that came with another Acronis product, you will still need to install Acronis Snap Deploy 5 License Server. You can install both license servers on the same machine. The machine will then act as a common license server for all Acronis products. After installation, Acronis Snap Deploy 5 License Server launches automatically as a Windows service. When installing Acronis Snap Deploy 5 License Server, you can add the license keys to it.
Acronis PXE Server starts running as a service immediately after installation. It will automatically launch at each system restart. You can stop and start this service in the same way as other services. 4.5.3.5 Installation of Acronis Wake-on-LAN Proxy Acronis Wake-on-LAN Proxy enables Acronis Snap Deploy 5 OS Deploy Server to wake up the target machines located in another subnet.
4.6.1.1 Preparation Before proceeding with remote installation, prepare the remote machines as follows: Simple file sharing. For a successful installation on a remote machine running any version of Windows XP, the option Control panel > Folder options > View > Use simple file sharing must be disabled on that machine. User Account Control. For a successful installation on a remote machine running Windows Vista or later, User Account Control (UAC) must be disabled.
7. To allow restarting the remote machine if it is required for installation, select the Restart the machine automatically when required check box. If you clear this check box, you may need to restart the remote machine later for the component to start working. 8. In User name and Password, specify the user name and password of an administrator on the remote machine. 9. Click Install. Updating a component To update a component on a remote machine, perform the same procedure. 4.6.
5. If you are upgrading Acronis OS Deploy Server apart from Acronis License Server, specify the machine with the license server. 6. Review the installation summary, and then click Install. Upgrading Acronis PXE Server removes all components of Acronis Snap Deploy 4 that are uploaded to the PXE server. To continue using the PXE server, you need to upload the new components by connecting to the PXE server and clicking Upload components. For details, see the “Configuring Acronis PXE Server” (p.
Uninstalling Acronis Snap Deploy 5 OS Deploy Server does not delete the deployment tasks, deployment templates, the list of machines, and individual deployment settings. If you later reinstall the deployment server, this data will be available to the new deployment server.
5 Using Acronis Snap Deploy 5 Management Console 5.1 Connecting to a machine 5.1.1 Connect to a local machine When started, Acronis Snap Deploy 5 Management Console connects to the local machine if there is a manageable component of Acronis Snap Deploy 5 (such as Acronis Snap Deploy 5 OS Deploy Server) on this machine. You can manage any Acronis server or Acronis Snap Deploy 5 Management Agent installed on the same machine without any additional actions. The welcome screen of the management console 5.
To connect to an Acronis component, you need the administrator’s privileges on the remote machine. To connect to a component 1. On the Connect menu, click Connect. 2. In Machine, specify the name or IP address of the machine where the component is installed. To open the list of machines on your network, click Browse. 3. In User name and Password, specify the user name and password of an administrator on that machine. 4. To save the password for the user name, select the Save password check box.
5.2 Browsing logs Acronis Snap Deploy 5 OS Deploy Server and Acronis PXE Server store the log of the operations they have performed. The view the log of Acronis Snap Deploy 5 OS Deploy Server 1. Connect the management console to the machine with Acronis Snap Deploy 5 OS Deploy Server. 2. Do either of the following: In the left pane, click Deployment tasks, and then click Log on the toolbar. On the Help menu, click View log. 3. In the left pane, select a log.
6 Using Acronis Snap Deploy 5 License Server This section contains general information necessary for understanding Acronis Snap Deploy 5 License Server and covers operations with licenses. 6.1 Understanding Acronis Snap Deploy 5 License Server Acronis Snap Deploy 5 License Server is a mechanism that tracks licenses of Acronis products. Acronis Snap Deploy 5 licensing is based on the number of machines (servers or workstations) that you deploy.
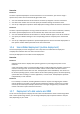
4. In the Add Licenses window, type the license key or the path to a .txt or .eml file containing the license keys; or, you can browse to the file. 5. Click Add. Acronis Snap Deploy 5 License Server performs the operation and reports the number of newly-added licenses. The license server has 10 license keys of various types. The license corresponding to the highlighted license key has already been used for deployment. The bottom license key corresponds to 100 deployment licenses. 6.
This will display all license keys available on Acronis Snap Deploy 5 License Server. One license key can correspond to multiple licenses. The license server contains 10 server licenses and five workstation licenses 3. Right-click the column headings bar to choose the details to display: license key, import date, expiration date (for trial licenses), the total number of licenses assigned to each license key, how many of them are available (that is, free), and how many are used.
2. Go to the folder where Acronis Snap Deploy 5 License Server is installed. By default, the folder name is: %Program Files%\Acronis\SnapDeploy\LicenseServerConsole 3. Run the following command: LicenseServerCmdLine --import-file In this command: is the name of the machine where Acronis Snap Deploy 5 License Server is installed. is the name of the .txt or .eml file with the license keys.
--import-file Imports license keys from a .txt or an .eml file. --help Shows usage information.
7 Deployment tools Before deployment, each target machine must boot into a dedicated bootable component of Acronis Snap Deploy 5. An example of such component is Acronis Snap Deploy 5 Agent. The machine can boot into the component in either of these ways: From a physical media (such as a DVD or a USB drive) that contains the component. Such media is called a bootable media. Over the network, by using Acronis PXE Server with the component uploaded to it.
7.2.1 Acronis bootable media Acronis bootable media is a physical media (CD, DVD, USB flash drive, or other media supported by the machine’s BIOS as a boot device) that contains bootable components of Acronis Snap Deploy 5. Acronis Snap Deploy 5 bootable media supports both BIOS and UEFI architecture. You can create an Acronis bootable media containing one or more of the following bootable components (p.
No autostart: The Acronis loader will display the boot menu and wait for someone to select whether to boot the operating system or one of the Acronis components. Start operating system: The operating system, if present on the booting machine’s hard disk, will start after the time-out. This option is designed to make the target machine boot into the deployed operating system after deployment. The main usage scenario is as follows.
If not configured in either way, the deployment server will be found automatically. The agent will start the search after the number of seconds you specify in Timeout (sec). Settings for Acronis Snap Deploy 5 Agent The option to save the agent’s log to the deployment server is designed primarily for troubleshooting. The log will be available on the deployment server in the following folder: %AllUsersProfile%\Application Data\Acronis\DeployServer\AgentsLogs 7. Select the type of bootable media to create.
selecting a bootable component. No password is required to start the operating system on the machine. Protecting the bootable components with a password 9. Click Create. After you create the disc, mark it and keep it in a safe place. Note: Components on an Acronis bootable media are based on a Linux kernel and are equipped with the Linux system and device drivers. Acronis regularly supplements the driver set with drivers for new devices.
7.2.2.1 Components included in the bootable media Each WinPE-based bootable media contains the following bootable components (p. 64): Acronis Snap Deploy 5 Agent Acronis Snap Deploy 5 Master Image Creator Acronis Snap Deploy 5 Command-Line Utility 7.2.2.2 Acronis Snap Deploy 5 PE Builder Acronis Snap Deploy 5 PE Builder is a dedicated tool for creating a WinPE-based bootable media. The PE Builder is installed with Acronis Snap Deploy 5 Management Console.
2. 3. 4. 5. 6. http://www.microsoft.com/downloads/details.aspx?familyid=696DD665-9F76-4177-A811-39C26 D3B3B34&displaylang=en Automated Installation Kit (AIK) Supplement for Windows 7 SP1 (PE 3.1): http://www.microsoft.com/download/en/details.aspx?id=5188 You can find system requirements for installation by following the above links. [Optional] Burn the WAIK to DVD or copy to a flash drive. Install the Microsoft .NET Framework from this kit (NETFXx86 or NETFXx64, depending on your hardware).
If you want to create a PE image (a WIM file) to later upload it to the PXE server (p. 71), select WIM image. You may want to select this setting if you are planning to use Preinstallation Environment for unattended deployment to specific machines (p. 103). If so, make sure that you have selected to start the agent automatically (see the previous step). Tip: The setting WIM image enables you to create a PE image for any future purpose, such as for adding other tools in addition to Acronis components. 7.
To perform a direct configuration of the PXE server 1. Start Acronis Snap Deploy 5 Management Console. 2. In the navigation pane, click PXE server. 3. If the PXE server is installed on a different machine, click Connect to the PXE server, and then specify the name or IP address of that machine. In logon settings, specify the user name and password of an administrator on that machine.
8 Creating a master image To be able to deploy a system, you need to create the desired system configuration and then to save an image of the system’s hard disk or volume to a network folder, detachable media (such as a USB drive) or removable media (such as a DVD). This section describes how to create a master image by using Acronis Snap Deploy 5.
By using a bootable media (either Acronis media or WinPE-based media) with Acronis Snap Deploy 5 Master Image Creator, or by using the command-line utility in a WinPE-based bootable media. This type of imaging is called offline imaging. This section describes imaging with Acronis Snap Deploy 5 Management Agent and Acronis Snap Deploy 5 Master Image Creator. For information about imaging in the command-line mode, see “Command-line mode and scripting under WinPE” (p. 134). 8.
The boot menu appears on the master machine. The boot menu on the master machine 5. In the boot menu, click Acronis Snap Deploy 5 Master Image Creator. 6. The master image creator establishes a network connection to be able to save the image in a network folder. A dialog box appears asking whether you want to configure the network connection that will be used by the image creator. By default, Acronis Snap Deploy 5 Master Image Creator uses DHCP auto configuration.
The manual configuration is needed if automatic configuration is not possible (no DHCP server on the network) or does not succeed. To configure the network connections manually, click OK in the prompt window. Acronis Snap Deploy 5 Master Image Creator configuration: network settings Set the preferable values and click OK. 7. When Acronis Snap Deploy 5 Master Image Creator starts, it displays the Master Image Creator welcome window. 8.
Windows 7 and Windows Server 2008 R2 place the loader on a hidden volume called System Reserved. If your operating system and its loader reside on different volumes, always include both volumes in the image. A volume with the loader is usually marked as the active volume and is shown with the Act. flag in the list. The volumes must also be deployed together; otherwise, there is a high risk that the operating system will not start.
Select the image location in the device tree. In File name, type the file name of the image. To generate a file name that is unique in the selected location, click Generate a name for the file. Note: Acronis bootable media uses NetBIOS networking protocol to resolve Acronis Snap Deploy 5 OS Deploy Server in a network. NetBIOS protocol uses ANSI characters for host names. So, machines that have non-English characters in their names cannot be accessed from Acronis bootable media.
A higher compression level may lead to a smaller size of the image, but creating the image will take longer. The default Normal level is recommended in most cases. Selecting the data compression level Process priority This option is available only for online imaging (p. 73). The preset is: Low Defines the priority of the imaging process.
The priority of any process running in the operating system determines the amount of CPU usage and system resources allocated to that process. Decreasing the image creation priority will free more resources for other programs. Increasing the image creation priority could speed up the imaging by taking resources from the other running processes. The effect will depend on the total CPU usage and other factors.
Alternatively, you can click Always, into the files of fixed size and type the desired file size or select it from the list. The image will then be split into multiple files of the specified size. This comes in handy when creating an image that you plan to burn to multiple discs later on. You can enter the file size in bytes (B), kilobytes (KB), megabytes (MB), gigabytes (GB), or terabytes (TB).
The imaging operation starts and its progress is displayed.
9 Validating a master image You can ensure that the master image is not damaged by validating it. To validate a master image 1. Start Acronis Snap Deploy 5 Management Console. 2. Connect the management console to a machine where Acronis Snap Deploy 5 Management Agent is installed. 3. On the Action menu, click Validate image. 4. Select the master image that you want to validate. 5. Click Validate in the summary window. The validation operation starts.
10 Deploying a master image This section describes how to deploy a master image to one or more machines. Caution: Deployment to a machine involves deleting some or all data that is currently stored on that machine. Make sure that you are performing deployment to the correct machines and to the correct disks on those machines. 10.
10.3 Deployment templates A deployment template is a set of configuration parameters of the deployment operation. These parameters include: A path to the master image. The operation mode (multicast or unicast, how to handle the target disk free space, and so on). Settings to be applied to the deployed systems (for example, machine names and user accounts). Operations to be performed on the deployed systems (transfer files, run applications, shut down, restart).
On DVD+R/RW, DVD-R/RW, CD-R/RW, or recordable Blu-ray Discs (BD-R, BD-RE) loaded in the media drive of the deployment server. The best practice is keeping images on the deployment server’s hard disk. This minimizes network traffic during deployment. The image created on removable media has to fit into one media disk. To deploy an image spread over several CDs, DVDs or other media, copy all parts of the image to the same folder on the deployment server or to a network folder.
10.3.1.2 Disk and volume selection If the image contains more than one disk, specify the disk that you want to deploy, and then click Next. You can select only one disk.
If the disk you selected contains more than one volume, specify the volumes that you want to deploy. You can select one or more volumes. Selecting disk volumes to deploy The further steps will depend on how many volumes you select. If you deploy only one volume, it is assumed that the target disk has volumes, so you can select the target volume, to deploy over it. Other volumes will remain untouched in this case.
settings is supported (p. 14). You always can specify general settings such as the disk to perform the deployment to. These settings can be overridden by individual settings (p. 130) for a machine. Target disk layout This setting determines the target disk for deployment, and what space on the target disk will be available for deploying the master image. The preset is: Default disk The selection Default disk means that the image will be deployed to the hard disk whose number in the BIOS is 1.
Note: The active volume of the target disk will remain active. Even if you deploy an active volume side by side with an already present active volume, the newly deployed volume will not become active. Therefore, you need to deploy an active volume to an active volume if you want to boot from the deployed volume.
Example 3. You are deploying two 50-GB volumes. Because you are deploying more than one volume, all volumes on the target disk will be deleted; see “Target disk layout” (p. 89). Each of the deployed volumes will be 150 GB in size. Example 4. You are deploying a 10-GB volume and a 20-GB volume. All volumes on the target disk will be deleted. The deployed volumes will be 100 GB and 200 GB in size, respectively. Example 5.
The preset is: The same name and membership as those of the machine in the master image By default, all deployed machines will have the same name as the machine in the master image. Alternatively, you can specify a name pattern for the machines. Specify whether the machine will be a member of a workgroup or an Active Directory domain. If you have selected the domain membership, specify the user name and password of a domain administrator.
Generates count consecutive numbers starting with start. For example, the pattern {1,5} generates the names 1, 2, 3, 4, and 5. Similarly, the pattern {8,5} generates the names 8, 9, 10, 11, and 12. Make sure that the value of count is big enough. If the number of target machines exceeds count, deployment to the remaining machines will fail. You can use two or more of these wildcards. See examples later in this section. In the wildcards, the value of start must be 0 or greater.
Specify a range of static IP addresses, a subnet mask, and a default gateway for the target machines. You may want to use this option if your network does not have the DHCP capability. Each machine will be assigned an IP address from the range. Make sure that the range is big enough. If there are more target machines than IP addresses in the range, deployment to the remaining machines will fail.
Security identifiers This setting determines whether Acronis Snap Deploy 5 will generate unique security identifiers (SIDs) for the target machines. The preset is: Generate a unique SID for each target machine Generating unique SIDs should normally be enabled. We recommend not to change the SID only if you are deploying the image to the same machine from which the image was created. You can keep the SID unchanged if there is no machine with the same SID in the same workgroup or domain.
Each file must be located in a network folder. When adding the file, specify the credentials to the network folder. The destination of each file must be on one of the volumes you are deploying. To run the file after it is transferred, select the Run the file on target machines check box. The file will run when Windows first starts on the target machine.
With the Unicast mode, the server divides the speed among 10 machines. Therefore, the data transfer speed will be 10 MB per second for each target machine. With the Multicast mode, the server sends one copy of data to a multicast address, and each client will receive data at a speed of 100 MB per second. Multicast configuration has a parameter that specifies the time to live (TTL) for multicast packets. Use this parameter to limit multicast packets distribution via gateways. The default value is 15.
Licensing This setting determines which type of license to use for deployment to a target machine and what to do when no appropriate license is available on the license server.
During deployment: Use deployment licenses If there are no deployment licenses: Use a machine license automatically If the license server is out of workstation licenses: Use a server license automatically With these settings, the software will use a license based on the following priority: a) b) c) d) Deployment workstation license Machine workstation license Deployment server license Machine server license If you change the second setting from Use a machine license automatically to Stop deploymen
Select whether to use Acronis Universal Deploy In Windows, Acronis Universal Deploy uses three sources for drivers: The Windows default driver storage folder (in the master image being deployed) The driver repository, which is one or more network folders or removable media The mass-storage device driver specified by the user The software will find the most suitable drivers of all available drivers and install them into the deployed system.
10.3.1.5 Summary window Check your settings in the summary window, and then click Save. The summary window 10.3.2 Configuring default deployment settings In the Default Deployment Settings window, you can specify the values that will be used by default when you create a deployment template (p. 85). To view or change the default deployment settings 1. Start Acronis Snap Deploy 5 Management Console. 2. On the Tools menu, click Configure default settings.
Machine name and membership (p. 91) The preset is: The same as of the master system TCP/IP properties (p. 93) The preset is: The network settings of the master system User accounts (p. 94) The preset is: Create no additional user accounts Security identifiers (p. 95) The preset is: Generate a unique security identifier (SID) for each target machine Action after deployment (p. 95) The preset is: Shut down the machine after the deployment Network utilization (p.
A deployment task runs according to a deployment template (p. 85). When creating the task, you can create a deployment template or specify an existing one. 10.4.1 Prerequisites Before proceeding with the deployment, make sure that: You have installed the following components: Acronis Snap Deploy 5 Management Console, Acronis Snap Deploy 5 License Server, Acronis Snap Deploy 5 OS Deploy Server, and (optionally) Acronis PXE Server.
00-01-23-45-67-1A 02-01-23-45-67-1B You can then specify this file when creating the deployment task or in the Machines view when adding machines (p. 127). You also will be able to provide each MAC address manually. Enabling Wake-on-LAN on target machines Make sure that Wake-on-LAN is enabled on the target machines. Enter the machine BIOS and set Power -> Wake On PCI PME -> Power On. The exact names might vary depending on the BIOS version.
Setting up a machine to boot from PXE For bare metal, it is enough that the machine BIOS configuration supports network booting. This is because no operating system is present on the hard disk, so the machine will boot from the network even if the hard disk drive is the first device in the boot sequence.
The following picture illustrates deployment to specific machines within a single subnet. If the target machines are located in another subnet, you may need to perform additional steps (p. 108) before creating the deployment task. Deployment to specific machines within one subnet To create a deployment task for specific machines 1. Make sure that you have completed the preparation steps (p. 103). 2. Start Acronis Snap Deploy 5 Management Console. 3. In the welcome screen, click Deploy image.
Now: The task will run immediately after you create it. Once later: The task will run once at the specified date and time. Daily: The task will run at the selected times every day or every few days. Weekly: The task will run on the selected days every week or every few weeks. Monthly: The task will run on the selected day every month. Manually: The task will run only when you start it manually. If prompted, specify the credentials for running the task.
The task appears in the Deployment tasks view. When the task is started, the connected machines’ IP addresses and the task progress are displayed in that view. When the task is finished, its log entries will be available in the log of the deployment server. 10.4.2.3 Deployment in another subnet Machines in another subnet (behind a network switch or router) can be woken up through the Acronis Wake-on-LAN Proxy component.
deployment when a specified number of machines is reached. Deployment is usually performed by multicasting. You can specify a time-out period. After the time-out, deployment will start anyway on the machines that will be ready at that moment. This way of deployment decouples configuring the deployment operation from booting the target machines. You configure the deployment first, no matter whether the target machines are ready or not, and then boot the machines.
If you specify a time-out, the deployment will start either when any 70 machines connect, or when the time runs out and at least one machine is connected. If no machine is connected, the task will stop. 6. 7. 8. 9. Triggering conditions for the deployment Click Next. Create a deployment template (p. 85) or select an existing one. Review the deployment operation summary and click Create to create and save the deployment task. You can see the task in the Deployment tasks view.
To perform deployment to the specific machines (p. 103) that do not support the Wake-on-LAN functionality You can boot the machines by using a bootable media or Acronis PXE Server. To boot a target machine 1. Do one of the following: Create a bootable media (p. 65) with Acronis Snap Deploy 5 Agent. OR Connect the management console to Acronis PXE Server and upload Acronis Snap Deploy 5 Agent (p. 71).
To load the agent with the default configuration (recommended in most cases), click Cancel or wait until the dialog box disappears after the time-out. To configure the agent before loading (recommended if your network does not have a DHCP server), click OK. Prompt for configuring the agent on the target machine’s side With the default configuration, the agent: Takes the network settings, such as the IP address, from the DHCP server (uses DHCP auto configuration).
Note: Acronis bootable media uses NetBIOS networking protocol to resolve Acronis Snap Deploy 5 OS Deploy Server in a network. NetBIOS protocol uses ANSI characters for host names. So, machines that have non-English characters in their names cannot be accessed from Acronis bootable media. If the name of the Acronis Snap Deploy 5 OS Deploy Server machine contains non-English characters, use the machine's IP-address to specify it in the network.
When Acronis Snap Deploy 5 Agent starts and the target machine is ready for deployment, the target machine displays the following window: Acronis Snap Deploy 5 Agent: ready for deployment 114 Copyright © Acronis International GmbH, 2002-2014
10.4.5 Operations with deployment tasks Once a deployment task is created, it appears in the Deployment tasks view. List of deployment tasks To edit a task (for example, to change its schedule), select it and click Edit. Editing is performed in the same way as creation; but, the previously selected options are already set, so you need to enter only the changes. Any task stays on the deployment server until you delete it. To delete a task, select the task and then click Delete.
If Acronis Wake-on-LAN Proxy is installed in that subnet, forward the TCP and UDP ports 9876 to the machine with the Wake-on-LAN proxy. If Acronis PXE Server is installed in that subnet, forward UDP ports 67, 68, and 69 to the machine with the PXE server. 2. When creating the deployment task, specify the IP address of the NAT device when asked about the address of the PXE server and/or of the Wake-on-LAN proxy.
should not save the image to an internal hard disk of the target machine, because it cannot be accessed during the stand-alone deployment. 5. Boot the target machine into Acronis Snap Deploy 5 Standalone Utility. 6. If you saved the master image to a media, attach or insert the media. Acronis Snap Deploy 5 Standalone Utility can deploy an image located: In a network folder. On a USB or FireWire (IEEE-1394) storage device (such as a flash drive) attached to the target machine.
Users who need to redeploy their machines boot the machines from the bootable media or the PXE server, and select the template by name from the boot menu. The deployment starts immediately and proceeds independently on each machine. User-initiated deployment mode: a user starts deployment. In software testing labs, the choices can be various operating systems, various editions of the same operating system, or the same operating system with various settings or applications.
Tip: To find a template in the custom boot menu, press a letter key which corresponds to the first letter of the template name. The cursor will jump on the first template whose name starts with the pressed letter. Important: If the user-initiated deployment uses a PXE server, machines that are deployed through deployment tasks (p. 102) will not be able to boot from that PXE server. However, deployments to such machines will be possible if they boot from a bootable media.
3. Create the deployment templates (p. 85) according to your organization’s needs. Assign to each template a name that can be easily understood by the users. Select one or more templates to be added to the boot menu. Adding templates to the boot menu 4. Select how to display the boot menu. For example, you can choose to start a particular deployment template automatically after a time-out. 5.
6. Review the operation summary and then click Switch on to proceed. The software creates the media with the custom boot menu. Acronis Snap Deploy 5 OS Deploy Server switches to the user-initiated deployment mode. Acronis Snap Deploy 5 OS Deploy Server in the user-initiated deployment mode In the Machines view, the administrator can see the status of the user-initiated deployment for each machine.
The user who requested deployment sees the following screen while the deployment is in progress. User-initiated deployment in progress: view on the target machine’s side 10.6.4 Changing parameters of the user-initiated deployment mode To change the templates or the boot menu password used in the user-initiated deployment mode, you need to reconfigure the user-initiated deployment mode. 1.
10.7 Deploying BIOS-based systems to UEFI-based and vice versa Acronis Snap Deploy 5 supports transferring 64-bit Windows operating systems between BIOS-based hardware and hardware that supports Unified Extensible Firmware Interface (UEFI). How it works Depending on whether the machine uses BIOS or UEFI firmware for booting, the disk with the system volume must have a specific partition style. The partition style is master boot record (MBR) for BIOS, and GUID partition table (GPT) for UEFI.
64-bit versions of all Windows Server operating systems starting with Windows Server 2008 x64 SP1 are convertible. All other operating systems are non-convertible. Source and target disk partition style: MBR or GPT. System and boot volumes of BIOS platforms use MBR disks. System and boot volumes of UEFI platforms use GPT disks.
Original system Target hardware BIOS BIOS UEFI UEFI Disk: MBR Disk: GPT Disk: MBR Disk: GPT mode in BIOS. UEFI OS: nonconvertible Solution Deploy the operating system to a GPT disk or to an uninitialized disk. 2. Perform the deployment under the bootable media. or After deployment, turn on the UEFI mode in BIOS. 10.7.2 Deploying disks Let's assume you have created a master image of a whole disk (with all its volumes) and want to deploy this disk to a different target platform.
Original system Target hardware BIOS BIOS UEFI The target disk will be initialized as the source one (MBR). OS: nonconvertible The target machine must support BIOS. Additional steps 1. Turn off the UEFI mode in BIOS. 2. Boot from a bootable media, and perform the deployment. UEFI The target disk will be initialized as MBR. OS: convertible The OS will be automatically converted to support BIOS booting. If you want to deploy the source disk “as is”: 1. Turn on the UEFI mode in BIOS. 2.
11 Managing the list of machines (the Machines view) The Machines view shows a list of machines for which you can set up deployment by using Acronis Snap Deploy 5 OS Deploy Server. A machine is determined by the MAC address of its network adapter. A MAC address is a set of six hexadecimal numbers, such as: 01-35-79-BD-F1-23. The list of machines includes: The machines that you added to the list. For example, you can add machines by using a file with MAC addresses.
11.2 Groups of machines Using groups helps you to organize the list of machines. For example, you can create a separate group for each department in your organization. You can then perform deployment to some or all machines of a department by selecting them in the corresponding group. Each machine can be a member of one or more groups. To create a group, click Create group on the toolbar, and then type the name of the group.
11.4 States and results for machines The State column shows the current state related to deployment. The state can be one of the following: Not ready: The machine is not connected to the deployment server; for example, the machine is turned off. For deployment to specific machines (p. 103), the deployment server will wake up the turned-off machine when the scheduled time comes or when you start the task manually. For deployment to any ready machines (p.
12 Individual deployment settings By using individual settings for a machine, you can override one or more deployment settings (p. 88) of a deployment template. Example. You created a deployment template to perform deployment to 100 machines. For one of those machines, however, you need to perform deployment to a different hard disk than the one prescribed by the template. You override the Target disk layout (p. 89) setting for that machine. By default, all templates recognize individual settings.
131 User accounts (p. 94) Security identifiers (p. 95) Action after deployment (p. 95) Licensing (p. 98) By selecting the Use machine license check box, you force using a machine license for the machine, even if the template prescribes using deployment licenses. If no machine license is available, the software will act according to the setting in the template: it will either stop deployment to the machine, or use a deployment license. A machine license enables an unlimited number of deployments.
13 Managing deployment tasks (the Deployment tasks view) The Deployment tasks view contains the list of deployment tasks (p. 102) that you previously created on Acronis Snap Deploy 5 OS Deploy Server. To open the Deployment tasks view 1. Start Acronis Snap Deploy 5 Management Console. 2. Click Deployment tasks. If prompted, specify the name or IP address of the machine with Acronis Snap Deploy 5 OS Deploy Server, and the user name and password of an administrator on that machine. 13.
Run: Starts the selected task. The task will wait for machines to become ready and then will perform deployment to them. Stop: Stops the selected task. The machines whose deployment finished by the time you stop the task remain deployed (the last result (p. 129) for such machines is Succeeded). Edit: Edits the task in the Create Deployment Task Wizard. Delete: Deletes the task from the deployment server. View log: Shows the log entries related to the selected task. 13.
14 Command-line mode and scripting under WinPE Having booted a machine in Windows Preinstallation Environment (WinPE), the administrator can perform imaging or deployment in the command-line mode or execute scripts. Acronis Snap Deploy 5 Command-Line Utility is included in a WinPE-based bootable media that you can create by using Acronis Snap Deploy 5 Management Console (p. 68). The section “Sample scenarios” (p. 142) provides examples of using the command-line utility. Limitation.
deploy Deploys disks and volumes, including the master boot record (MBR), from an image /filename: /password: /net_user: /net_password: /oss_numbers /reboot /harddisk: /partition:- /target_harddisk: /target_partition:- /start: /shutdown /fat16_32 /log: /size: /log_net_user: /type: /log_net_password:
14.1.2 Common parameters (parameters common for most commands) Parameter Description Image location Access to images /filename: Specifies the full path to the image, including Any the file name /password: Specifies the password for the image (if required) Any /net_user: Specifies a user name for accessing the network drive Network drive /net_password: Specifies a password for accessing the network drive Network drive Sets the image type to incremental.
General options /oss_numbers If this parameter is specified, the numbers of Any the volumes in the /partition parameter are adjusted for the MBR partition table. This means that primary volumes have numbers 1-1, 1-2, 1-3, and 1-4 (a disk cannot have more than four primary volumes); logical volume numbers start with 1-5. If this parameter is not specified, consecutive volume numbering must be used.
/partition:- Specifies the volumes to include into the image file. Volume numbers are specified as -, for example: /partition:1-1,1-2,3-1 See also the /oss_numbers parameter. To view the list of available volumes, use the /list command. /raw Use this parameter to create an image of a volume with an unrecognized or unsupported file system, or of a disk that contains such volume.
/restore_bootable: deploying a volume (when deploying a disk, MBR is always deployed): auto: Deploy the MBR only when deploying an active volume that contains an operating system. Use this setting to ensure that the operating system can boot. on: Deploy the MBR when deploying any active volume, no matter whether the volume contains an operating system or not. off: Do not deploy the MBR.
/patching_sid Generates a unique security identifier (SID) for the target machine. Without this parameter, the target machine will have the same SID as the master machine. /ud_path: /ud_username: /ud_password: Specifies using Acronis Universal Deploy, the path to the drivers storage (in a network folder), and the user name and password to access the folder.
/filename: Displays the image content. When listing image content, volume numbers may not coincide with those in the list of disks and volumes if the image does not contain all the volumes. For example, if the image contains only volumes 2-3 and 2-5, they will be listed as 2-1 and 2-2. If the deploy /partition command cannot find a volume in the image by its physical number, use the list command to obtain the volume number in the image.
14.1.4 Usage examples Example 1. The following command creates an image arc.tib of hard disk 1, and places the image to the network folder \\server1\folder. The operation log file log1.log is saved in another network folder: \\server2\dir\. Credentials for both network folders are provided: asdcmd /create /harddisk:1 /filename:\\server1\folder\arc.tib /net_user:user1 /net_password:pw1 /log:\\server2\dir\log1.log /log_net_user:user2 /log_net_password:pw2 Example 2.
Sample script setlocal SET IMG_PATH=\\image_server\images SET TMP_DRV_LETTER=h: net use %TMP_DRV_LETTER% %IMG_PATH% echo off for /f "tokens=1-13 delims= " %%a in ('ipconfig /all') do ( IF %%a EQU Physical ( for /f "tokens=1-3 delims= " %%a in ('echo %%l') do ( IF EXIST %TMP_DRV_LETTER%\%%a.tib ( echo DEPLOYMENT IMAGE file: %%a.tib asdcmd.exe /deploy /filename:%TMP_DRV_LETTER%\%%a.tib /harddisk:1 /target_partition:c goto end ) ELSE ( echo THE IMAGE FILE %IMG_PATH%\%%a.
Sample script setlocal SET IMG_PATH=\\image_server\images SET TMP_DRV_LETTER=h: net use %TMP_DRV_LETTER% %IMG_PATH% echo off for /f "tokens=1-13 delims= " %%a in ('ipconfig /all') do ( IF %%a EQU Physical ( for /f "tokens=1-3 delims= " %%a in ('echo %%l') do ( echo IMAGE FILE: %%a.tib asdcmd.exe /create /filename:%TMP_DRV_LETTER%\%%a.
15 Collecting system information The Acronis System Report tool collects information about a machine and saves this information to a file. You may want to provide this file when contacting Acronis technical support. The tool is available: On a machine where Acronis Snap Deploy 5 Management Console is installed. The tool collects information about that machine. Under an Acronis bootable media.