
Operation Manual

Using the Acronis Snap Deploy Management Console
Copyright © Acronis, Inc., 2000-2007 19
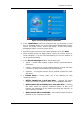
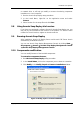
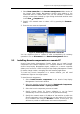
1. Select New connection in the Remote management sidebar section of
the Acronis Snap Deploy Management Console main window or the
associated menu or toolbar items. You can also establish a connection
using a context menu invoked by right-clicking the desired machine name
in the View → Computers list.
2. Specify a PC network name or select a PC by pressing the Browse…
button.
3. Enter the user name and password.
Figure 5. Establishing connection with a remote PC
You can disconnect from a remote PC after accomplishing all necessary
operations. Click on Disconnect in the Remote Management sidebar.
3.3 Installing Acronis components on a remote PC
Acronis Snap Deploy Management Console allows you to install Acronis
components onto remote computers on a corporate network. For example,
Acronis Snap Deploy Management Agent installed on a remote computer
allows you to access to it from the Acronis Snap Deploy Management Console
for master image creation, managing files and executing applications.
To install any Acronis component on a remote machine, you will need
administrator rights on the target system.
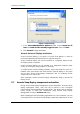
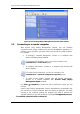
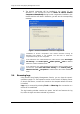
To install Acronis components:
1. Select Install Acronis components in the Acronis Snap Deploy
Management Console main window.
2. Select the installer location from the list (Registered Components,
Search removable media or Specify location).
3. Select the Acronis component you want to install.
4. Specify License Server for license validation. It can be found
automatically on the local network or can be specified manually.
5. Specify the network name or IP address of the machine on which the
Acronis component is to be installed. You can also select a PC from the
list of available ones using the Browse… button. At that point, you
will have to provide an administrator user name and password.