Acronis® Disk Director® 11 Advanced Server Quick Start Guide
Copyright © Acronis, Inc., 2000-2010. All rights reserved. “Acronis” and “Acronis Secure Zone” are registered trademarks of Acronis, Inc. "Acronis Compute with Confidence", “Acronis Startup Recovery Manager”, “Acronis Active Restore” and the Acronis logo are trademarks of Acronis, Inc. Linux is a registered trademark of Linus Torvalds. VMware and VMware Ready are trademarks and/or registered trademarks of VMware, Inc. in the United States and/or other jurisdictions.
1 Introducing Acronis® Disk Director® 11 Advanced Acronis® Disk Director® 11 Advanced is a powerful and easy-to-use tool for managing disks and volumes on local and remote machines. With a comprehensive set of operations, you can organize your hard disk and volume configuration for optimal performance, while keeping your data safe.
Disk and volume management operations Experience the vast array of disk and volume management operations: Resize, move, copy, split and merge volumes without data loss or destruction Delete volumes and clean up disks Format and label volumes, change file systems, clusters size, assign volume letters, and set volumes active Hide/unhide volumes Specify i-node density Initialize newly added hard disks Explore volume data, even on Linux volumes, before performing operations Preview cha
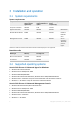
3 Installation and operation 3.1 System requirements System requirements Component Memory (above the OS and running applications) Disk space required during installation or update Disk space occupied Additional by the component(s) Complete installation 300 MB 2 GB 1.
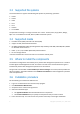
3.3 Supported file systems Acronis Disk Director supports the following file systems for performing operations: FAT16 FAT32 NTFS Ext2 Ext3 Reiser3 Linux SWAP The operations resulting in a change of volume size—that is: Create, Resize, Copy, Move, Merge, Split—are not available for the XFS, Reiser4, HPFS and JFS file systems. 3.4 Supported media Hard disk drives (HDD) and solid-state drives (SSD) USB 1.1 / 2.0 / 3.
6. Specify where to install the components. By default, the setup program will install components to the C:\Program Files\Acronis\. 7. Specify credentials for the account under which the agent service will run. By default, the setup program will create a dedicated user account for the service. 8. Confirm opening of the Microsoft Windows Firewall port. Details. Acronis Disk Director uses TCP port 9876 for local installation and for communication between components.
2. Connect the management console to the machine where the agent is installed. 3. In the Disk management view, examine the current layout of disks and volumes. 4. Add one or more management operations on disks and volumes to the queue of pending operations. These operations will take effect only after you commit them. 5. In the Disk management view, examine how the layout of disks and volumes will look when the pending operations are completed. 6. Commit the pending operations.
3.10.2 Upgrading from previous product versions Preparation If the languages of the two products are different, uninstall Acronis Disk Director 10 before installing Acronis Disk Director 11. Otherwise, the installation will fail. The procedures below assume that you have an upgrade license key, but you can also use these procedures if you have a full license key.