
User manual


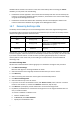


Table Of Contents
- 1 User's Guide
- 1.1 About the backup service
- 1.2 Software requirements
- 1.3 Activating the backup account
- 1.4 Accessing the backup service
- 1.5 Installing the software
- 1.6 Backup console views
- 1.7 Backup
- 1.8 Recovery
- 1.9 Operations with backups and backup plans
- 1.10 Troubleshooting
- 2 Glossary

27
databases which existed in the instance at the time of the backup. After recovering the master
database, you may need to do the following:
Databases that have appeared in the instance after the backup was done are not visible by the
instance. To bring these databases back to production, attach them to the instance manually by
using SQL Server Management Studio.
Databases that have been deleted after the backup was done are displayed as offline in the
instance. Delete these databases by using SQL Server Management Studio.
1.8.7 Recovering Exchange data
The backup service enables you to recover Exchange Server data to the original Exchange Server.
The following table summarizes the Exchange Server data that you can select for recovery and the
minimal user rights required to recover the data.
Exchange version
Data items
User rights
2003
Storage groups
Membership in the Organization Management
role group.
2007
Storage groups
Membership in the Exchange Organization
Administrators role group.
2010/2013
Databases
Membership in the Organization Management
role group.
Alternatively, you can recover the databases (storage groups) as files. The database files, along with
transaction log files, will be extracted from the backup to a folder that you specify. This can be useful
if you need to extract data for an audit or further processing by third-party tools, or when the
recovery fails for some reason and you are looking for a workaround to mount the databases
manually (p. 28).
To recover Exchange data
We will refer to both databases and storage groups as "databases" throughout this procedure.
1. Click Microsoft Exchange.
Machines with Agent for Exchange installed are shown.
2. Select the machine which originally contained the data that you want to recover.
3. Click Recovery.
4. Select a recovery point. Note that recovery points are filtered by location.
5. Click Recover Exchange data.
6. Select the data that you want to recover.
7. If you want to recover the databases as files, click Recover as files, select a local or a network
folder to save the files to, and then click Recover. Otherwise, skip this step.
8. Click Recover. If prompted, provide credentials to access the Exchange Server.
9. By default, the databases are recovered to the original ones. If the original database does not
exist, it will be recreated.
To recover a database as a different one:
a. Click the database name.
b. In Recover to, select New database.
c. Specify the new database name.