Acronis Backup & Recovery 11.
Copyright Statement Copyright © Acronis International GmbH, 2002-2012. All rights reserved. “Acronis” and “Acronis Secure Zone” are registered trademarks of Acronis International GmbH. "Acronis Compute with Confidence", “Acronis Startup Recovery Manager”, “Acronis Active Restore” and the Acronis logo are trademarks of Acronis International GmbH. Linux is a registered trademark of Linus Torvalds. VMware and VMware Ready are trademarks and/or registered trademarks of VMware, Inc.
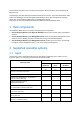
Table of contents 1 Main components ..................................................................................................................4 2 Supported operating systems .................................................................................................4 2.1 Agent..........................................................................................................................................4 2.2 Management server and management console................................
This document describes how to install and start using the advanced editions of Acronis Backup & Recovery 11.5. This document describes disk-level and file-level backup and recovery. If you need information about how to start backing up and recovering Microsoft Exchange Server data with Agent for Exchange, please refer to Acronis Backup & Recovery 11.5 Web help located at http://www.acronis.com/support/documentation/ABR11.5/index.html#18304.html. 1 Main components Acronis Backup & Recovery 11.
Windows MultiPoint Server 2010 2.2 No Yes No Management server and management console Regardless of the edition, you can install the management server and the management console on a machine running any of these operating systems: Windows XP Professional SP3 (x86, x64). Windows Server 2003/2003 R2 – the Standard, Enterprise editions (x86, x64). Windows Small Business Server 2003/2003 R2. Windows Vista – all editions except for Vista Home Basic and Vista Home Premium (x86, x64).
Below is an example of how you would distribute the components. The comments remind you which licenses are required to install each component. You do not have to enter the license key on each individual machine. Just import all the keys when installing the management server and then specify its address when installing agents. An example of distributing Acronis Backup & Recovery 11.
Install the main components of the product. Back up a machine to a USB drive. Recover a volume of a machine. Create a centralized vault in a network shared folder. Back up several machines to the vault. Back up user profiles to each machine's local folder and replicate the backups to the vault. Recover a user's documents. 5.1 Installation In this step, you will install the main components of Acronis Backup & Recovery 11.5.
7. The setup program displays the license to be used for installation. Click Next to install the agent with this license. 8. Click Register now, and then specify: The name or IP address of the management server. The user name and password of an administrator of the machine where the management server is installed. Click Next to continue. Details. The setup program will automatically register the machine on the management server. Or, you can add the machine to the management server later. 9.
Details. By default, all of the machine's disks are selected. If you want to back up specific disks, volumes, or files, click Items to back up and select the necessary objects. Also, you may want to exclude the USB drive from the backup. 3. Under Where to back up, click Location. In Path, type the path to a folder on the USB drive. Or, you can select this folder in the tree. Click OK to confirm your selection. 4. Click OK to immediately start the backup. Details.
5.4.2 Backing up several machines In this step, you will create and run a centralized backup plan to back up several machines registered on the management server. 1. 2. 3. 4. 5. 6. 7. 8. 9. Connect the console to the management server. Click Create backup plan. Under What to back up, click Items to back up. Expand the Management Server node, expand the Machines with agents node, and then expand the All Machines node. Select the check boxes next to the machines you want to back up.
b. In the Path field, type the path to the local folder to store the backups. Click OK to confirm your selection. c. Specify an archive name other than the default one (for example, [Machine_Name]_Files). Do not remove the [Machine_Name] variable from the archive name. Details. A different name is required because the centralized vault where the backups will be replicated to already contains archives with default names. 6.
10. By default, the software overwrites the existing files with the files stored in the backup. Please, close all applications that use any of the target folder's files. Otherwise, overwriting will not be possible and the software may require a reboot. 11. Click OK to immediately start the recovery. Details. You will see the window with the recovery progress and details. 6 What to read next The Quick Start Guide gives you an idea of the product usage and enables immediate "field testing".