Acronis® Backup & Recovery ™ 10 Workstation User's Guide
Copyright © Acronis, Inc., 2000-2009. All rights reserved. “Acronis” and “Acronis Secure Zone” are registered trademarks of Acronis, Inc. "Acronis Compute with Confidence", “Acronis Startup Recovery Manager”, “Acronis Active Restore” and the Acronis logo are trademarks of Acronis, Inc. Linux is a registered trademark of Linus Torvalds. VMware is a registered trademark of VMware, Inc. Windows and MS-DOS are registered trademarks of Microsoft Corporation.
Table of Contents 1. Introducing Acronis® Backup & Recovery™ 10 ......................................................... 6 1.1. Acronis Backup & Recovery 10 overview ............................................................................ 6 1.2. Getting started .................................................................................................................... 6 1.2.1. 1.3. 1.3.1. 1.3.2. 1.3.3. Using the management console .........................................................
. Vaults .................................................................................................................. 80 4.1. 4.1.1. 4.1.2. 4.2. 4.2.1. 4.2.2. 4.2.3. 4.2.4. 5. Personal vaults .................................................................................................................. 81 Working with the "Personal vault" view .................................................................................................. 81 Actions on personal vaults .......................
6.4.1. 6.4.2. 6.4.3. 6.4.4. 6.4.5. 6.4.6. 6.5. 6.5.1. 6.5.2. 6.5.3. 6.5.4. Task credentials........................................................................................................................................157 Archive selection ......................................................................................................................................157 Backup selection ..........................................................................................................
1. Introducing Acronis® Backup & Recovery™ 10 1.1. Acronis Backup & Recovery 10 overview Based on Acronis’ patented disk imaging and bare metal restore technologies, Acronis Backup & Recovery 10 succeeds Acronis True Image Echo as the next generation disaster recovery solution.
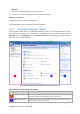
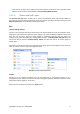
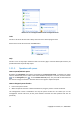
Windows Start the console by selecting it from the start menu. 3. Connect the console to the machine where the agent is installed. Where to go from here For what to do next see "Basic concepts (p. 17)". For understanding of the GUI elements see the next section. 1.2.1. Using the management console As soon as the console connects to a managed machine (p. 215) or to a management server (p.
Main area The main place of working, where you create, edit and manage backup plans, policies, tasks and perform other operations. Displays the different views and action pages (p. 11) depending on items selected in the menu, Navigation tree, or on the Actions and Tools pane. Menu bar Appears across the top of the program window and lets you perform all the operations, available on both panes. Menu items change dynamically.
If the console and agent are installed on the same machine, the shortcut to this machine will be added to the shortcuts bar automatically as Local machine [Machine name]. 1.2.1.2. "Actions and tools" pane The Actions and tools pane enables you to easily and efficiently work with Acronis Backup & Recovery 10. The pane's bars provide quick access to program's operations and tools. All items of the Actions and tools bar are duplicated in the program menu.
"Actions" bar on a managed machine and on a management server Tools Contains a list of the Acronis tools. Always the same across all the program views. All the tools can also be accessed in the Tools menu. "Tools" bar Help Contains a list of help topics. Different views and action pages of Acronis Backup & Recovery 10 provided with lists of specific help topics. 1.2.1.3.
1.2.1.4. Main area, views and action pages The main area is a basic place where you work with the console. Here you create, edit and manage backup plans, policies, tasks and perform other operations. The main area displays different views and action pages according the items you select in the menu, Navigation tree, or on the Actions and Tools pane. Views A view appears on the main area when clicking any item in the Navigation tree in the Navigation pane (p. 8).
Action pages An action page appears in the main area when clicking any action item in the Actions menu, or in the Actions bar on the Actions and tools pane. It contains steps you need to perform in order to create and launch any task, or a backup plan, or backup policy. Action page - Create backup plan Using controls and specifying settings The action pages offer two ways of representation: basic and advanced. The basic representation hides such fields as credentials, comments, etc.
Acronis Backup & Recovery 10 remembers the changes you made on the action pages. For example, if you started to create a backup plan, and then for any reason switched to another view without accomplishing the plan creation, you can click the Back navigation button on the menu. Or, if you have passed several steps forward, click the Down arrow and select the page where you started the plan creation from the list. Thus, you can perform the remaining steps and accomplish the backup plan creation.
File backup File-level data protection is based on backing up files and folders residing on the machine where the agent is installed or on a network share. Files can be recovered to their original location or to another place. It is possible to recover all files and folders that were backed up or select which of them to recover.
1.3.3. Management Console Acronis Backup & Recovery 10 Management Console is an administrative tool for local access to Acronis Backup & Recovery 10 agent. 1.4.
1.6. Hardware requirements This section lists the minimum and recommended hardware requirements to install and run Acronis Backup & Recovery 10 components.
2. Understanding Acronis Backup & Recovery 10 This section attempts to give its readers a clear understanding of the product so that they can use the product in various circumstances without step-by-step instructions. 2.1. Basic concepts Please familiarize yourself with the basic notions used in the Acronis Backup & Recovery 10 graphical user interface and documentation. Advanced users are welcome to use this section as a step-by-step quick start guide. The details can be found in the context help.
The following diagram illustrates the notions discussed above. For more definitions please refer to the Glossary. 18 Copyright © Acronis, Inc.
Backup using bootable media You can boot the machine using the bootable media, configure the backup operation in the same way as a simple backup plan and execute the operation. This will help you extract files and logical volumes from a system that failed to boot, take an image of the offline system or back up sector-by-sector an unsupported file system. Recovery under operating system When it comes to data recovery, you create a recovery task on the managed machine.
The following diagram illustrates data recovery under the operating system (online). No backup can proceed on the machine while the recovery operation is taking place. If required, you can connect the console to another machine and configure a recovery operation on that machine. This ability (remote parallel recovery) first appeared in Acronis Backup & Recovery 10; the previous Acronis products do not provide it.
If the machine fails to boot or you need to recover data to bare metal, you boot the machine using the bootable media and configure the recovery operation in the same way as the recovery task. The following diagram illustrates the recovery using the bootable media. 2.2. Full, incremental and differential backups Acronis Backup & Recovery 10 provides the capability to use popular backup schemes, such as Grandfather-Father-Son and Tower of Hanoi, as well as to create custom backup schemes.
It is widely accepted that a full backup is the slowest to do but the fastest to restore. With Acronis technologies, recovery from an incremental backup may be not slower than recovery from a full one. A full backup is most useful when: • • you need to roll back the system to its initial state this initial state does not change often, so there is no need for regular backup.
specifications of the devices, the backup/recovery options you set, to name a few. Practice is the best guide to selecting the optimal backup scheme. Parameter Full backup Differential backup Incremental backup Storage space Maximal Medium Minimal Creation time Maximal Medium Minimal Recovery time Minimal Medium Maximal 2.3. User privileges on a managed machine When managing a machine running Windows, the scope of a user's management rights depends on the user's privileges on the machine.
Managing a plan (task) owned by another user Having Administrator privileges on the machine, a user can modify tasks and local backup plans owned by any user registered in the operating system. When a user opens a plan or task for editing, which is owned by another user, all passwords set in the task are cleared. This prevents the "modify settings, leave passwords" trick. The program displays a warning each time you are trying to edit a plan (task) last modified by another user.
2.5. GFS backup scheme This section covers implementation of the Grandfather-Father-Son (GFS) backup scheme in Acronis Backup & Recovery 10. With this backup scheme you are not allowed to back up more often than once a day. The scheme enables you to mark out the daily, weekly and monthly cycles in your daily backup schedule and set the retention periods for the daily, monthly and weekly backups.
Weekly/Monthly This step forms the daily, weekly and monthly cycles in the schedule. Select a day of the week from the days selected in the previous step. Each 1st, 2nd and 3rd backup created on this day of the week will be considered as a weekly backup. Each 4th backup created on this day of the week will be considered as a monthly backup. Backups created on the other days will be considered as daily backups. Assume you select Friday for Weekly/Monthly backup.
Keep backups: Monthly This step defines the retention rule for monthly backups. The cleanup task will run after each monthly backup and delete all monthly backups that are older than you specify. The monthly backups’ retention period cannot be less than the weekly backups’ retention period. It is usually set several times longer. You have the option to keep the monthly backups infinitely.
Starting from the third week, weekly backups will be regularly deleted. After 6 months, monthly backups will start to be deleted. The diagram for weekly and monthly backups will look similar to the week-based timescale. The resulting archive: real In reality, the archive content will somewhat differ from the ideal scheme. When using the incremental and differential backup methods, you cannot delete a backup as soon as the scheme requires if later backups are based on this backup.
2.6. Tower of Hanoi backup scheme The need to have frequent backups always conflicts with the cost of keeping such backups for a long time. The Tower of Hanoi (ToH) backup scheme is a useful compromise. Tower of Hanoi overview The Tower of Hanoi scheme is based on a mathematical puzzle of the same name. In the puzzle a series of rings are stacked in size order, the largest on the bottom, on one of three pegs. The goal is to move the ring series to the third peg.
Tower of Hanoi by Acronis The Tower of Hanoi backup scheme is generally too complex to mentally calculate the next media to be used. But Acronis Backup & Recovery 10 provides you with automation of the scheme usage. You can set up the backup scheme while creating a backup plan.
For information about using Tower of Hanoi for tape libraries, see Using the Tower of Hanoi tape rotation scheme. 2.7. Retention rules The backups produced by a backup plan make an archive. The two retention rules described in this section enable you to limit the archive size and set the lifetime (retention period) of the backups. 1. Delete backups older than This is a time interval counted back from the moment when the retention rules are applied.
There is a certain risk that all but one backup will be deleted if the maximum archive size is set improperly (too small) or a regular backup turns out to be too large. To protect the recent backups from deletion, select the Never delete backups younger than check box and specify the maximum age of backups that must be retained. The diagram below illustrates the resulting rule. Combination of rules 1 and 2 You can limit both the backups’ lifetime and the archive size.
• Retain the backup until all dependent backups become subject to deletion The outdated backup will be kept until all backups that depend on it also become outdated. Then all the chain will be deleted at once during the regular cleanup. This mode helps to avoid the potentially time-consuming consolidation but requires extra space for storing backups whose deletion is postponed. The archive size and/or the backup age can exceed the values you specify.
Acronis Backup & Recovery 10 can back up and recover dynamic volumes and, with minor limitations, basic GPT volumes. Backing up dynamic volumes Dynamic and basic GPT volumes are backed up in the same way as basic MBR volumes. When creating a backup plan through the GUI, all types of volumes are available for selection as Items to back up. When using the command line, specify the dynamic and GPT volumes with the DYN prefix.
o o If the data size is less than 20GB, then one disk can hold, say, 10GB; the other will hold the remaining 10GB. This way, a striped volume will be created on both disks and 20GB on the second disk will remain unallocated. If the data size is more than 20GB, the data cannot be distributed evenly between the two disks, but can fit into a single simple volume. A simple volume accommodating all the data will be created on the second disk. The first disk will remain untouched.
2.9. Tape support Acronis Backup & Recovery 10 supports tape libraries, autoloaders, SCSI and USB tape drives as storage devices. A tape device can be locally attached to a managed machine (in this case, the Acronis Backup & Recovery 10 Agent writes and reads the tapes) or accessed through the Acronis Backup & Recovery 10 Storage Node. Storage nodes ensure fully automatic operation of tape libraries and autoloaders. Backup archives created using different ways of access to tape have different formats.
Tape written on a tape device through... Backup Server Storage Node 2.9.2. ATIE 9.1 + + + + ATIE 9.5 - - - + ATIE 9.7 - - - + ABR10 - - - + Using a single tape drive A tape drive that is locally attached to a managed machine can be used by local backup plans as a storage device. The functionality of a locally attached autoloader or tape library is limited to the ordinary tape drive.
Recovery from a locally attached tape device Before creating a recovery task, insert or mount the tape containing the backup you need to recover. When creating a recovery task, select the tape device from the list of available locations and then select the backup. After recovery is started, you will be prompted for other tapes if the tapes are needed for recovery. 2.10.
With the new Acronis Secure Zone behavior, you obtain the ability to: • • list archives located in the zone and backups contained in each archive • • mount a disk backup to copy files from the backup to a physical disk examine a backup's content safely delete archives and backups from the archives. For more information about operations available in Acronis Secure Zone, see the Personal vaults (p. 81) section.
2.10.3. Universal Restore (Acronis Backup & Recovery 10 Universal Restore) Acronis Backup & Recovery 10 Universal Restore is the Acronis proprietary technology that helps recover and boot up Windows on dissimilar hardware or a virtual machine. The Universal Restore handles differences in devices that are critical for the operating system start-up, such as storage controllers, motherboard or chipset.
Universal Restore relies on the built-in Plug and Play discovery and configuration process to handle hardware differences in devices that are not critical for the system start, such as video, audio and USB. Windows takes control over this process during the logon phase, and if some of the new hardware is not detected, you will have a chance to install drivers for it later manually. Universal Restore and Microsoft Sysprep Universal Restore is not a system preparation tool.
Limitation The only supported archive location is a local drive, or more precisely, any device available through the machine’s BIOS. This may be Acronis Secure Zone, a USB hard drive, a flash drive or any internal hard drive. How it works When configuring a recovery operation, you select disks or volumes to recover from a backup. Acronis Backup & Recovery 10 scans the selected disks or volumes in the backup.
4. Configure the system recovery: select the system disk or volume and select the Use Acronis Active Restore check box. Acronis Active Restore will choose for the boot-up and subsequent recovery the first operating system found during the backup scan. Do not try to recover more than one operating system using Active Restore if you want the result to be predictable. When recovering a multi-boot system, choose only one system volume and boot volume at a time. 5.
3. Options This section covers Acronis Backup & Recovery 10 options that can be configured using Graphical User Interface. The content of this section is applicable to both stand-alone and advanced editions of Acronis Backup & Recovery 10. 3.1. Console options The console options define the way information is represented in the Graphical User Interface of Acronis Backup & Recovery 10. To access the console options, select Options > Console options from the top menu. 3.1.1.
The option defines whether to display the pop-up messages about task run results: successful completion, failure or success with warnings. When displaying of pop-up messages is disabled, you can review the task execution states and results in the Tasks view. The preset is: Enabled for all results. To make a setting for each result (successful completion, failure or success with warnings) individually, select or clear the respective check box. 3.1.3.
3.1.5. Fonts This option is effective when the console is connected to a managed machine or to the management server. The option defines the fonts to be used in the Graphical User Interface of Acronis Backup & Recovery 10. The Menu setting affects the drop-down and context menus. The Application setting affects the other GUI elements. The preset is: System Default font for both the menus and the application interface items.
You can further override the settings set in the default backup and recovery options, when creating a backup plan or a recovery task. The settings you obtain in this case will be plan-specific or taskspecific. The preset is: Disabled. To enable this option, select the Log events check box. Use the Types of events to log check box to filter the events to be logged in the Application Event Log of Windows: o o o All events - all events (information, warnings and errors) Errors and warnings Errors only.
o Community – type the name of the SNMP community to which both the host running SNMP management application and the sending machine belong. The typical community is "public". To disable sending SNMP messages, clear the Send messages to SNMP server check box. The messages are sent over UDP. The next section contains additional information about Setting up SNMP services on the receiving machine (p. 48). 3.2.1.3.
3.3. Default backup and recovery options 3.3.1. Default backup options Each Acronis agent has its own default backup options. Once an agent is installed, the default options have pre-defined values, which are referred to as presets in the documentation. When creating a backup plan, you can either use a default option, or override the default option with the custom value that will be specific for this plan only.
Backup priority (p. 58) + + - - HDD writing speed (p. 59) Dest: HDD Dest: HDD Dest: HDD Dest: HDD Network connection speed (p. 59) Dest: network share Dest: network share Dest: network share Dest: network share Fast incremental/differential backup (p. 63) + - + - Backup splitting (p. 63) + + + + Preserve files’ security settings in archives - + - - In archives, store encrypted files in decrypted state - + - - Media components (p.
Reboot after the backup - - + + E-mail (p. 60) + + - - Win Pop-up (p. 61) + + - - Windows events log (p. 61) + + - - SNMP (p. 62) + + - - Notifications: Event tracing: 3.3.1.1. Archive protection This option is effective for Windows and Linux operating systems and bootable media. This option is effective for both disk-level and file-level backup. The preset is: Disabled. To protect the archive from unauthorized access 1. Select the Set password for the archive check box. 2.
The option defines which files and folders to skip during the backup process and thus exclude from the list of backed-up items. The preset is: Exclude files matching the following criteria: *.tmp, *.~, *.bak. To specify which files and folders to exclude: Set up any of the following parameters: • Exclude all hidden files and folders Select this check box to skip files and folders with the Hidden attribute.
The following scheme illustrates when pre/post commands are executed. Pre-backup command Backup Post-backup command Examples of how you can use the pre/post commands: • • • delete some temporary files from the disk before starting backup configure a third-party antivirus product to be started each time before the backup starts copy an archive to another location after the backup ends. The program does not support interactive commands, i.e. commands that require user input (for example, "pause").
successfully executed. Fail the task if the command execution fails. execution failure or success. execution and irrespective of the command execution result. Post-backup command To specify a command/executable file to be executed after the backup is completed 1. In the Command field, type a command or browse to a batch file. 2. In the Working directory field, specify a path to a directory where the command/batch file will be executed. 3.
To specify pre/post data capture commands 1. Enable pre/post data capture commands execution by checking the following options: o Execute before the data capture o Execute after the data capture 2. Do any of the following: o Click Edit to specify a new command or a batch file o Select the existing command or the batch file from the drop-down list 3. Click OK. Pre-data capture command To specify a command/batch file to be executed before data capture 1.
3. In the Arguments field specify the command’s execution arguments, if required. 4. Depending on the result you want to obtain, select the appropriate options as described in the table below. 5. Click Test command to check if the command is correct.
3.3.1.6. Multi-volume snapshot This option is effective only for Windows operating systems. This option applies to disk-level backup. This option also applies to file-level backup when the filelevel backup is performed by taking a snapshot. (The File-level backup snapshot (p. 56) option determines whether a snapshot will be taken during file-level backup). The option determines whether to take snapshots of multiple volumes at the same time or one by one. The preset is: Enable.
vssadmin list writers Note: In Microsoft Windows Small Business Server 2003, the writer for Microsoft Exchange Server 2003 is turned off by default. For instructions on how to turn it on, see the corresponding Microsoft Help and Support article http://support.microsoft.com/kb/838183/en. 3.3.1.8. Compression level This option is effective for Windows and Linux operating systems and bootable media. The option defines the level of compression applied to the data being backed up. The preset is: Normal.
To specify the backup process priority Select one of the following: • Low – to minimize resources taken by the backup process, leaving more resources to other processes running on the machine • Normal – to run the backup process with normal speed, allocating resources on a par with other processes • High – to maximize the backup process speed by taking resources from other processes. HDD writing speed This option is effective for Windows and Linux operating systems and bootable media.
• Click Transferring speed stated in kilobytes per second, and then enter the bandwidth limit for transferring backup data in kilobytes per second. 3.3.1.10. Notifications Acronis Backup & Recovery 10 provides the ability of notifying users about backup completion through e-mail or the messaging service. E-mail This option is effective for Windows and Linux operating systems. This option is not available when operating under the bootable media.
• • Port – set the port of the SMTP server. By default, the port is set to 25. • Password – enter the password. User name – enter the user name. 6. Click Send test e-mail message to check if the settings are correct. Messenger service (WinPopup) This option is effective for Windows and Linux operating systems on the sending machine and only for Windows on the receiving machine. This option is not available when operating under bootable media.
The preset is: Use the setting set in the Machine options. To select whether to log the backup operations events in the Application Event Log of Windows: Choose one of the following: • Use the setting set in the Machine options – to use the setting specified for the machine. For more information refer to Machine options (p. 46). • Log the following event types – to log events of the backup operations in the Application Event Log.
Click Send test message to check if the settings are correct. • Do not send SNMP notifications – to disable sending the log events of the backup operations to SNMP managers. 3.3.1.12. Fast incremental/differential backup The option is effective in Windows and Linux operating systems and bootable media. This option is effective for incremental and differential disk-level backup.
Fixed size Enter the desired file size or select it from the drop-down list. The backup will then be split into multiple files of the specified size. This comes in handy when creating a backup that you plan to burn to multiple CDs or DVDs later on. You might also want to split the backup destined to an FTP server, since data recovery directly from an FTP server requires the backup to be split into files no more than 2GB in size. 3.3.1.14.
When backing up to removable media, you can make this media work as regular Linux-based bootable media (p. 209) by writing additional components to it. As a result, you will not need a separate rescue disc. The preset is: None selected. Select the check boxes for the components you want to put on the bootable media: • One-Click Restore is the minimal addition to a disk backup stored on removable media, allowing for easy recovery from this backup.
Ignore bad sectors The preset is: Disabled. When the option is disabled, the program will display a pop-up window each time it comes across a bad sector and ask for a user decision as to whether to continue or stop the backup procedure. In order to back up the valid information on a rapidly dying disk, enable ignoring bad sectors. The rest of the data will be backed up and you will be able to mount the resulting disk backup and extract valid files to another disk. 3.3.1.17.
This option determines the program behavior in case a backup task is about to start (the scheduled time comes or the event specified in the schedule occurs), but the condition (or any of multiple conditions) is not met. For more information on conditions please see Scheduling (p. 87) and Conditions (p. 97). The preset is: Wait until the conditions are met.
This option is not available when operating under the bootable media. This option determines the program behavior when any of the backup plan's tasks fails. The preset is not to restart a failed task. The program will try to execute the failed task again if you select the Restart a failed task check box and specify the number of attempts and the time interval between the attempts.
Ask for the first media while backing up to removable media This option is effective only when backing up to removable media. The option defines whether to display the Insert First Media prompt when backing up to removable media. The preset is: Enabled. When the option is enabled, backing up to removable media may be not possible if the user is away, because the program will wait for someone to press OK in the prompt box. Hence, you should disable the prompt when scheduling a backup to removable media.
The preset is: Disabled. Enabling this option turns off deduplicating backups at source, meaning that deduplication will be performed by Acronis Backup & Recovery 10 Storage Node after the backup is saved to the vault (this is called deduplication at target). Turning off deduplication at source may lead to faster backup processes but greater network traffic and heavier load of the storage node. The eventual size of the backup in the vault is independent of whether deduplication at source is turned on.
• • The environment the agent operates in (Windows, bootable media) • The operating system being recovered from the disk backup The type of data being recovered (disk, file) The following table summarizes the availability of the recovery options. Agent for Windows Bootable media (Linux-based or PEbased) Disk recovery File recovery Disk recovery (also from a disk backup) File recovery (also from a disk backup) Pre/Post recovery commands (p. 72) + + PE only PE only Recovery priority (p.
Event tracing: Windows events log (p. 76) + + - - SNMP (p. 76) + + - - 3.3.2.1. Pre/Post commands This option is effective for Windows and Linux operating systems and PE-based bootable media. The option enables you to define the commands to be automatically executed before and after the data recovery.
Check box Selection Fail the task if the command execution fails Selected Cleared Selected Cleared Do not recover until the command execution is complete Selected Selected Cleared Cleared Perform the recovery after the command is executed despite execution failure or success. N/A Result Preset Perform the recovery only after the command is successfully executed. Fail the task if the command execution failed.
To specify the recovery process priority Select one of the following: • Low – to minimize resources taken by the recovery process, leaving more resources to other processes running on the machine • Normal – to run the recovery process with normal speed, allocating resources on a par with other processes • High – to maximize the recovery process speed by taking resources from the other processes. 3.3.2.3.
5. Click Additional e-mail parameters, to configure additional e-mail parameters as follows, then click OK: o From - type the e-mail address of the user from whom the message will be sent. If you leave this field empty, messages will be constructed as if they are from the destination address. o Use encryption – you can opt for encrypted connection to the mail server. SSL and TLS encryption types are available for selection.
The When user interaction is required check box – to send notification during the operation when user interaction is required – is always selected. 4. Click Send Test WinPopup Message to check if the settings are correct. 3.3.2.5. Event tracing It is possible to duplicate log events of the recovery operations, performed on the managed machine, in the Application Event Log of Windows; or send the events to the specified SNMP managers.
The preset is: Use the setting set in the Machine options. To select whether to send the recovery operations events to the SNMP managers: Choose one of the following: • Use the setting set in the Machine options – to use the setting specified for the machine. For more information refer to Machine options (p. 46). • Send SNMP notifications individually for recovery operation events – to send the events of the recovery operations to the specified SNMP managers.
3.3.2.7. Additional settings Specify the additional settings for the recovery operation by selecting or clearing the following check boxes. Set current date and time for recovered files This option is effective only when recovering files. The preset is Enabled. This option defines whether to recover the files’ date and time from the archive or assign the files the current date and time. Validate backup before recovery The preset is Disabled.
Acronis Backup & Recovery 10 can generate an unique security identifier (SID) for the recovered system. You do not need a new SID when recovering a system over itself or when creating a system replica that will replace the original system. Generate a new SID if the original and the recovered systems will work concurrently in the same workgroup or domain. Use FTP in Active mode The preset is: Disabled.
4. Vaults A vault is a location for storing backup archives. For ease of use and administration, a vault is associated with the archives' metadata. Referring to this metadata makes for fast and convenient operations with archives and backups stored in the vault. A vault can be organized on a local or networked drive, detachable media or a tape device attached to the Acronis Backup & Recovery 10 Storage Node. There are no settings for limiting a vault size or number of backups in a vault.
Click any personal vault in the vaults tree to open the detailed view of this vault (p. 81) and to take actions on the vault (p. 82), archives (p. 84) and backups (p. 85) stored in there. 4.1. Personal vaults A vault is called personal if it was created using direct connection of the console to a managed machine. Personal vaults are specific for each managed machine. Personal vaults are visible to any user that can log on to the system.
The legend displays the following information about the vault: • • full path to the vault • the ratio of the occupied space to the original data size. total number of archives and backups stored in the vault Vault content The Vault content section contains the archives table and toolbar. The archives table displays archives and backups that are stored in the vault. Use the archives toolbar to perform actions on the selected archives and backups.
Change user account for accessing a vault Click Change user. In the appearing dialog box, provide the credentials required for accessing the vault. Create Acronis Secure Zone Click Explore a vault's content Click Create Acronis Secure Zone. The procedure of creating the Acronis Secure Zone is described in-depth in the Creating Acronis Secure Zone (p. 170) section. Explore. In the appearing Explorer window, examine the selected vault's content. Validate a vault Click Validate.
How can I merge two vaults? Suppose you have two vaults A and B in use. Both vaults are used by backup plans. You decide to leave only vault B, moving all the archives from vault A there. To do this, proceed as follows 1. Make sure that none of the backup plans uses vault A while merging, or temporarily disable (p. 111) schedules of the given plans. 2. Move the archives to vault B manually by means of a third-party file manager. 3.
The program duplicates your selection in the new window that has check boxes for each archive and each backup. Review the selection and correct if need be, then confirm the deletion. 4.2.2. Operations with backups To perform any operation with a backup, you have to select it first. To select a backup, expand the archive, then click the backup. If the archive is protected with a password, you will be asked to provide it.
4.2.3. Deleting archives and backups The Backups deletion window displays the same tab as for the vaults view, but with check boxes for each archive and backup. The archive or backup you have chosen to delete has the check mark. Review the archive or backup that you have selected to delete. If you need to delete other archives and backups select the respective check boxes, then click Delete selected and confirm the deletion. The filters in this window are from the archives list of the vault view.
5. Scheduling Acronis scheduler helps the administrator adapt backup plans to the company’s daily routine and each employee’s work style. The plans’ tasks will be launched systematically keeping the critical data safely protected. The scheduler uses local time of the machine the backup plan exists on. Before creating a schedule, be sure the machine’s date and time settings are correct. Schedule To define when a task has to be executed, you need to specify an event or multiple events.
The scheduler behavior, in case the event occurs but the condition (or any of multiple conditions) is not met is defined by the Task start conditions (p. 66) backup option. What-ifs • What if an event occurs (and a condition, if any, is met) while the previous task run has not completed? The event will be ignored. • What if an event occurs while the scheduler is waiting for the condition required by the previous event? The event will be ignored.
Examples "Simple" daily schedule Run the task every day at 6PM. The schedule's parameters are thus set up as follows. 1. Every: 1 day(s). 2. Once at: 06:00:00 PM. 3. Effective: From: not set. The task will be started on the current day, if it has been created before 6PM. If you have created the task after 6 PM, the task will be started for the first time on the next day at 6 PM. To: not set. The task will be performed for an indefinite number of days.
The obvious way is to add five simple schedules. If you spend one minute for examination, you can think out a more optimal way. As you can see, the time interval between the first and the second task's recurrences is 4 hours, and between the third, fourth and fifth is 2 hours. In this case, the optimal way is to add two schedules to the task. First daily schedule 1. Every: 3 day(s). 2. Every: 4 hours. From: 08:00:00 AM Until: 12:00:00 PM. 3. Effective: From: 09/20/2009. To: not set. Second daily schedule 1.
Advanced scheduling settings are available only for machines registered on Acronis Backup & Recovery 10 Management Server. To specify these settings, click Change in the Advanced settings area. All the settings you made are displayed in the Result field at the bottom of the window. Examples "One day in the week" schedule Run the task every Friday at 10PM, starting from a certain date (say 05/14/2009) and ending after six months. The schedule's parameters are thus set up as follows. 1.
Several weekly schedules for one task In the case when the task needs to be run on different days of the weeks with different time intervals, consider adding a dedicated schedule to every desired day of the week, or to several days. For example, you need the task to be run with the following schedule: • • • • Monday: twice at 12 PM (noon) and 9 PM • • • Friday: twice at 12 PM and 9 PM (i.e.
To specify a monthly schedule In the Schedule area, select the appropriate parameter as follows: Months: <...> Select a certain month(s) you want to run the task in. Days: <...> Select specific days of the month to run the task on. You can also select the last day of the month, irrespective of its actual date. On: <...> <...> Select specific days of the weeks to run the task on. In the During the day execute the task... area, select one of the following: Once at: <...
"Season" schedule Run the task on all workdays during the northern autumn seasons of 2009 and 2010. During a workday, the task is performed every 6 hours from 12 AM (midnight) till 6 PM. The schedule's parameters are set up as follows. 1. Months: September, October, November. 2. On: . 3. Every: 6 hours. From: 12:00:00 AM Until: 06:00:00 PM. 4. Effective: From: 08/30/2009. Actually the task will be started on the first workday of September.
From: 11/01/2009. To: not set. Third schedule 1. Months: June, July, August. 2. Days: 1, 15. 3. Once at: 10:00:00 PM. 4. Effective: From: 11/01/2009. To: not set. 5.4. At Windows Event Log event This type of schedule is effective only in Windows operating systems. You can schedule a backup task to start when a certain Windows event has been recorded in one of the event logs such as the Application, Security, or System log.
When Windows detects a bad block on a hard disk, it records an event with the event source disk and the event number 7 into the System log; the type of this event is Error. When creating the plan, type or select the following in the Schedule area: • • • • Log name: System Event source: disk Event type: Error Event ID: 7 Important: To ensure that such a task will complete despite the presence of bad blocks, you must make the task ignore bad blocks.
3. In the Event Properties dialog box, view the event's properties such as the event source, shown in the Source field; and the event number, shown in the Event ID field. When you are finished, click OK to close the Event Properties dialog box. 5.5. Conditions Conditions add more flexibility to the scheduler, enabling to execute backup tasks with respect to certain conditions.
Example: Run the backup task on the managed machine every day at 9PM, preferably when the user is idle. If the user is still active by 11PM, run the task anyway. • Event: Daily, every 1 day(s); Once at: 09:00:00 PM. • • Condition: User is idle. Task start conditions: Wait until the conditions are met, Run the task anyway after 2 hour(s). As a result, (1) If the user becomes idle before 9PM, the backup task will start at 9PM.
Example A company uses different locations on the same network-attached storage for backing up users data and servers. The workday starts at 8AM and ends at 5 PM. Users' data should be backed up as soon as the users log off, but not earlier than 4:30 PM and not later than 10 PM. Every day at 11 PM the company's servers are backed up. So, all the users' data should be preferably backed up before this time, in order to free network bandwidth.
• • Event: Monthly, Months: ; On: , ; Once at 08:00:00 PM. • Task start conditions: Wait until the conditions are met, Run the task anyway after 3 hour(s). Condition: User logged off. As a result, (1) If all users are logged off at 8PM, the backup task will start at 8PM. (2) If the last user logs off between 8PM and 11PM, the backup task will start immediately after the user has logged off. (3) If any of the users is still logged on at 11PM, the backup task starts anyway.
6. Direct management This section covers operations that can be performed directly on a managed machine by using the direct console-agent connection. The content of this section is applicable to both stand-alone and advanced editions of Acronis Backup & Recovery 10. 6.1. Administering a managed machine This section describes the views that are available through the navigation tree of the console connected to a managed machine, and explains how to work with each view. 6.1.1.
Bootable media was not created Create now To be able to recover an operating system when the machine fails to boot, you must: 1 Back up the system volume (and the boot volume, if it is different) 2 Create at least one bootable media (p. 209). Create now will launch the Bootable Media Builder (p. 216). No backups have been created for X days Back up now The Dashboard warns you that no data was backed up on the machine for a relatively long period of time.
If you select the check box for the Do not show this window when tasks require interaction. I will see this information in the tasks' details and dashboard. parameter, the tasks will be displayed on the Dashboard among other alerts and warnings. Alternatively, you can review the task execution states in the Backup plans and tasks (p. 103) view and specify your decision on each task in the Information panel (or in the Task details (p. 111) window). 6.1.2.
1 State How it is determined How to handle Need interaction At least one task needs user interaction. Identify the tasks that need interaction (the program will display what action is needed) -> Stop the tasks or enable the tasks to run (change media; provide additional space on the vault; ignore the read error; create the missing Acronis Secure Zone). Otherwise, see 2. 2 Running At least one task is running. No action is required. Otherwise, see 3. 3 Waiting At least one task is waiting.
2 Warning At least one task has succeeded with warnings. View the log to read the warnings -> [optionally] Perform actions to prevent the future warnings or failure. Otherwise, see 3. 3 OK All the tasks are completed successfully. No action is required. Note that a backup plan can be OK in case none of the tasks has been started yet or some of the tasks are stopped or being stopped. These situations are considered as normal.
Task state diagram Task statuses A task can have one of the following statuses: Error; Warning; OK. A task status is derived from the result of the last run of the task.
6.1.2.2. Working with backup plans and tasks Actions on backup plans and tasks The following is a guideline for you to perform operations with backup plans and tasks. To Do Create a new backup plan, or a task Click View details of a plan/task New, then select one of the following: • Backup plan (p. 116) • Recovery task (p. 137) • Validation task (p. 156) Backup plan Click View details. In the Plan Details (p. 113) window, review the plan details. Task View details.
Stop a plan/task Backup plan Click Stop. Stopping the running backup plan stops all its tasks. Thus, all the task operations will be aborted. Task Click Stop. What will happen if I stop the task? Generally, stopping the task aborts its operation (backup, recovery, validation, exporting, conversion, migration). The task enters the Stopping state first, then becomes Idle. The task schedule, if created, remains valid. To complete the operation you will have to run the task over again.
Edit a plan/task Backup plan Click Edit. Backup plan editing is performed in the same way as creation (p. 116), except for the following limitations: It is not always possible to use all scheme options, when editing a backup plan if the created archive is not empty (i.e. contains backups). 1 It is not possible to change the scheme to Grandfather-Father-Son or Tower of Hanoi. 2 If the Tower of Hanoi scheme is used, it is not possible to change the number of levels.
Delete a plan/task Backup plan Click Delete. What will happen if I delete the backup plan? The plan's deletion deletes all its tasks. Why can't I delete the backup plan? • The backup plan is in the "Running" state A backup plan cannot be deleted, if at least one of its tasks is running. • Do not have the appropriate privilege Without the Administrator's privileges on the machine, a user cannot delete plans owned by other users. • The backup plan has a centralized origin.
Configuring backup plans and the tasks table By default, the table has six columns that are displayed, others are hidden. If required, you can hide the displayed columns and show hidden ones. To show or hide columns 1. Right-click any column header to open the context menu. The menu items that are ticked off correspond to column headers presented in the table. 2. Click the items you want to be displayed/hidden.
Recovery (disk) Disk backup recovery Recovery (file) File and folder recovery Recovery (volume) Recovery of volumes from a disk backup Recovery (MBR) Master boot record recovery Recovery (disk to existing VM) Recovery of a disk/volume backup to an existing virtual machine Recovery (disk to new VM) Recovery of a disk/volume backup to a new virtual machine Recovery (existing VM) Recovery of a virtual machine backup to an existing virtual machine Recovery (new VM) Recovery of a virtual machine b
Backup plan details The Backup plan details window (also duplicated on the Information panel) aggregates in four tabs all the information on the selected backup plan. The respective message will appear at the top of the tabs, if one of the plan's tasks requires user interaction. It contains a brief description of the problem and action buttons that let you select the appropriate action or stop the plan.
• Backup options - backup options changed against the default values. 6.1.3. Log The Log stores the history of operations performed by Acronis Backup & Recovery 10 on the machine, or actions a user takes on the machine using the program. For instance, when a user edits a task, the respective entry is added to the log. When the program executes a task, it adds multiple entries. With the log, you can examine operations, results of tasks' execution including reasons for failure, if any.
View a log entry’s details Save the selected log entries to a file Save all the log entries to a file Save all the filtered log entries to a file Delete all the log entries 6.1.3.2. 1 Select a log entry. 2 Do one of the following • Click View Details. The log entry's details will be displayed in a separate window. • Expand the Information panel, by clicking the chevron. 1 Select a single log entry or multiple log entries.
Configuring the log table By default, the table has seven columns that are displayed, others are hidden. If required, you can hide the shown columns and show the hidden ones. To show or hide columns 1. Right-click any column header to open the context menu. The menu items that are ticked off correspond to column headers presented in the table. 2. Click the items you want to be displayed/hidden. 6.1.3.3.
To create a backup plan, perform the following steps. General Plan name [Optional] Enter a unique name for the backup plan. A conscious name lets you identify the plan among others. Plan's credentials (p. 119) [Optional] The backup plan will run on behalf of the user who is creating the plan. You can change the plan account credentials if necessary. To access this option, select the Advanced view check box . Comments [Optional] Type a description of the backup plan.
Archive comments [Optional] Enter comments on the archive. To access this option, select the Advanced view check box. How to back up Backup scheme (p. 125) Specify when and how often to back up your data; define for how long to keep the created backup archives in the selected location; set up schedule for the archive cleanup procedure. Use well-known optimized backup schemes, such as Grandfather-Father-Son and Tower of Hanoi; create a custom backup scheme, or back up data once.
Specify the machine that will perform the conversion. The machine has to have Acronis Backup & Recovery 10 Agent for Windows, Agent for ESX/ESXi or Agent for Hyper-V installed. Virtualization server (p. 136) Here you select the resulting virtual machine type and location. Available options depend on the host you selected in the previous step. Storage (p. 136) Choose the storage on the virtualization server or the folder to place the virtual machine files in.
6.2.3. Source type Select the type of data you want to be backed up on the managed machine. The list of available data types depends on the agents running on the machine: Files Available if the Acronis Backup & Recovery 10 Agent for Windows (or for Linux) is installed. Select this option to back up specific files and folders.
What does a disk or volume backup store? For supported file systems, with the sector-by-sector option turned off, a disk or volume backup stores only those sectors that contain data. This reduces the resulting backup size and speeds up the backup and recovery operations. Windows The swap file (pagefile.sys) and the file that keeps the RAM content when the machine goes into hibernation (hiberfil.sys) are not backed up. After recovery, the files will be re-created in the appropriate place with the zero size.
o Use the following credentials The program will access the source data using the credentials you specify. Use this option if the plan's account does not have access permissions to the data. Specify: • User name. When entering the name of an Active Directory user account, be sure to also specify the domain name (DOMAIN\Username or Username@domain) • Password. The password for the account. 2. Click OK. 6.2.6. Exclusions Set up exclusions for the specific types of files you do not wish to back up.
Mask (?) 6.2.7. my???.log Excludes all .log files with names consisting of five symbols and starting with “my”. Archive Specify where the archive will be stored and the name of the archive. 1. Selecting the destination Enter the full path to the destination in the Path field, or select the desired destination in the folders tree. • • • • To back up data to a centralized vault, expand the Centralized group and click the vault.
Backing up to an existing archive You can configure the backup plan to back up to an existing archive. To do so, select the archive in the archives table or type the archive name in the Name field. If the archive is protected with a password, the program will ask for it in the pop-up window. By selecting the existing archive, you are meddling in the area of another backup plan that uses the archive.
6.2.9. Backup schemes Choose one of the available backup schemes: • Back up now – to create a backup task for manual start and run the task immediately after its creation. • Back up later – to create a backup task for manual start OR schedule one-time task execution in the future. • • Simple – to schedule when and how often to backup data and specify retention rules. Grandfather-Father-Son – to use the Grandfather-Father-Son backup scheme.
6.2.9.3. Simple scheme With the simple backup scheme you just schedule when and how often to back up data and set the retention rule. At the first time a full backup will be created. The next backups will be incremental. To set up the simple backup scheme, specify the appropriate settings as follows. Backup Set up the backup schedule - when and how often to back up the data. To learn more about setting up the schedule, see the Scheduling (p. 87) section. Retention rule 6.2.9.4.
Parameters You can set up the following parameters of a Grandfather-Father-Son (GFS) scheme. Start backup at: Specifies when to start a backup. The default value is 12:00 PM. Back up on: Specifies the days on which to perform a backup. The default value is Workdays. Weekly/Monthly: Specifies which of the days selected in the Back up on field you want to reserve for weekly and monthly backups. A monthly backup will be performed every fourth such day. The default value is Friday.
• • Weekly/monthly: Saturday (for example) Keep backups: o Daily: 1 week o Weekly: 1 month o Monthly: indefinitely As a result, an archive of daily, weekly, and monthly backups will be created. Daily backups will be available for seven days since creation. For instance, a daily backup of Sunday, January 1, will be available through next Sunday, January 8; the first weekly backup, the one of Saturday, January 7, will be stored on the system until February 7. Monthly backups will never be deleted.
Moreover, assume that you want to retain access to all backups, including the daily ones, for at least six months. The following GFS scheme suits such purposes: • • • • Start backup at: 11:30 PM Back up on: Tuesday, Thursday, Friday Weekly/monthly: Friday Keep backups: o Daily: 6 months o Weekly: 6 months o Monthly: 5 years Here, daily incremental backups will be created on Tuesdays and Thursdays, with weekly and monthly backups performed on Fridays.
Parameters You can set up the following parameters of a Tower of Hanoi scheme. Schedule Set up a daily (p. 88), weekly (p. 90), or monthly (p. 92) schedule. Setting up schedule parameters allows creating simple schedules (example of a simple daily schedule: a backup task will be run every 1 day at 10 AM) as well as more complex schedules (example of a complex daily schedule: a task will be run every 3 days, starting from January 15.
Roll-back period The number of days we can go back in the archive is different on different days. The minimum number of days we are guaranteed to have is called the roll-back period. The following table shows full backup and roll-back periods for schemes of various levels.
6.2.9.6. Custom backup scheme At a glance • Custom schedule and conditions for backups of each type • Custom schedule and retention rules Parameters Parameter Meaning Full backup Specifies on what schedule and under which conditions to perform a full backup. For example, the full backup can be set up to run every Sunday at 1:00 AM as soon as all users are logged off. Incremental Specifies on what schedule and under which conditions to perform an incremental backup.
backup for some reason. Apply the rules Specifies when to apply the retention rules (p. 31). (only if the retention rules are set) For example, the cleanup procedure can be set up to run after each backup, and also on schedule. This option is available only if you have set at least one retention rule in Retention rules. Cleanup schedule Specifies a schedule for archive cleanup. (only if On schedule is selected) For example, the cleanup can be scheduled to start on the last day of each month.
Full backup: Schedule: Monthly, every Last Sunday of the month, at 9:00 PM Incremental: Schedule: Weekly, every workday, at 7:00 PM Differential: Schedule: Weekly, every Saturday, at 8:00 PM Further, we want to add conditions that have to be satisfied for a backup task to start. This is set up in the Conditions fields for each backup type.
You can run any of these backup tasks by selecting it from the list of tasks in the Backup plans and tasks section in the left pane. If you have also specified the retention rules in your backup scheme, the scheme will result in four tasks: three backup tasks and one cleanup task. 6.2.10. Archive validation Set up the validation task to check if the backed up data is recoverable. If the backup could not pass the validation successfully, the validation task fails and the backup plan gets the Error status.
6.2.11.2. Selecting a host that will perform conversion Specify the machine that will perform the conversion. The machine has to have Acronis Backup & Recovery 10 Agent for Windows, Agent for ESX/ESXi or Agent for Hyper-V installed. Take into account the following considerations. Which agent is installed on the host? The resulting virtual machine type and location depend on the agent that resides on the selected host.
Since the space is not pre-allocated, the physical disk on which the virtual machine will run is expected to have sufficient free space for the virtual disks to increase in size. 6.3. Recovering data When it comes to data recovery, first consider the most functional method: connect the console to the managed machine running the operating system and create the recovery task.
What to recover Archive (p. 140) Select the archive to recover data from. Data type (p. 140) Applies to: disk recovery Choose the type of data you need to recover from the selected disk backup. Content (p. 141) Select the backup and content to be recovered. Access credentials (p. 141) [Optional] Provide credentials for the archive location if the task account does not have the right to access it. To access this option, select the Advanced view check box.
Use the Acronis Universal Restore when you need to recover and boot up Windows on dissimilar hardware. Automatic drivers search Specify where the program should search for HAL, mass storage and network adapter drivers. Acronis Universal Restore will install drivers that better fit the target hardware. Mass storage drivers to install anyway [Optional] Specify the mass storage drivers manually if the automatic drivers search has not found the appropriate drivers.
To learn more about operations available depending on the user privileges, see the User privileges on a managed machine (p. 23) section. 6.3.2. Archive selection Selecting the archive 1. Enter the full path to the location in the Path field, or select the desired folder in the folders tree. o If the archive is stored in a centralized vault, expand the Centralized group and click the vault. o If the archive is stored in a personal vault, expand the Personal group and click the vault.
6.3.4. Content selection The representation of this window depends on the type of data stored in the archive. 6.3.4.1. Disks/volumes selection To select a backup and disks/volumes to recover: 1. Select one of the successive backups by its creation date and time. Thus, you can revert the disk data to a certain moment in time. Specify the items to recover. By default, all items of the selected backup will be selected. If you do not want to recover certain items, just uncheck them.
To specify credentials 1. Select one of the following: o Use the task credentials The program will access the location using the credentials of the task account specified in the General section. o Use the following credentials The program will access the location using the credentials you specify. Use this option if the task account does not have access permissions to the location. You might need to provide special credentials for a network share or a storage node vault. Specify: • User name.
Existing virtual machine Available when the Acronis Backup & Recovery 10 Agent for Hyper-V or Agent for ESX/ESXi is installed. On selecting this, you specify the virtualization server and the target virtual machine. Then you proceed to the regular disk mapping procedure described below. Please be aware that the target machine will be powered off automatically before the recovery. If you prefer to power it off manually, modify the VM power management option. Disk #: Disk # (MODEL) (p.
o o o o • Acronis Backup & Recovery 10 creates scheduled tasks using the signature of the source hard disk.
Select the way the disk's signature contained in the MBR will be handled. The disk signature is used by Windows and the Linux kernel version 2.6 and later. Recover [Volume] [Letter] to: Disk # /Volume (p. 145) Sequentially map each of the source volumes to a volume or an unallocated space on the destination disk. Size (p. 145): [Optional] Change the recovered volume size, location and other properties. MBR destination To specify a destination disk: 1. Select the disk to recover the MBR to. 2. Click OK.
Properties Type A basic MBR disk can contain up to four primary volumes or up to three primary volumes and multiple logical drives. By default, the program selects the original volume's type. You can change this setting, if required. • Primary. Information about primary volumes is contained in the MBR partition table. Most operating systems can boot only from the primary volume of the first hard disk, but the number of primary volumes is limited.
To select the virtualization server the new virtual machine will be created on 1. Choose the Place on the virtualization server that I select option. 2. In the left part of the window, select the virtualization server. Use the right part of the window to review details on the selected server. 3. Click OK to return to the Data recovery page. To select the type of virtual machine 1. Choose the Save as files of the VM type that I select to the folder that I specify option. 2.
This is the number of processors of the new virtual machine. In most cases it is set to one. The result of assignment of more than one processor to the machine is not guaranteed. The number of virtual processors may be limited by the host CPU configuration, the virtualization product and the guest operating system. Multiple virtual processors are generally available on multi-processor hosts. A multicore host CPU or hyperthreading may enable multiple virtual processors on a single-processor host. 6.3.6.5.
Exclusion examples Criterion Example Description By name File1.log Excludes all files named File1.log. By path C:\Finance\test.log Excludes the file named test.log located in the folder C:\Finance Mask (*) *.log Excludes all files with the .log extension. Mask (?) my???.log Excludes all .log files with names consisting of five symbols and starting with “my”. The above settings are not effective for the files or folders that were explicitly selected for recovery.
• Password. The password for the account. 2. Click OK. 6.3.8. When to recover Select when to start the recovery task: • • Recover now - the recovery task will be started immediately after you click the final OK. Recover later - the recovery task will be started at the date and time you specify. If you do not need to schedule the task and wish to start it manually afterwards, select the Task will be started manually (do no schedule the task) check box. 6.3.9.
- If the drivers are on a vendor's disc or other removable media, turn on the Search removable media. - If the drivers are located in a networked folder or on the bootable media, specify the path to the folder in the Search folder field. During recovery, Universal Restore will perform the recursive search in all the sub-folders of the specified folder, find the most suitable HAL and HDD controller drivers of all those available, and install them into the recovered system.
XenServer virtual appliance can be imported to a XenServer using Citrix XenCenter. The VMware Workstation machine can be converted to the open virtualization format (OVF) using the VMware OVF tool. With Acronis Backup & Recovery 10 Agent for Hyper-V or Agent for ESX/ESXi, you can recover a disk (volume) backup to a new virtual machine on the respective virtualization server. To convert a disk backup to a virtual machine: 1.
6.3.11. Bootability troubleshooting If a system was bootable at the time of backup, you expect that it will boot after recovery. However, the information the operating system stores and uses for booting up may become outdated during recovery, especially if you change volume sizes, locations or destination drives. Acronis Backup & Recovery 10 automatically updates Windows loaders after recovery. Other loaders might also be fixed, but there are cases when you have to re-activate the loaders.
• The system loader points to the wrong volume This may happen when system or boot volumes are not recovered to their original location. Solution: Modification of the boot.ini or the boot\bcd files fixes this for Windows loaders. Acronis Backup & Recovery 10 does this automatically and so you are not likely to experience the problem. For the GRUB and LILO loaders, you will need to correct the GRUB configuration files.
The lines starting with title, root, kernel, and initrd respectively determine: o The title of the menu item. o The device on which the Linux kernel is located—typically, this is the boot partition or the root partition, such as root (hd0,0) in this example. o The path to the kernel on that device and the root partition—in this example, the path is /vmlinuz-2.6.24.4 and the root partition is /dev/sda2.
multi(0)disk(0)rdisk(0)partition(1)\WINDOWS="Microsoft Windows XP Professional" /noexecute=optin /fastdetect Windows Vista/2008 A part of the loader resides in the partition boot sector, the rest is in the files bootmgr, boot\bcd. At starting Windows, boot\bcd is mounted to the registry key HKLM \BCD00000000. 6.4. Validating vaults, archives and backups Validation is an operation that checks the possibility of data recovery from a backup.
What to validate Validate Choose an object to validate: Archive (p. 157) - in that case, you need to specify the archive. Backup (p. 158) - specify the archive first, and then select the desired backup in this archive. Vault (p. 158) - select a vault (or other location), which archives to validate. Access Credentials (p. 159) [Optional] Provide credentials for accessing the source if the task account does not have enough privileges to access it. To access this option, select the check box for Advanced view.
o o o If the archive is stored in a centralized vault, expand the Centralized group and click the vault. If the archive is stored in a personal vault, expand the Personal group and click the vault. If the archive is stored in a local folder on the machine, expand the Local folders group and click the required folder. If the archive is located on removable media, e.g. DVDs, first insert the last DVD and then insert the discs in order starting from the first one when the program prompts.
• • To select a personal vault, expand the Personal group and click the appropriate vault. To select a local folder (CD/DVD drive, or locally attached tape device), expand the Local folders group and click the required folder. • To select a network share, expand the Network folders group, select the required networked machine and then click the shared folder. If the network share requires access credentials, the program will ask for them.
Choose one of the following: • Now - to start the validation task right after its creation, that is, after clicking OK on the Validation page. • Later - to start the one-time validation task, at the date and time you specify. Specify the appropriate parameters as follows: o Date and time - the date and time when to start the task. o The task will be started manually (do not schedule the task) - select this check box, if you wish to start the task manually later. • On schedule - to schedule the task.
Mount settings Volumes (p. 162) Select volumes to mount and configure the mount settings for every volume: assign a letter or enter the mount point, choose the read/write or read only access mode. When you complete all the required steps, click OK to mount the volumes. 6.5.1. Archive selection Selecting the archive 1. Enter the full path to the location in the Path field, or select the desired folder in the folders tree.
6.5.2. Backup selection To select a backup: 1. Select one of the backups by its creation date/time. 2. To assist you with choosing the right backup, the bottom table displays the volumes contained in the selected backup. To obtain information on a volume, right-click it and then click Information. 3. Click OK. 6.5.3. Access credentials To specify credentials 1. Select one of the following: o Use the current user credentials The program will access the location using the credentials of the current user.
4. Click OK. 6.6. Managing mounted images Once a volume is mounted, you can browse files and folders contained in the backup using a file manager and copy the desired files to any destination. Thus, if you need to take out only a few files and folders from a volume backup, you do not have to perform the recovery procedure. Exploring images Exploring mounted volumes lets you view and modify (if mounted in the read/write mode) the volume's content.
• recovery without access to the storage node in case of networking problems or failure of the storage node • recovery of the storage node itself. Export from an HDD-based vault to a tape device can be considered as simple on-demand archive staging. The resulting archive's name By default, the exported archive inherits the name of the original archive.
Tip. You can implement the staging scenario manually, by regularly running the archive deletion task followed by the export task. Different ways to create an export task Using the Export page is the most general way to create an export task. Here, you can export any backup, or archive you have permission to access. You can access the Export page from the Vaults view. Right-click the object to export (archive or backup) and select Export from the context menu.
6.7.1. Task credentials Provide credentials for the account under which the task will run. To specify credentials 1. Select one of the following: o Run under the current user The task will run under the credentials with which the user who starts the tasks is logged on. If the task has to run on schedule, you will be asked for the current user's password on completing the task creation.
After entering access credentials, the folders on the server become available. Click the appropriate folder on the server. You can access the server as an anonymous user if the server enables such access. To do so, click Use anonymous access instead of entering credentials. According to the original FTP specification, credentials required for access to FTP servers are transferred through a network as plaintext.
According to the original FTP specification, credentials required for access to FTP servers are transferred through a network as plaintext. This means that the user name and password can be intercepted by an eavesdropper using a packet sniffer. 6.7.5. Location selection Specify a destination where the exported object will be stored. Exporting backups to the same archive is not allowed. 1.
3. Naming the new archive By default, the exported archive inherits the name of the original archive.
6.8.1. Creating Acronis Secure Zone You can create Acronis Secure Zone while the operating system is running or using bootable media. To create Acronis Secure Zone, perform the following steps. Space Disk (p. 170) Choose a hard disk (if several) on which to create the zone. Acronis Secure Zone is created using unallocated space, if available, or at the expense of the volume's free space. Size (p. 170) Specify the exact size of the zone.
• Taking all free space from a system volume may cause the operating system to work unstably and even fail to start. Do not set the maximum zone size if the boot or the system volume is selected. 6.8.1.3. Password for Acronis Secure Zone Setting up a password protects the Acronis Secure Zone from unauthorized access.
6.8.2. Managing Acronis Secure Zone Acronis Secure Zone is considered as a personal vault (p. 219). Once created on a managed machine, the zone is always present in the list of Personal vaults. Centralized backup plans can use Acronis Secure Zone as well as local plans. If you have used the Acronis Secure Zone before, please note a radical change in the zone functionality. The zone does not perform automatic cleanup, that is, deleting old archives, anymore.
o o dragging the slider and selecting any size between the current and minimum values. The minimum size is approximately 50MB, depending on the geometry of the hard disk; typing an exact value in the Acronis Secure Zone Size field. 4. Click OK. 6.8.2.3. Deleting Acronis Secure Zone To delete the zone without uninstalling the program, proceed as follows: 1. In the Acronis Secure Zone Actions bar (on the Actions and tools pane), select Delete. 2.
• • boot the machine from a separate bootable rescue media use network boot from Acronis PXE Server or Microsoft Remote Installation Services (RIS). See the Bootable media (p. 174) section for details. 6.10.
• PE-based bootable media helps overcome some Linux-related bootable media issues such as support for certain RAID controllers or certain levels of RAID arrays only. Media based on PE 2.x, that is, Windows Vista or Windows Server 2008 kernel, allows for dynamic loading of the necessary device drivers. 6.10.1. How to create bootable media To enable creating physical media, the machine must have a CD/DVD recording drive or allow a flash drive to be attached.
http://www.microsoft.com/downloads/details.aspx?FamilyID=94bb6e34-d890-4932-81a55b50c657de08&DisplayLang=en 2. [optional] Burn the WAIK to DVD or copy to a flash drive. 3. Install the Microsoft .NET Framework v.2.0 from this kit (NETFXx86 or NETFXx64, depending on your hardware.) 4. Install Microsoft Core XML (MSXML) 5.0 or 6.0 Parser from this kit. 5. Install Windows AIK from this kit. 6. Install Bootable Media Builder on the same machine.
o o o o create CD, DVD or other bootable media such as removable USB flash drives if the hardware BIOS allows for boot from such media build an ISO image of a bootable disc to burn it later on a blank disc upload the selected components to Acronis PXE Server upload the selected components to a WDS/RIS. 8. [optional] Windows system drivers to be used by Acronis Universal Restore (p. 180).
Without this parameter, all startup messages will be displayed, followed by a command prompt. To start the management console from the command prompt, run the command: /bin/product nousb Disables loading of the USB (Universal Serial Bus) subsystem. nousb2 Disables USB 2.0 support. USB 1.1 devices still work with this parameter. This parameter allows you to use some USB drives in the USB 1.1 mode if they do not work in the USB 2.0 mode. nodma Disables direct memory access (DMA) for all IDE hard disk drives.
• • Subnet mask • • DNS server Gateway WINS server. Once the bootable agent starts on a machine, the configuration is applied to the machine’s network interface card (NIC.) If the settings have not been pre-configured, the agent uses DHCP auto configuration. You also have the ability to configure the network settings manually when the bootable agent is running on the machine. Pre-configuring multiple network connections You can pre-configure TCP/IP settings for up to ten network interface cards.
Drivers for Universal Restore While creating bootable media, you have an option to add Windows drivers to the media. The drivers will be used by Universal Restore when recovering Windows on a machine with a dissimilar processor, different motherboard or different mass storage device than in the backed up system.
2. Start the Bootable Media Builder either from the management console, by selecting Tools > Create Bootable Media or, as a separate component. 3. Select Bootable media type: Windows PE. o Select Use WinPE files located in the folder I specify 4. Specify path to the folder where the WinPE files are located. 5. Specify the full path to the resulting ISO file including the file name. 6. Check your settings in the summary screen and click Proceed. 7. Burn the .
controller, network adapter, tape drive or other device. You will have to repeat this procedure for each driver you want to be included in the resulting WinPE boot media. 5. Choose whether you want to create ISO or WIM image or upload the media on Acronis PXE Server. 6. Specify the full path to the resulting image file including the file name, or specify the PXE server and provide the user name and password to access it. 7. Check your settings in the summary screen and click Proceed. 8. Burn the .
11. Build the Bart PE. 12. Burn the ISO to CD or DVD (if this has not been done yet) or copy to a flash drive. Once the machine boots into the Bart PE and you configure the network connection, select Go -> System -> Storage -> Acronis Backup & Recovery 10 to start. 6.10.2. Connecting to a machine booted from media Once a machine boots from bootable media, the machine terminal displays a startup window with the IP address(es) obtained from DHCP or set according to the pre-configured values.
6.10.3.1. Setting up a display mode For a machine booted from media, a display video mode is detected automatically based on the hardware configuration (monitor and graphics card specifications). If, for some reason, the video mode is detected incorrectly, do the following: 1. In the boot menu, press F11. 2. Add to the command prompt the following command: vga=ask, and then proceed with booting. 3.
6.10.4. List of commands and utilities available in Linux-based bootable media Linux-based bootable media contains the following commands and command line utilities, which you can use when running a command shell. To start the command shell, press CTRL+ALT+F2 while in the bootable media's management console.
gawk mtx tune2fs gpm mv udev grep parted udevinfo growisofs pccardctl udevstart grub ping umount gunzip pktsetup uuidgen halt poweroff vconfig hexdump ps vi hotplug raidautorun zcat 6.10.5. Recovering MD devices and logical volumes To recover Linux Software RAID devices, known as MD devices, and/or devices created by Logical Volume Manager (LVM), known as logical volumes, you need to create the corresponding volume structure before starting the recovery.
Under the archive contents, Acronis Backup & Recovery 10 will display a message saying that it detected information about the volume structure. 4. Click Details in the area with that message. 5. Review the volume structure, and then click Apply RAID/LVM to create it. To create the volume structure by using a script 1. Boot the machine from a Linux-based bootable media. 2. Click Acronis Bootable Agent. Then, click Run management console. 3. On the toolbar, click Actions, and then click Start shell.
8. Click Recover, then specify the path to the archive and any other required parameters, and then click OK. Note: This procedure does not work when connected to Acronis Backup & Recovery 10 Bootable Agent remotely, because the command shell is not available in this case.
--- Volume group --VG Name my_volgroup ... VG Access read/write VG Status resizable ... VG Size 1.99 GB ... VG UUID 0qoQ4l-Vk7W-yDG3-uF1l-Q2AL-C0z0-vMeACu 5. Run the following command to create the logical volume; in the -L parameter, specify the size given by VG Size: lvm lvcreate -L1.99G --name my_logvol my_volgroup 6. Activate the volume group by running the following command: lvm vgchange -a y my_volgroup 7. Press CTRL+ALT+F1 to return to the management console. Step 2: Starting the recovery 1.
... Dynamic & GPT Volumes: DYN1 4 my_volgroup-my_logvol 12533760 Ext2 You will need the volume's index, given in the Idx column, in the next step. 2. Use the --mount command, specifying the volume's index in the -i parameter. For example: trueimagemnt --mount /mnt --filename smb://server/backups/linux_machine.tib -i 4 This command mounts the logical volume DYN1, whose index in the backup is 4, on the mount point /mnt.
3. Do not perform any disk/volume operations while running other software that has low-level disk access. Close these programs before running Acronis Disk Director Lite. With these simple precautions, you will protect yourself against accidental data loss. 6.11.2. Running Acronis Disk Director Lite You can run Acronis Disk Director Lite under Windows or start it from a bootable media.
The graphic panel at the bottom of the view also graphically depicts all the disks and their volumes as rectangles with basic data on them (label, letter, size, status, type and file system). Both parts of the view also depict all unallocated disk space that can be used in volume creation.
If you need to initialize a disk: 1. Select a disk to initialize. 2. Right-click on the selected volume, and then click Initialize in the context menu. You will be forwarded to the Disk Initialization window, that will provide the basic hardware details such as the disk’s number, capacity and state to aid you in the choice of your possible action. 3. In the window, you will be able to set the disk partitioning scheme (MBR or GPT) and the disk type (basic or dynamic).
Cloning method and advanced options The Clone basic disk operation usually means that the information from the source disk is transferred to the target “As is”. So, if the destination disk is the same size and even if it is larger, it is possible to transfer all the information there exactly as it is stored at the source. But with the wide range of available hardware it is normal that the target disk would differ in size from the source.
If you need to copy the NT signature: 1. Select the Copy NT signature check box. You receive the warning: “If there is an operating system on the hard disk, uninstall either the source or the target hard disk drive from your machine prior to starting the machine again. Otherwise, the OS will start from the first of the two, and the OS on the second disk will become unbootable.” The Turn off the machine after the cloning operation check box is selected and disabled automatically. 2.
Dynamic disk conversion: MBR to GPT Acronis Disk Director Lite does not support direct MBR to GPT conversion for dynamic disks. However you can perform the following conversions to reach the goal using the program: 1. MBR disk conversion: dynamic to basic (p. 197) using the Convert to basic operation. 2. Basic disk conversion: MBR to GPT using the Convert to GPT operation. 3. GPT disk conversion: basic to dynamic (p. 196) using the Convert to dynamic operation. 6.11.5.4.
Should you decide to revert your dynamic disks back to basic ones, e.g. if you want to start using an OS on your machine that does not support dynamic disks, you can convert your disks using the same menu items, though the operation now will be named Convert to basic. System disk conversion Acronis Disk Director Lite does not require an operating system reboot after basic to dynamic conversion of the disk, if: 1. There is a single Windows 2008/Vista operating system installed on the disk. 2.
2. The machine runs this operating system. Dynamic to basic conversion of the disk, comprising of system volumes, takes a certain amount of time, and any power loss, unintentional turning off of the machine or accidental pressing of the Reset button during the procedure could result in bootability loss.
6.11.6.1. Creating a volume You might need a new volume to: • • Recover a previously saved backup copy in the “exactly as was” configuration; Store collections of similar files separately — for example, an MP3 collection or video files on a separate volume; • • Store backups (images) of other volumes/disks on a special volume; • Add new hardware to a machine.
RAID-5 A fault-tolerant volume whose data is striped across an array of three or more disks. The disks do not need to be identical, but there must be equally sized blocks of unallocated space available on each disk in the volume. Parity (a calculated value that can be used to reconstruct data in case of failure) is also striped across the disk array. And it is always stored on a different disk than the data itself.
To create a Simple/Spanned volume: o Select one or more destination disks to create the volume on. To create a Mirrored volume: o Select two destination disks to create the volume on. To create a Striped volume: o Select two or more destination disks to create the volume on. To create a RAID-5 volume: o Select three destination disks to create the volume on.
The wizard will prompt you to choose one of the Windows file systems: FAT16 (disabled, if the volume size has been set at more than 2 GB), FAT32 (disabled, if the volume size has been set at more than 2 TB), NTFS or to leave the volume Unformatted. In setting the cluster size you can choose between any number in the preset amount for each file system. Note, the program suggests the cluster size best suited to the volume with the chosen file system.
By clicking OK in the Delete volume window, you'll add the pending operation of volume deletion. (To finish the added operation you will have to commit (p. 205) it. Exiting the program without committing the pending operations will effectively cancel them.) 6.11.6.3. Set active volume If you have several primary volumes, you must specify one to be the boot volume. For this, you can set a volume to become active.
The new volume structure will be graphically represented in the Disk management view immediately. 6.11.6.5. Change volume label The volume label is an optional attribute. It is a name assigned to a volume for easier recognition. For example, one volume could be called SYSTEM — a volume with an operating system, or PROGRAM — an application volume, DATA — a data volume, etc., but it does not imply that only the type of data stated with the label could be stored on such a volume.
(To finish the added operation you will have to commit (p. 205) it. Exiting the program without committing the pending operations will effectively cancel them.) The new volume structure will be graphically represented in the Disk management view. If you set a 64K cluster size for FAT16/FAT32 or an 8KB-64KB cluster size for NTFS, Windows can mount the volume, but some programs (e.g. Setup programs) might calculate its disk space incorrectly. 6.11.7.
Glossary A Acronis Active Restore The Acronis proprietary technology that brings a system online immediately after the system recovery is started. The system boots from the backup (p. 212) and the machine becomes operational and ready to provide necessary services. The data required to serve incoming requests is recovered with the highest priority; everything else is recovered in the background.
Agent (Acronis Backup & Recovery 10 Agent) An application that performs data backup and recovery and enables other management operations on the machine (p. 215), such as task management and operations with hard disks. The type of data that can be backed up depends on the agent type. Acronis Backup & Recovery 10 includes the agents for backing up disks and files and the agents for backing up virtual machines residing on virtualization servers. Agent-side cleanup Cleanup (p. 211) performed by an agent (p.
Backup options Configuration parameters of a backup operation (p. 207), such as pre/post backup commands, maximum network bandwidth allotted for the backup stream or data compression level. Backup options are a part of a backup plan (p. 208). Backup plan (Plan) A set of rules that specify how the given data will be protected on a given machine. A backup plan specifies: • • • what data to back up where to store the backup archive (p. 207) (the backup archive name and location) the backup scheme (p.
3. The management server deploys the policy to the machines. 4. On each machine, the agent (p. 207) installed on the machine finds data items using the selection rules. For example, if the selection rule is [All volumes], the entire machine will be backed up. 5. On each machine, the agent installed on the machine creates a backup plan (p. 208) using other rules specified by the policy. Such backup plan is called a centralized plan (p. 210). 6.
A management server has two built-in groups that contain all machines of each type: All physical machines (p. 216), All virtual machines (p. 219). Built-in groups cannot be deleted, moved to other groups or manually modified. Custom groups cannot be created within built-in groups. There is no way to remove a physical machine from the built-in group except for deleting the machine from the management server. Virtual machines are deleted as a result of their host server deletion. A backup policy (p.
On a machine that is not registered on the management server, a user having the privilege to back up to the centralized vault can do so by specifying the full path to the vault. If the vault is managed, the user's archives will be managed by the storage node as well as other archives stored in the vault. Cleanup Deleting backups (p. 207) from a backup archive (p. 207) in order to get rid of outdated backups or prevent the archive from exceeding the desired size.
Differential backup A differential backup stores changes to the data against the latest full backup (p. 214). You need access to the corresponding full backup to recover the data from a differential backup. Direct management Any management operation that is performed on a managed machine (p. 215) using the direct console (p. 211)-agent (p. 207) connection (as opposed to centralized management (p. 210) when the operations are configured on the management server (p.
and the foreign disks so that they form a single entity. A foreign group is imported as is (will have the original name) if no disk group exists on the machine. For more information about disk groups please refer to the following Microsoft knowledge base article: 222189 Description of Disk Groups in Windows Disk Management http://support.microsoft.com/kb/222189/EN-US/ Dynamic disk A hard disk managed by Logical Disk Manager (LDM) that is available in Windows starting with Windows 2000.
• IP address range. A machine remains in a dynamic group as long as the machine meets the group's criteria. The machine is removed from the group automatically as soon as • • the machine's properties change so that the machine does not meet the criteria anymore OR the administrator changes the criteria so that the machine does not meet them anymore. There is no way to remove a machine from a dynamic group manually except for deleting the machine from the management server.
F Full backup A self-sufficient backup (p. 207) containing all data chosen for backup. You do not need access to any other backup to recover the data from a full backup. G GFS (Grandfather-Father-Son) A popular backup scheme (p. 209) aimed to maintain the optimal balance between a backup archive (p. 207) size and the number of recovery points (p. 217) available from the archive.
Managed vault A centralized vault (p. 210) managed by a storage node (p. 217). Archives (p. 207) in a managed vault can be accessed as follows: bsp://node_address/vault_name/archive_name/ Physically, managed vaults can reside on a network share, SAN, NAS, on a hard drive local to the storage node or on a tape library locally attached to the storage node. The storage node performs storage node-side cleanup (p. 218) and storage node-side validation (p. 218) for each archive stored in the managed vault.
Plan See Backup plan (p. 208). Policy See Backup policy (p. 208). R Recovery point Date and time to which the backed up data can be reverted to. Registered machine A machine (p. 215) managed by a management server (p. 216). A machine can be registered on only one management server at a time. A machine becomes registered as a result of the registration (p. 217) procedure. Registration A procedure that adds a managed machine (p. 215) to a management server (p. 216).
• prevent access to the backup archives, even in case the storage medium is stolen or accessed by a malefactor, by using encrypted vaults (p. 214). Storage node-side cleanup Cleanup (p. 211) performed by a storage node (p. 217) according to the backup plans (p. 208) that produce the archives (p. 207) stored in a managed vault (p. 215). Being an alternative to the agentside cleanup (p. 207), the cleanup on the storage node side relieves the production servers of unnecessary CPU load.
U Universal Restore (Acronis Backup & Recovery 10 Universal Restore) The Acronis proprietary technology that helps boot up Windows on dissimilar hardware or a virtual machine. The Universal Restore handles differences in devices that are critical for the operating system start-up, such as storage controllers, motherboard or chipset. The Universal Restore is not available: • • when the machine is booted with Acronis Startup Recovery Manager (p. 206) (using F11) or • when using Acronis Active Restore (p.
Virtual machine On Acronis Backup & Recovery 10 Management Server, a machine (p. 215) is considered virtual if it can be backed up from the virtualization host without installing an agent (p. 207) on the machine. A virtual machine appears on the management server after registration of the virtualization server that hosts the machine, provided that Acronis Backup & Recovery 10 agent for virtual machines is installed on that server.
Agent-side cleanup • 207, 218 Index A About Windows loaders • 155 Access credentials • 160, 162 Access credentials for archive location • 117, 124 Agent-side validation • 207, 218 Archive • 117, 123, 206, 207 Archive protection • 49, 51 Archive selection • 137, 138, 140, 157, 160, 161, 165, 166 Archive validation • 118, 135 At Windows Event Log event • 95 Access credentials for destination • 138, 149, 165, 169 B Access credentials for location • 138, 141 Back up later scheme • 125 Access credentials
Bootable agent • 39, 173, 206, 209 Creating a volume • 198, 199 Bootable components and media builder • 14 Creating Acronis Secure Zone • 83, 170 Bootable media • 14, 17, 65, 102, 137, 174, 191, 206, 209, 212, 216 Building Bart PE with Acronis Plug-in from Windows distribution • 176, 182 Built-in group • 209 C Centralized backup plan • 38, 208, 209, 210 Centralized management • 210, 211, 212 Centralized task • 209, 210, 212 Centralized vault • 210, 216 Change volume label • 198, 204 Change volume lette
Drivers for Universal Restore • 177, 180 Grandfather-Father-Son scheme • 126 Dual destination • 38, 50, 66 H Dynamic disk • 33, 206, 212, 213, 214 Dynamic group • 210, 213 Dynamic volume • 33, 209, 214 E E-mail • 51, 60, 71, 74 Encrypted archive • 214 Encrypted vault • 214, 218 Hardware requirements • 16 HDD writing speed • 50, 59 How to convert a disk backup to a virtual machine • 151 How to create bootable media • 175, 181 How to reactivate GRUB and change its configuration • 154 Error handling • 5
Managed vault • 211, 214, 216, 217, 218, 219 Management Console • 15 Management server (Acronis Backup & Recovery 10 Management Server) • 7, 45, 208, 209, 210, 211, 212, 213, 216, 217 Personal vault • 206, 212, 216 Personal vaults • 39, 81 Physical machine • 210, 216 Plan • 217 Policy • 217 Pop-up messages • 44 Managing Acronis Secure Zone • 172 Post-backup command • 54 Managing mounted images • 163 Post-data capture command • 55 MBR destination • 144, 145 Post-recovery command • 73 Media builder •
Selecting source and target disks • 193 Selection rule • 208, 217 Set active volume • 198, 203 Set the volume options • 201 Set the volume size • 201, 202 Setting up a conversion schedule • 118, 135 Temporarily disabling a backup plan • 83, 84, 111 Time since last backup • 100 Time-based alerts • 45 Tower of Hanoi • 209, 218 Tower of Hanoi backup scheme • 29, 218 Tower of Hanoi scheme • 129 Setting up a display mode • 184 Types of dynamic volumes • 199 Setting up regular conversion to a virtual machine
Volume selection • 161, 162 Volume Shadow Copy Service • 49, 54, 57 Volumes • 138, 144 W Weekly schedule • 90, 130 When to recover • 138, 150 When to validate • 157, 159 Why is the program asking for the password? • 119 Windows event log • 46, 51, 61, 72, 76 WinPE (Windows Preinstallation Environment) • 206, 209, 220 Working under bootable media • 183 Working with backup plans and tasks • 107 Working with the • 81 226 Copyright © Acronis, Inc.