Acronis® Backup & Recovery ™ 10 Server for Linux Installation Guide
Table of Contents 1. Before installation .................................................................................................. 3 1.1. 1.1.1. 1.1.2. 1.1.3. Agent for Linux ............................................................................................................................................. 3 Bootable components and media builder ................................................................................................. 3 Management Console .........................
1. Before installation This section answers questions that might arise before the product installation. 1.1. Acronis Backup & Recovery 10 components This section contains a list of Acronis Backup & Recovery 10 components with a brief description of their functionality. Components for a managed machine (agents) These are applications that perform data backup, recovery and other operations on the machines managed with Acronis Backup & Recovery 10.
can choose not to install the bootable components and perform operations that require reboot using bootable media. Acronis Bootable Media Builder is a dedicated tool for creating bootable media containing the bootable components. The media builder creates bootable media that represents volumes and network in the Linux-like style (hda1, sdb2, smb://server/share). 1.1.3.
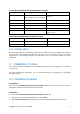
Acronis Backup & Recovery 10 Management Console Item Minimum requirements Recommended Computer processor Modern processor, 800 MHz or faster 1 GHz 32-bit (x86) or 64-bit (x64) processor Itanium platforms are not supported System memory 128 MB 512 MB or more Screen resolution 800*600 pixels 1024*768 pixels or higher Installation disk space 50 MB Other hardware Mouse CD-RW/ DVD-RW drive for bootable media creation Acronis Backup & Recovery 10 Agent for Linux Item Minimum requirements Recomme
4. When prompted to select the edition to install, select Next. 5. Select the components that you want to install. Note: You need Acronis Backup & Recovery 10 Upgrade Tool only if you are upgrading from Acronis True Image Echo. 6. The setup program may ask you to compile the SnapAPI module for your Linux kernel. Click Continue to compile the module now (recommended), or click Skip to compile it manually later.
-n or --nodeps Ignores dependencies during an unattended setup. This option is effective only in the unattended setup mode (see the -a parameter described previously). -u or --uninstall Uninstalls the component. You do not need to specify a license key. -c or --norpm Uses the installation file's own RPM Package Manager and not the system's package manager. Specify this parameter when installing the component on a system which does not use RPM Package Manager—such as an Ubuntu system.
2. Run the following command to delete the source files of the SnapAPI module: # rm -rf /usr/src/snapapi* 3. Upgrading from trial to full product version The trial key required at installation can be obtained on the Acronis Web site. The Acronis Backup & Recovery 10 trial version has the following limitations for bootable media: • The disk management functionality is available, but there is no option to commit the changes. • Besides disk management, only the recovery functionality is available.
4. Upgrading to stand-alone editions of Acronis Backup & Recovery 10 This section describes how to upgrade Acronis True Image Echo Server for Linux to Acronis Backup & Recovery 10 Server for Linux. Preparation Before proceeding with the upgrade, make sure that: • • You have a license key for Acronis True Image Echo Server for Linux. You have an upgrade license key for Acronis Backup & Recovery 10 Server for Linux. Installing components 1.
Importing old options The upgrade tool enables you to import the default backup options, default restoration options, notification options, and event tracing options of Acronis True Image Echo to the default backup and recovery options of Acronis Backup & Recovery 10. To import the old options: 1. Change the current directory to the one where the upgrade tool is installed. 2. Run the following command: ./UpgradeTool.
The names of the .tis files are Universally Unique Identifiers (UUIDs), such as 6AED5F49-7EED-4E3E939E-19360A44137F.tib.tis. Each file has the XML format. The tag in the file specifies the task name as it appears in the list of tasks. To import a task 1. Determine the file name of the task that you want to import—for example, by examining the content of the tag. 2. Change the current folder to the one where the upgrade tool is installed. 3.
5.