Acronis® Backup & Recovery ™ 10 Advanced Server User's Guide
Copyright © Acronis, Inc., 2000-2009. All rights reserved. “Acronis” and “Acronis Secure Zone” are registered trademarks of Acronis, Inc. "Acronis Compute with Confidence", “Acronis Startup Recovery Manager”, “Acronis Active Restore” and the Acronis logo are trademarks of Acronis, Inc. Linux is a registered trademark of Linus Torvalds. VMware is a registered trademark of VMware, Inc. Windows and MS-DOS are registered trademarks of Microsoft Corporation.
Table of Contents 1. Introducing Acronis® Backup & Recovery™ 10 ......................................................... 7 1.1. Acronis Backup & Recovery 10 overview ............................................................................ 7 1.2. Getting started .................................................................................................................... 8 1.2.1. 1.3. 1.3.1. 1.3.2. 1.3.3. 1.3.4. 1.3.5. 1.3.6. Using the management console ....................................
3. Options ................................................................................................................ 92 3.1. 3.1.1. 3.1.2. 3.1.3. 3.1.4. 3.1.5. 3.2. 3.2.1. 3.2.2. 3.2.3. 3.2.4. 3.2.5. 3.2.6. 3.3. 3.3.1. 3.3.2. 3.3.3. 3.4. 3.4.1. 3.4.2. 4. Console options................................................................................................................. 92 Startup page ...................................................................................................
6.1.1. 6.1.2. 6.1.3. 6.2. 6.2.1. 6.2.2. 6.2.3. 6.2.4. 6.2.5. 6.2.6. 6.2.7. 6.2.8. 6.2.9. 6.2.10. 6.2.11. 6.3. 6.3.1. 6.3.2. 6.3.3. 6.3.4. 6.3.5. 6.3.6. 6.3.7. 6.3.8. 6.3.9. 6.3.10. 6.3.11. 6.3.12. 6.3.13. 6.3.14. 6.4. 6.4.1. 6.4.2. 6.4.3. 6.4.4. 6.4.5. 6.4.6. 6.5. 6.5.1. 6.5.2. 6.5.3. 6.5.4. Dashboard ................................................................................................................................................189 Backup plans and tasks..................................
.10. 6.10.1. 6.10.2. 6.10.3. 6.10.4. 6.10.5. 6.10.6. 6.11. 6.11.1. 6.11.2. 6.11.3. 6.11.4. 6.11.5. 6.11.6. 6.11.7. 6.12. 7. Bootable media ............................................................................................................... 264 How to create bootable media ...............................................................................................................265 Connecting to a machine booted from media ...................................................................
1. Introducing Acronis® Backup & Recovery™ 10 1.1. Acronis Backup & Recovery 10 overview Based on Acronis’ patented disk imaging and bare metal restore technologies, Acronis Backup & Recovery 10 succeeds Acronis True Image Echo as the next generation disaster recovery solution.
Overview of all configured and running operations with color-coding for successful and failed operations • Enterprise level of security Controlling user rights to perform operations and access backups Running services with minimal user rights Restricted remote access to a backup agent Secure communication between the product components Using third-party certificates for authentication of the components Data encryption options for both data transmission and storage Backup of remote machines to a centralize
2. Install Acronis Backup & Recovery 10 Agents on the machines that need data protection. When installing the agents, register each of the machines on the management server. To do so, enter the server's IP or name and the centralized administrator's credentials in one of the installation wizard's windows. 3. Install Acronis Backup & Recovery 10 Management Console (p. 22) on the machine from which you prefer to operate.
• Using deduplication 1. Install Acronis Backup & Recovery 10 Storage Node (p. 21) and add it to the management server. 2. Create the deduplicating managed vault on the storage node. 3. Install the Acronis Deduplication add-on to the agent on all machines that will back up to the deduplicating vault. 4. Ensure that the backup plans you create use the managed vault as destination for the backup archives.
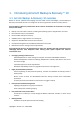
Acronis Backup & Recovery 10 Management Console - Welcome screen Key elements of the console workspace Name Description Navigation pane Contains the Navigation tree and the Shortcuts bar and lets you navigate to the different views (see the Navigation pane (p. 11) section.) Actions and tools pane Contains bars with a set of actions that can be performed and tools (see the Actions and Tools pane (p. 13) section).
Navigation tree The Navigation tree enables you to navigate across the program views. Views depend on whether the console is connected to a managed machine or to the management server. Views for a managed machine When the console is connected to a managed machine, the following views are available in the navigation tree. • [Machine name]. Root of the tree also called a Welcome view. Displays the name of the machine the console is currently connected to.
the history of operations logged in the local logs of the registered machines and the storage nodes. Shortcuts bar The Shortcuts bar appears under the navigation tree. It offers you an easy and convenient way of connection to the machines in demand by adding them as shortcuts. To add a shortcut to a machine 1. Connect the console to a managed machine. 2. In the navigation tree, right-click the machine's name (a root element of the navigation tree), and then select Create shortcut.
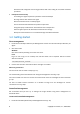
Actions Contains a list of common operations that can be performed on a managed machine or on a management server. Always the same for all views. Clicking the operation opens the respective action page (see the Action pages (p. 16) section.) All the actions can also be accessed in the Actions menu. "Actions" bar on a managed machine and on a management server Tools Contains a list of the Acronis tools. Always the same across all the program views. All the tools can also be accessed in the Tools menu.
The management console "remembers" the way the panes' borders are set. When you run the management console next time, all the panes' borders will have the same position that was set previously. 1.2.1.4. Main area, views and action pages The main area is a basic place where you work with the console. Here you create, edit and manage backup plans, policies, tasks and perform other operations.
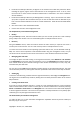
o o o By clicking in the items in the [Item's name] Actions bar (on the Actions and Tools pane); By selecting the items in the Actions menu; By right-clicking the item and selecting the operation in the context menu. Action pages An action page appears in the main area when clicking any action item in the Actions menu, or in the Actions bar on the Actions and tools pane. It contains steps you need to perform in order to create and launch any task, or a backup plan, or backup policy.
Action page - Controls Acronis Backup & Recovery 10 remembers the changes you made on the action pages. For example, if you started to create a backup plan, and then for any reason switched to another view without accomplishing the plan creation, you can click the Back navigation button on the menu. Or, if you have passed several steps forward, click the Down arrow and select the page where you started the plan creation from the list.
Console The console provides Graphical User Interface and remote connection to the agents and other Acronis Backup & Recovery 10 components. 1.3.1. Agent for Windows This agent enables disk-level and file-level data protection under Windows. Disk backup Disk-level data protection is based on backing up either a disk or a volume file system as a whole, along with all the information necessary for the operating system to boot; or all the disk sectors using the sector-by-sector approach (raw mode).
1.3.1.2. Deduplication This add-on enables the agent to back up data to deduplicating vaults managed by Acronis Backup & Recovery 10 Storage Node. 1.3.2. Agent for Linux This agent enables disk-level and file-level data protection under Linux. Disk backup Disk-level data protection is based on backing up either a disk or a volume file system as a whole, along with all information necessary for the operating system to boot; or all the disk sectors using the sector-by-sector approach (raw mode.
1.3.4.1. Management Server Acronis Backup & Recovery 10 Management Server is the central server that drives data protection within the enterprise network. The management server provides the administrator with: • • • • • a single entry point to the Acronis Backup & Recovery 10 infrastructure an easy way to protect data on numerous machines (p. 390) using backup policies (p. 383) and grouping enterprise-wide monitoring functionality the ability to create centralized vaults (p.
1.3.4.2. Storage Node Acronis Backup & Recovery 10 Storage Node is a server aimed to optimize usage of various resources (such as the corporate storage capacity, the network bandwidth, or the managed machines' CPU load) required for the enterprise data protection. This goal is achieved through organizing and managing the locations that serve as dedicated storages of the enterprise backup archives (managed vaults).
Encryption A managed vault can be configured so that anything written to it is encrypted and anything read from it is decrypted transparently by the storage node, using a vault-specific encryption key stored on the node server. In case the storage medium is stolen or accessed by an unauthorized person, the malefactor will not be able to decrypt the vault contents without access to this specific storage node.
1.4.
• Various Linux distributions, including: o Red Hat Enterprise Linux 4 and 5 o CentOS 4 and 5 o Fedora 9 and 10 o Ubuntu 8.10 (Intrepid Ibex) and 9.04 (Jaunty Jackalope) o Debian 4 (Lenny) and 5 (Etch) o SUSE Linux Enterprise Server 10 o openSUSE o Asianux • x64 versions of the above Linux distributions and other Linux distributions are also supported. The agent for Linux is in fact a 32-bit executable.
Acronis Backup & Recovery 10 Management Console Item Minimum requirements Recommended Computer processor Modern processor, 800 MHz or faster 1 GHz 32-bit (x86) or 64-bit (x64) processor Itanium platforms are not supported System memory 128 MB 512 MB or more Screen resolution 800*600 pixels 1024*768 pixels or higher Installation disk space 50 MB Other hardware Mouse Network interface card or a virtual network adapter CD-RW/ DVD-RW, drive for bootable media creation Acronis Backup & Recovery 1
Acronis License Server Item Minimum requirements Recommended System memory 128 MB 256 MB or more Installation disk space 25 MB 1.7. Technical support As part of a purchased annual Support charge you are entitled to Technical Support as follows: to the extent that electronic services are available, you may electronically access at no additional charge, Support services for the Software, which Acronis shall endeavor to make available twenty four (24) hours a day, seven (7) days per week.
2. Understanding Acronis Backup & Recovery 10 This section attempts to give its readers a clear understanding of the product so that they can use the product in various circumstances without step-by-step instructions. 2.1. Basic concepts Please familiarize yourself with the basic notions used in the Acronis Backup & Recovery 10 graphical user interface and documentation. Advanced users are welcome to use this section as a step-by-step quick start guide. The details can be found in the context help.
The following diagram illustrates the notions discussed above. For more definitions please refer to the Glossary. 28 Copyright © Acronis, Inc.
Backup using bootable media You can boot the machine using the bootable media, configure the backup operation in the same way as a simple backup plan and execute the operation. This will help you extract files and logical volumes from a system that failed to boot, take an image of the offline system or back up sector-by-sector an unsupported file system. Recovery under operating system When it comes to data recovery, you create a recovery task on the managed machine.
The following diagram illustrates data recovery under the operating system (online). No backup can proceed on the machine while the recovery operation is taking place. If required, you can connect the console to another machine and configure a recovery operation on that machine. This ability (remote parallel recovery) first appeared in Acronis Backup & Recovery 10; the previous Acronis products do not provide it.
If the machine fails to boot or you need to recover data to bare metal, you boot the machine using the bootable media and configure the recovery operation in the same way as the recovery task. The following diagram illustrates the recovery using the bootable media. 2.2. User privileges on a managed machine Windows When managing a machine running Windows, the scope of a user's management rights depends on the user's privileges on the machine.
• Back up and recover the entire machine or any data on the machine, with or without using a disk snapshot. Members of the Administrators group also can: • View and manage backup plans and tasks owned by any user on the machine. Linux When managing a machine running Linux, the user has or obtains the root privileges, and so can: • Back up and recover any data or the entire machine, having full control over all Acronis Backup & Recovery 10 agent operations and log files on the machine.
Plan's credentials and task credentials Any task running on a machine runs on behalf of a user. When creating a plan or a task, you have the option to explicitly specify an account under which the plan or the task will run. Your choice depends on whether the plan or task is intended for manual start or for executing on schedule. Manual start You can skip the Plan's (Task) credentials step. Every time you start the task, the task will run under the credentials with which you are currently logged on.
Full backup A full backup stores all data selected for backup. A full backup underlies any archive and forms the base for incremental and differential backups. An archive can contain multiple full backups or consist of only full backups. A full backup is self-sufficient - you do not need access to any other backup to recover data from a full backup. It is widely accepted that a full backup is the slowest to do but the fastest to restore.
An incremental or differential backup created after disk defragmentation might be considerably larger than usual because defragmentation changes file locations on the disk and the backup reflects these changes. It is recommended that you re-create a full backup after disk defragmentation. The following table summarizes the advantages and shortcomings of each backup type as they appear based on common knowledge.
GFS-related settings of the backup plan Start backup at: Back up on: This step creates the total backup schedule, that is, defines all the days you need to back up on. Assume you select backing up at 8:00 PM on workdays. Here is the total schedule you have defined. “B” stands for “backup”. The total schedule. Schedule: Workdays at 8:00 PM Weekly/Monthly This step forms the daily, weekly and monthly cycles in the schedule. Select a day of the week from the days selected in the previous step.
Backup tasks created according to the GFS scheme by Acronis Backup & Recovery 10. Schedule: Workdays at 8:00 PM Weekly/Monthly: Friday Keep backups: Daily This step defines the retention rule for daily backups. The cleanup task will run after each daily backup and delete all daily backups that are older than you specify. Keep backups: Weekly This step defines the retention rule for weekly backups.
An ideal archive created according to the GFS scheme. Schedule: Workdays at 8:00 PM Weekly/Monthly: Friday Keep daily backups: 7 days Keep weekly backups: 2 weeks Keep monthly backups: 6 months Starting from the third week, weekly backups will be regularly deleted. After 6 months, monthly backups will start to be deleted. The diagram for weekly and monthly backups will look similar to the week-based timescale.
An archive created according to the GFS scheme by Acronis Backup & Recovery 10. Schedule: Workdays at 8:00 PM Weekly/Monthly: Friday Keep daily backups: 7 days Keep weekly backups: 2 weeks Keep monthly backups: 6 months 2.6. Tower of Hanoi backup scheme The need to have frequent backups always conflicts with the cost of keeping such backups for a long time. The Tower of Hanoi (ToH) backup scheme is a useful compromise.
For example, if there are five rings labeled A, B, C, D, and E in the puzzle, the solution gives the following order of moves: The Tower of Hanoi backup scheme is based on the same patterns. It operates with Sessions instead of Moves and with Backup levels instead of Rings. Commonly an N-level scheme pattern contains (Nth power of two) sessions. So, the five-level Tower of Hanoi backup scheme cycles the pattern that consists of 16 sessions (moves from 1 to 16 in the above figure).
• • differential backups on all intermediate levels (B, C and D for five-level pattern) • the scheme forces every backup level to keep only the most recent backup, other backups from the level have to be deleted; however backup deletion is postponed in cases where the backup is a base for another incremental or differential one • an old backup on a level is kept until a new backup has been successfully created on the level.
to this interval and deletes all backups created before that moment. None of the backups created after this moment will be deleted. 2. Keep the archive size within This is the maximum size of the archive. Every time a retention rule is applied, the program compares the actual archive size with the value you set and deletes the oldest backups to keep the archive size within this value. The diagram below shows the archive content before and after the deletion.
Combination of rules 1 and 2 You can limit both the backups’ lifetime and the archive size. The diagram below illustrates the resulting rule. Example Delete backups older than = 3 Months Keep the archive size within = 200GB Never delete backups younger than = 10 Days • Every time the retention rules are applied, the program will delete all backups created more than 3 months (or more exactly, 90 days) ago.
This mode ensures that after each cleanup the archive size and the backups’ age are within the bounds you specify. The consolidation, however, may take a lot of time and system resources. And you still need some extra space in the vault for temporary files created during consolidation. What you need to know about consolidation Please be aware that consolidation is just a method of deletion but not an alternative to deletion.
Command line examples trueimagecmd /create /partition:DYN1,DYN2 /asz This will back up DYN1 and DYN2 volumes to the Acronis Secure Zone. trueimagecmd /create /harddisk:DYN /asz This will back up all dynamic volumes in the system to the Acronis Secure Zone. The boot code on basic GPT volumes is not backed up or recovered. Recovering dynamic volumes A dynamic volume can be recovered • • over any type of existing volume • to unallocated space of a basic disk.
o Backed up (source): Recovered to: Dynamic volume Basic MBR volume Basic GPT volume Dynamic volume Dynamic volume Dynamic volume Dynamic volume Type as of the target Type as of the target Type as of the target Dynamic volume Dynamic volume N/A Type as of the source Simple Basic MBR volume Basic MBR volume Basic MBR volume Basic MBR volume Basic GPT volume Basic GPT volume Basic GPT volume Basic GPT volume Unallocated space (basic MBR disk) Basic MBR volume Basic MBR volume Basic
You can back up data of one or more logical volumes and recover it to a previously created logical volume or a basic (MBR) disk or volume; likewise, it is also possible to recover the data of a basic volume to a logical volume. In each case, the program stores and recovers volume contents only. The type or other properties of the target volume will not change.
3-1 3-2 hdd1 Acronis Secure Zone Pri,Act Pri 63 1219680 Dynamic & GPT Volumes: DYN1 VolGroup00-LogVol00 DYN2 VolGroup00-LogVol01 1219617 2974608 Ext3 FAT32 15269888 1048576 Ext3 Linux Swap The system has three physical disks (Disk 1, Disk 2, and Disk 3). Two logical volumes, DYN1 and DYN2, are arranged across basic volumes 1-2 and 2-1. Disk 3 includes Acronis Secure Zone which is not normally backed up. To back up the logical volume DYN1, select the volume DYN1.
The system has RAID-1 configured on two basic volumes: sdc1, sdd1.
Physical drives that are part of hardware RAID arrays may be listed alongside other disks as if they had a bad partition table or no partition table at all. Backing up such disks does not make sense as it won’t be possible to recover them. 2.11. Tape support Acronis Backup & Recovery 10 supports tape libraries, autoloaders, SCSI and USB tape drives as storage devices.
Tape written on a tape device through... Backup Server Storage Node ABR10 + + + + ATIE 9.1 + + + + ATIE 9.5 - - - + ATIE 9.7 - - - + ABR10 - - - + 2.11.2. Using a single tape drive A tape drive that is locally attached to a managed machine can be used by local backup plans as a storage device. The functionality of a locally attached autoloader or tape library is limited to the ordinary tape drive.
Recovery from a locally attached tape device Before creating a recovery task, insert or mount the tape containing the backup you need to recover. When creating a recovery task, select the tape device from the list of available locations and then select the backup. After recovery is started, you will be prompted for other tapes if the tapes are needed for recovery. 2.12.
With the new Acronis Secure Zone behavior, you obtain the ability to: • • list archives located in the zone and backups contained in each archive • • mount a disk backup to copy files from the backup to a physical disk examine a backup's content safely delete archives and backups from the archives. For more information about operations available in Acronis Secure Zone, see the Personal vaults (p. 166) section.
2.12.3. Universal Restore (Acronis Backup & Recovery 10 Universal Restore) Acronis Backup & Recovery 10 Universal Restore is the Acronis proprietary technology that helps recover and boot up Windows on dissimilar hardware or a virtual machine. The Universal Restore handles differences in devices that are critical for the operating system start-up, such as storage controllers, motherboard or chipset.
Universal Restore relies on the built-in Plug and Play discovery and configuration process to handle hardware differences in devices that are not critical for the system start, such as video, audio and USB. Windows takes control over this process during the logon phase, and if some of the new hardware is not detected, you will have a chance to install drivers for it later manually. Universal Restore and Microsoft Sysprep Universal Restore is not a system preparation tool.
Limitation The only supported archive location is a local drive, or more precisely, any device available through the machine’s BIOS. This may be Acronis Secure Zone, a USB hard drive, a flash drive or any internal hard drive. How it works When configuring a recovery operation, you select disks or volumes to recover from a backup. Acronis Backup & Recovery 10 scans the selected disks or volumes in the backup.
4. Configure the system recovery: select the system disk or volume and select the Use Acronis Active Restore check box. Acronis Active Restore will choose for the boot-up and subsequent recovery the first operating system found during the backup scan. Do not try to recover more than one operating system using Active Restore if you want the result to be predictable. When recovering a multi-boot system, choose only one system volume and boot volume at a time. 5.
Since you connect the console to the management server rather than to each machine and perform all management operations through the central management unit, this way of management is called centralized management (p. 385). Centralized management does not rule out the direct management (p. 387) of each machine. You can connect the console to each machine and perform any direct management operation.
You have to protect each server as a whole, the users' data on the workstations, and the virtual machines. You want to be able to track the health of the data protection, be sure that the backup archives do not store duplicated information and that the obsolete backups are deleted from the storage in a timely manner. These goals can be achieved by regular backup of the desired data items to a centralized vault with deduplication. Setting up the Acronis infrastructure 1.
5. Install Acronis Backup & Recovery 10 Storage Node [ASN] on one of the Windows servers (9). The storage node enables you to organize the infrastructure for storing backup archives and to use the deduplication functionality. The node can be installed together with the management server if the host is capable enough. When installing the storage node, register it on the management server in the same way as you register the agents.
3. Apply the policy to the S_1 group. Make sure that the policy has been successfully deployed to each of the servers. The policy deployment state has to change from Deploying to Deployed and its status has to be OK. To see the resulting backup plans on each of the servers: a. navigate to the All machines group or the S_1 group b. select the server c. select the Backup plans and tasks tab on the Information pane.
2.13.2.3. Protecting the virtual machines Acronis Backup & Recovery 10 Agent for ESX provides the flexibility to protect virtual machines in multiple ways: • Connect the console to the virtual appliance (Agent for ESX) and create a backup plan that will back up all or some of the virtual machines. • Connect the console to the virtual appliance (Agent for ESX) and create an individual backup plan for each machine. The plan will back up the volumes you specify.
• • Active Directory organization unit (OU) IP address range. Multiple criteria can be specified for a dynamic group. For example, a set of criteria "OS equals Windows 2000, OS equals Windows 2003, OU equals Accounting” is interpreted as "all machines running Windows 2000 or Windows 2003 and belonging to the Accounting organizational unit". The All machines group can be thought of as a dynamic group with the single built-in criterion: include all the registered machines. 2.13.3.3.
3, 4, 5, 6 - the salesmen's machines (Windows XP) from the "Sales department" AD organization unit. An example of group hierarchy The backup policy on the server has to differ from that on the workstations. The administrator creates the G1 dynamic group that contains machines with the server operating systems, and applies a backup policy to the group.
• edit a group, that is: o change the group name o change the group description o change the dynamic membership criteria • • transform a static group into a dynamic one by adding membership criteria transform a dynamic group into a static one with two options: o keep the group members o remove the group members • • move a group from the root to another group (any group type to any group type) • • move a group from one parent group to another (any group type to any group type) move a group from the p
management server tracks and displays personal statuses for each machine that it works with, as well as the policy's cumulative status. 2.13.4.1. A policy on a machine or a group In the diagrams below, each numbered scheme illustrates the result of the respectively numbered action.
4. To completely revoke the policy from the machine, revoke it from both the group and the machine. 2.13.4.2. Operations with a machine This section is a simplified illustration of what happens with the policies on a machine when the machine is moved, copied, or deleted from a group.
2.13.4.3. Inheritance of policies Policy inheritance can be easily understood if we assume that a machine can be a member of only one group besides the All machines group. Let's start from this simplified approach. In the diagram below, the container stands for a group; the two-color circle stands for a machine with two applied policies; the three-color circle stands for a machine with three applied policies and so on. 68 Copyright © Acronis, Inc.
Besides the All machines group, we have the custom G1 group in the root and the custom G2 group, which is G1's child. The "green" policy, applied to the All machines group, is inherited by all machines. The "orange" policy, applied to G1, is inherited by the G1 members and all its child groups, both immediate and indirect. The "blue" policy, applied to G2, is inherited only by the G2 members since G2 does not have child groups. The "violet" policy is applied straight to machine #4.
#4 #5 or #6 "green" Inherited All machines -> #4 "orange" Inherited G1 -> G2 -> #4 "blue" Inherited G2 -> #4 "violet" Applied directly "green" Inherited All machines -> #5 or #6 "orange" Inherited G1 -> G2 -> #5 or #6 "blue" Inherited G2 -> #5 or #6 2.13.5. Backup policy's state and statuses Centralized management presumes that the administrator can monitor the health of the entire product infrastructure using a few easily understandable parameters.
You may change grouping conditions or the machine may change its properties so that the machine leaves one group and is included into another. This may result in revoking one policy and deploying another policy. In this case, the first policy's state on the machine will be Revoking and the second policy's state will be Deploying. The policies can appear in the GUI simultaneously or one after another. Backup policy state diagram 2.13.5.2.
Examples Assume, the selection rule states that the policy has to back up volumes D: and F:. The policy is applied to both Linux and Windows machines. Once the first backup is started, the policy gets the Error status on the Linux machines and on the Windows machines that do not have such volumes. The policy gets the Warning status on Windows machines that have either a D: or F: volume, unless an event that will result in an error occurs.
"Deploying, Deployed". When the deployment completes on both machines, the state will be "Deployed". 2.13.5.4. Policy status on a group To see this parameter, select Machines in the tree, then select the group, and then select the Backup policies tab on the Information pane. This status is defined as the most severe status of the policy on the machines included in the group and its child groups. If the policy is currently not applied to any machine, its status is "OK". 2.13.5.5.
Deduplication may also reduce network load: if, during a backup, a file or a disk block is found to be a duplicate of an already stored one, its content is not transferred over the network. Deduplication is performed on disk blocks (block-level deduplication) and on files (file-level deduplication), for disk-level and file-level backups respectively. In Acronis Backup & Recovery 10, deduplication consists of two steps: Deduplication at source Performed on a managed machine during backup.
Before sending the item to the vault, the agent queries the deduplication database to determine whether the item's hash value is the same as that of an already stored item. If so, the agent sends only the item's hash value; otherwise, it sends the item itself. Some items, such as encrypted files or disk blocks of a non-standard size, cannot be deduplicated, and the agent always transfers such items to the vault without calculating their hash values.
• When performing incremental backups of data that does not change itself, but changes its location. Such is the case when multiple pieces of data circulate over the network or within one system. Each time a piece of data moves, it is included in the incremental backup which becomes sizeable while it does not contain new data. Deduplication helps to solve the problem: each time an item appears in a new place, a reference to the item is saved instead of the item itself.
What ratio to expect Although, in some situations, the deduplication ratio may be very high (in the previous example, increasing the number of machines would lead to ratios of 3:1, 4:1, etc.), a reasonable expectation for a typical environment is a ratio between 1.2:1 and 1.6:1. As a more realistic example, suppose that you are performing a file-level or disk-level backup of two machines with similar disks.
• If you protected the archive with a password Files that were not deduplicated are stored in the archive as they would be in a non-deduplicating vault. Deduplication and NTFS data streams In the NTFS file system, a file may have one or more additional sets of data associated with it—often called alternate data streams. When such file is backed up, so are all its alternate data streams. However, these streams are never deduplicated—even when the file itself is. 2.13.7.
2.13.7.2. Privileges for local connection Windows Local connection on a machine running Windows can be established by any user who has the "Log on locally" user right on the machine. Linux Establishing a local connection on a machine running Linux, and managing such machine, requires the root privileges on it. To establish a local connection as the root user 1.
2.13.7.4. Privileges for remote connection in Linux Remote connections to a machine running Linux—including those performed by the root user—are established according to authentication policies, which are set up by using Pluggable Authentication Modules for Linux, known as Linux-PAM. For the authentication policies to work, we recommend installing the latest version of Linux-PAM for your Linux distribution. The latest stable source code of Linux-PAM is available at Linux-PAM source code Web page.
Example 2 The above authentication policy might not work on Linux distributions with kernel version 2.4— including Red Hat Linux and VMware® ESX™ 3.5 Upgrade 2—because the pam_succeed_if.so module is not supported there. In this case, you can use the following authentication policy. 1. As the root user, create the file /etc/pam.d/Acronis_trusted_users 2. Add the names of the non-root users whom you want to allow to manage the machine, to this file, one user name per line.
Management Console; they have the same management rights on the registered machines as users with administrative privileges on those machines—regardless of the contents of Acronis security groups there. To be able to connect to the management server remotely, an administrator of the management server must also be a member of the Acronis Remote Users group.
A regular user, such as a member of the Users group on the storage node, can: • • Create archives in any centralized vault managed by the storage node View and manage archives owned by the user A user who is a member of the Administrators group on the storage node can additionally: • View and manage any archive in any centralized vault managed by the storage node • Create centralized vaults to be managed by the storage node—provided that the user is also an Acronis Backup & Recovery 10 Management Ser
2.13.7.8. Rights for Acronis services The Acronis Backup & Recovery 10 Agent for Windows, Acronis Backup & Recovery 10 Management Server, and Acronis Backup & Recovery 10 Storage Node components run as services. When installing any of these components, you need to specify the account under which the component's service will run. For each service, you can either create a dedicated user account (recommended in most cases) or specify an existing account of a local or domain user—for example: .
2.13.8. Communication between Acronis Backup & Recovery 10 components This section describes how Acronis Backup & Recovery 10 components communicate with each other using secure authentication and encryption. This section also provides information on configuring communication settings, selecting a network port for communication, and managing security certificates. 2.13.8.1.
Acronis Backup & Recovery 10 Management Server Yes Yes Acronis Backup & Recovery 10 Storage Node Yes Yes Acronis PXE Server No Yes Acronis Backup & Recovery 10 Bootable Agent Yes Yes 2.13.8.3. Configuring communication settings You can configure communication settings, such as whether to encrypt transferred data, for Acronis Backup & Recovery 10 components installed on one or more machines, by using Acronis Administrative Template.
Enabled The component will use the specified port; type the port number in the Server TCP Port box. Disabled The same as Not configured. For details about the network port and instructions on how to specify it in Linux and a bootable environment, see Network port configuration (p. 89). Client Encryption options Specifies whether to encrypt the transferred data when the component acts as a client application, and whether to trust self-signed SSL certificates.
Always use The use of SSL certificates is enabled. The connection will be established only if the use of SSL certificates is enabled on the server application. Disabled The same as Not configured. Server Encryption options Specifies whether to encrypt the transferred data when the component acts as a server application. Select one of the following: Not configured The component will use the default setting, which is to use encryption if possible (see the following option). Enabled Encryption is enabled.
2.13.8.4. Network port configuration Acronis Backup & Recovery 10 components use the 9876/TCP network communication port by default. The server listens to this port for incoming connection. This port is also used as default by the Acronis client. During component installation you might be asked to confirm the port opening or to open the port manually, in case you are using a firewall other than Windows Firewall.
In Windows, the certificate path and the server certificate's file name are specified in the registry key HKEY_LOCAL_MACHINE\SOFTWARE\Acronis\Encryption\Server. The default path is %SystemDrive%\Program Files\Common Files\Acronis\Agent. To ensure reliability, the certificate is stored in Windows Certificate Store at the following location: Certificates (Local Computer)\Acronis Trusted Certificates Cache.
Non-self-signed certificates You have the option to use trusted third-party certificates or certificates created by your organization's CA as an alternative to self-signed certificates, by using Acronis Certificate Commandline Utility. To install a third-party certificate 1. Click Start, then click Run, and then type: certmgr.msc 2. In the Certificates console, double-click the name of the certificate that you want to install. 3. In the Details tab, in the list of fields, click Thumbprint. 4.
3. Options This section covers Acronis Backup & Recovery 10 options that can be configured using Graphical User Interface. The content of this section is applicable to both stand-alone and advanced editions of Acronis Backup & Recovery 10. 3.1. Console options The console options define the way information is represented in the Graphical User Interface of Acronis Backup & Recovery 10. To access the console options, select Options > Console options from the top menu. 3.1.1.
The option defines whether to display the pop-up messages about task run results: successful completion, failure or success with warnings. When displaying of pop-up messages is disabled, you can review the task execution states and results in the Tasks view. The preset is: Enabled for all results. To make a setting for each result (successful completion, failure or success with warnings) individually, select or clear the respective check box. 3.1.3.
3.1.5. Fonts This option is effective when the console is connected to a managed machine or to the management server. The option defines the fonts to be used in the Graphical User Interface of Acronis Backup & Recovery 10. The Menu setting affects the drop-down and context menus. The Application setting affects the other GUI elements. The preset is: System Default font for both the menus and the application interface items.
entries. You can select the amount of log entries to retain. The default 95% setting will keep most of the log. With the minimum 1% setting, the log will be nearly cleared. Even if you remove the log size limit, logging events to an SQL Server Express database will stop after the log size reaches 4 GB, because SQL Express Edition has the 4 GB per database limit. Set the maximum log size to approximately 3.8 GB if you want to use the maximum capacity of the SQL Express database.
To set up sending SNMP messages 1. Select the Send messages to SNMP server check box. 2. Specify the appropriate options as follows: o Types of events to send – choose the types of events: All events, Errors and warnings, or Errors only. o Server name/IP – type the name or IP address of the host running the SNMP management application, the messages will be sent to. o Community – type the name of the SNMP community to which both the host running SNMP management application and the sending machine belong.
b. Click Add, and then enter the name or IP address of the machine where the Acronis WOL Proxy is installed. Provide access credentials for the machine. c. Repeat this step if there are several Acronis WOL Proxies. 3. When scheduling a backup policy, enable the Use Wake-On-LAN setting. You also have the ability to delete proxies from the list. Please keep in mind that any change to this option affects the entire management server.
On the vCenter Server side When integration is enabled, the vCenter Server will store and show information about when and how successful each virtual machine was backed up. The same information is displayed in the Status and the Last backup columns on the management server. Backup status - the most severe status of all backup plans and backup policies on the machine. For more information, see "Backup plan statuses (p. 193)" and "Policy status on a machine (p. 71)".
3.3.2. Event tracing It is possible to duplicate log events generated by the agent(s), operating on the managed machine, in the Application Event Log of Windows; or send the events to the specified SNMP managers. If you do not modify the event tracing options anywhere except for here, your settings will be effective for each local backup plan and each task created on the machine.
The option defines whether the agent(s) operating on the managed machine have to send the log events to the specified Simple Network Management Protocol (SNMP) managers. You can choose the types of events to be sent. You can override the settings set here, exclusively for the events that occur during backup or during recovery, in the Default backup and recovery options (p. 101).
5. Click OK. You might be asked for lmmib2.dll that can be found on the installation disc of your operating system. Linux To receive SNMP messages on a machine running Linux, the net-snmp (for RHEL and SUSE) or the snmpd (for Debian) package has to be installed. SNMP can be configured using the snmpconf command. The default configuration files are located in the /etc/snmp directory: • • /etc/snmp/snmpd.conf - configuration file for the Net-SNMP SNMP agent /etc/snmp/snmptrapd.
• • The backup destination (networked location or local disk) The backup scheme (Back up now or using the scheduler) The following table summarizes the availability of the backup options. Agent for Windows Agent for Linux Bootable media (Linux-based or PE-based) Disk backup File backup Disk backup File backup Disk backup File backup + + + + + + Source files exclusion (p. 104) + + + + + + Pre/Post backup commands (p.
Error handling (p. 118): Do not show messages and dialogs while processing (silent mode) + + + + + + Re-attempt if an error occurs + + + + + + Ignore bad sectors + + + + + + Dual destination (p. 119) Dest: local Dest: local Dest: local Dest: local - - Task start conditions (p. 119) + + + + - - Task failure handling (p.
3.4.1.1. Archive protection This option is effective for Windows and Linux operating systems and bootable media. This option is effective for both disk-level and file-level backup. The preset is: Disabled. To protect the archive from unauthorized access 1. Select the Set password for the archive check box. 2. In the Enter the password field, type a password. 3. In the Confirm the password field, re-type the password. 4.
• Exclude all system files and folders Select this check box to skip files and folders with the System attribute. If a folder is System, all of its contents — including files that are not System — will be excluded. You can view file or folder attributes in the file/folder properties or by using the attrib command. For more information, refer to the Help and Support Center in Windows.
The program does not support interactive commands, i.e. commands that require user input (for example, "pause"). To specify pre/post commands 1. Enable pre/post commands execution by checking the following options: o Execute before the backup o Execute after the backup 2. Do any of the following: o Click Edit to specify a new command or a batch file o Select the existing command or the batch file from the drop-down list 3. Click OK.
Post-backup command To specify a command/executable file to be executed after the backup is completed 1. In the Command field, type a command or browse to a batch file. 2. In the Working directory field, specify a path to a directory where the command/batch file will be executed. 3. In the Arguments field, specify the command execution arguments, if required. 4. If successful execution of the command is critical for your backup strategy, select the Fail the task if the command execution fails check box.
o Select the existing command or the batch file from the drop-down list 3. Click OK. Pre-data capture command To specify a command/batch file to be executed before data capture 1. In the Command field, type a command or browse to a batch file. The program does not support interactive commands, i.e. commands that require user input (for example, "pause".) 2. In the Working directory field, specify a path to a directory where the command/batch file will be executed. 3.
Check box Selection Fail the task if the command execution fails Selected Cleared Selected Cleared Do not back up until the command execution is complete Selected Selected Cleared Cleared Result Preset Continue the backup only after the command is successfully executed. Delete the TIB file and temporary files and fail the task if the command execution fails. 3.4.1.5. Continue the backup after the command is executed despite command execution failure or success.
The option determines whether to take snapshots of multiple volumes at the same time or one by one. The preset is: Enable. When this option is set to Enable, snapshots of all volumes being backed up will be created simultaneously. Use this option to create a time-consistent backup of data spanned across multiple volumes, for instance for an Oracle database. When this option is set to Disable, the volumes' snapshots will be taken one after the other.
3.4.1.8. Compression level This option is effective for Windows and Linux operating systems and bootable media. The option defines the level of compression applied to the data being backed up. The preset is: Normal. The optimal data compression level depends on the type of data being backed up. For example, even maximum compression will not significantly reduce the archive size if the archive contains essentially compressed files, such as .jpg, .pdf or .mp3. However, formats such as .doc or .
• Normal – to run the backup process with normal speed, allocating resources on a par with other processes • High – to maximize the backup process speed by taking resources from other processes. HDD writing speed This option is effective for Windows and Linux operating systems and bootable media.
3.4.1.10. Notifications Acronis Backup & Recovery 10 provides the ability of notifying users about backup completion through e-mail or the messaging service. E-mail This option is effective for Windows and Linux operating systems. This option is not available when operating under the bootable media. The option enables you to receive e-mail notifications about the backup task's successful completion, failure or need for interaction along with the full log of the task. The preset is: Disabled.
• Password – enter the password. 6. Click Send test e-mail message to check if the settings are correct. Messenger service (WinPopup) This option is effective for Windows and Linux operating systems on the sending machine and only for Windows on the receiving machine. This option is not available when operating under bootable media. The option enables you to receive WinPopup notifications about the backup task's successful completion, failure or need for interaction. The preset is: Disabled.
To select whether to log the backup operations events in the Application Event Log of Windows: Choose one of the following: • Use the setting set in the Machine options – to use the setting specified for the machine. For more information refer to Machine options (p. 98). • Log the following event types – to log events of the backup operations in the Application Event Log.
• Do not send SNMP notifications – to disable sending the log events of the backup operations to SNMP managers. 3.4.1.12. Fast incremental/differential backup The option is effective in Windows and Linux operating systems and bootable media. This option is effective for incremental and differential disk-level backup. This option defines whether a file change is detected using the file size and time stamp or by comparing the file contents to those stored in the archive. The preset is: Enabled.
to multiple CDs or DVDs later on. You might also want to split the backup destined to an FTP server, since data recovery directly from an FTP server requires the backup to be split into files no more than 2GB in size. 3.4.1.14. File-level security These options are effective only for file-level backup in Windows operating systems. In archives, store encrypted files in a decrypted state This option defines whether to decrypt files before saving them to a backup archive. The preset is: Disabled.
Select the check boxes for the components you want to put on the bootable media: • One-Click Restore is the minimal addition to a disk backup stored on removable media, allowing for easy recovery from this backup. If you boot a machine from the media and click Run Acronis One-click Restore, the disk will be immediately recovered from the backup contained on the same media.
the data will be backed up and you will be able to mount the resulting disk backup and extract valid files to another disk. 3.4.1.17. Dual destination This option is effective for both Windows and Linux operating systems, when the primary backup destination is a local folder or Acronis Secure Zone and the secondary destination is another local folder or network share. Managed vaults and FTP servers are not supported as secondary destinations. The preset is: Disabled.
The preset is: Wait until the conditions are met. Wait until the conditions are met With this setting, the scheduler starts monitoring the conditions and launches the task as soon as the conditions are met. If the conditions are never met, the task will never start. To handle the situation when the conditions are not met for too long and further delaying the backup is becoming risky, you can set the time interval after which the task will run irrespective of the condition.
The program will try to execute the failed task again if you select the Restart a failed task check box and specify the number of attempts and the time interval between the attempts. The program stops trying as soon as an attempt completes successfully OR the specified number of attempts is performed, depending on which comes first. If the task fails because of a mistake in the backup plan, you can edit the plan while the task is in the Idle state.
If the console is connected to the management server The Use a separate tape set option has more precise definitions. So for the backup policy to be created you can use a separate tape set for all machines or for each single machine. The A single tape set for all machines option is selected by default. Generally this option ensures more efficient usage of tapes, than the A separate tape set for each single machine option.
When starting backup to a non-empty tape in a locally attached tape device, the program will warn that you are about to lose data on the tape. To disable this warning, select this check box. Dismount media after backup has finished This option is effective in Windows and Linux operating systems. This option is effective when backing up to a removable media (CD, DVD, tape or floppy disk.) The preset is: Disabled.
When the option is enabled, Acronis Backup & Recovery 10 will restart the machine after the backup process is completed. For example, if the machine boots from a hard disk drive by default and you select this check box, the machine will be restarted and the operating system will start as soon as the bootable agent has finished creating the backup.
3.4.2. Default recovery options Each Acronis agent has its own default recovery options. Once an agent is installed, the default options have pre-defined values, which are referred to as presets in the documentation. When creating a recovery task, you can either use a default option, or override the default option with the custom value that will be specific for this task only. You can also customize a default option itself by changing its value against the pre-defined one.
Validate backup archive before recovery + + + + + + Check file system after recovery + - + - + - Reboot machine automatically if it is required for recovery + + + + - - Windows recovery - Windows recovery - Windows recovery - E-mail (p. 128) + + + + - - Win Pop-up (p. 129) + + + + - - Windows events log (p. 130) + + - - - - SNMP (p. 130) + + + + - - Change SID after recovery Notifications: Event tracing: 3.4.2.1.
Pre-recovery command To specify a command/batch file to be executed before the recovery process starts 1. In the Command field, type a command or browse to a batch file. The program does not support interactive commands, i.e. commands that require user input (for example, "pause".) 2. In the Working directory field, specify a path to a directory where the command/batch file will be executed. 3. In the Arguments field specify the command’s execution arguments, if required. 4.
3.4.2.2. Recovery priority This option is effective for both Windows and Linux operating systems. This option is not available when operating under the bootable media. The priority of a process running in a system determines the amount of CPU and system resources allocated to that process. Decreasing the recovery priority will free more resources for other applications.
To configure e-mail notification 1. Select the Send e-mail notifications check box to activate notifications. 2. In the E-mail addresses field, type the e-mail address to which notifications will be sent. You can enter several addresses separated by semicolons. 3.
The Messenger service is not started by default in the Microsoft Windows Server 2003 family. Change the service Startup mode to Automatic and start the service. To configure WinPopup notifications: 1. Select the Send WinPopup notifications check box. 2. In the Machine name field, enter the name of the machine to which notifications will be sent. Multiple names are not supported. 3.
This option is not available when operating under the bootable media. The option defines whether the agent(s) operating on the managed machine have to send the log events of the recovery operations to the specified Simple Network Management Protocol (SNMP) managers. You can choose the types of events to be sent. Acronis Backup & Recovery 10 provides the following Simple Network Management Protocol (SNMP) objects to SNMP management applications: 1.3.6.1.4.1.24769.100.200.1.
When a recoverable error occurs, the program re-attempts to perform the unsuccessful operation. You can set the time interval and the number of attempts. The attempts will be stopped as soon as the operation succeeds OR the specified number of attempts is performed, depending on which comes first. For example, if the network location becomes unavailable or not reachable, the program will attempt to reach the location every 30 seconds, but no more than 5 times.
The preset is Disabled. This option enables booting the machine into the recovered operating system without user interaction. Change SID after the recovery is finished The preset is Disabled. Acronis Backup & Recovery 10 can generate an unique security identifier (SID) for the recovered system. You do not need a new SID when recovering a system over itself or when creating a system replica that will replace the original system.
4. Vaults A vault is a location for storing backup archives. For ease of use and administration, a vault is associated with the archives' metadata. Referring to this metadata makes for fast and convenient operations with archives and backups stored in the vault. A vault can be organized on a local or networked drive, detachable media or a tape device attached to the Acronis Backup & Recovery 10 Storage Node. There are no settings for limiting a vault size or number of backups in a vault.
A vault is called personal if it was created using direct connection of the console to a managed machine. Personal vaults are specific for each managed machine. Way of working with the "Vaults" view Vaults (on the navigation pane) - top element of the vaults tree. Click this item to display groups of centralized and personal vaults. Centralized. This group is available when the console is connected to a managed machine or to a management server.
Accessing managed vaults To be able to back up to a managed vault, a user must have an account on the machine where the storage node is installed. The scope of a user's privileges in a vault depends on the user's rights on the storage node. A user who is a member of the Users group can view and manage his/her own archives. Members of the Administrators group can view and manage any archive stored on the storage node.
• [for managed vaults only] encryption state (Yes, No) Vault content The Vault content section contains the archives table and toolbar. The archives table displays archives and backups that are stored in the vault. Use the archives toolbar to perform actions on the selected archives and backups. The list of backups is expanded by clicking the "plus" sign to the left of the archive's name.
password (if the vault is encrypted) and information in the Comments field. Validate a vault • The Edit unmanaged vault page lets you edit the vault's name and information in the Comments field. 1 Select the vault. 2 Click Validate. You will be taken to the Validation (p. 246) page with an already pre-selected vault as a source. The vault validation checks all the archives in this vault. Delete a vault 1 Select the vault. 2 Click Delete.
4.1.2.1. Creating a managed centralized vault To create a managed centralized vault, perform the following steps Vault Name Specify a unique name for the vault. Creation of two centralized vaults with the same name is prohibited. Comments [Optional] Enter the distinctive description of the vault being created. Type Select the Managed type. Storage node Select the Acronis Backup & Recovery 10 Storage Node that will manage the vault. You may need to enter access credentials for the storage node. Path (p.
o o o o o on the hard drives local to the storage node on a network share on a Storage Area Network (SAN) on a Network Attached Storage (NAS) on a tape library locally attached to the storage node. To create a new folder for the vault in the selected location, click Create folder. 2. Click OK. A vault can be created in an empty folder only. We do not recommend creating a deduplicating managed vault on a FAT32 volume.
o o o AES 128 – the vault contents will be encrypted using the Advanced Standard Encryption (AES) algorithm with a 128-bit key AES 192 – the vault contents will be encrypted using the AES algorithm with a 192-bit key AES 256 – the vault contents will be encrypted using the AES algorithm with a 256-bit key. 5. Click OK. The AES cryptographic algorithm operates in the Cipher-block chaining (CBC) mode and uses a randomly generated key with a user-defined size of 128, 192 or 256 bits.
To create a new folder for the vault, click Create folder. A vault can be created in an empty folder only. 2. Click OK. 4.1.2.3. Attaching a managed vault A vault managed by a storage node can be attached to another storage node. You might need to do so when retiring storage node hardware, when the storage node is lost or when balancing loads between storage nodes. As a result, the first node stops managing the vault.
4.1.3.1. Overview Acronis Backup & Recovery 10 provides full support of a tape library through Acronis Backup & Recovery 10 Storage Node. The storage node should be installed on the machine a tape library is attached to. Storage node can simultaneously use more than one tape library for keeping archives. To manage a tape library media, the storage node uses the Windows Removable Storage Manager (RSM). See the RSM Media Pools (p. 144) section for more information.
If all cartridges in a tape library have barcodes, the library is ready to be automatically managed by software. Tape libraries are a cost-effective solution for data storages with huge capacity. Moreover, tape is perfect for archiving because cartridges can be stored off-site for enhanced data security. However reading even a small amount of data from a tape library takes much more time (from several seconds to several minutes) than from other types of data storages.
If a tape was used previously, the RSM tries to detect the registered application the tape is concerned to. If the application is not found, the RSM will move the tape into the Unrecognized pool. If the application is not found, but the RSM database has no information about the tape, it will be moved into the Import pool. If the RSM database has the information, the tape moves into its own pool of the application.
Fill the library slots with tape cartridges. If a tape does not get a barcode or its barcode is corrupted, you can define the tape label for identification purposes later. You should have Acronis Backup & Recovery 10 Management Server and Acronis Backup & Recovery 10 Management Console installed on local or remote machines, as well as Acronis Backup & Recovery 10 Storage Node, installed on the machine with the tape library device, and registered in the management server.
At the Delete operation, the vault content will be deleted from the storage node database without accessing the tapes. The plans and tasks that use this vault will fail. The backup archives, belonging to a deleting centralized vault on a tape library, will be deleted as well, but these archives might be recovered by any storage node through the Rescan operation.
The program finds the tapes and inserts them automatically in the right order. The Task Need Interaction window comes up if a required tape is not found. Keep in mind that a data recovery operation may require access to a number of tapes.
To launch the procedure select the tape library vault in the Navigation pane of the console, click Manage tapes and then click Start inventory on the Tape Management window. When inventorying is completed a user has the list of tapes currently loaded into the library. Perform the procedure every time you load new tapes into tape library slots. Rescan As stated above the storage node keeps information about tapes and their contents in a dedicated database.
Tapes from the Free or the Imported pool can be renamed on condition that the user account used to run the storage node service (ASN User) has write permissions for these pools. These permissions are not assigned to ASN User during installation, so you might need to add them manually. To define your own label for a tape, select a related data field, type in a new label, click Eject tape, write the same label on the tape cartridge (to make association with the label) and insert it back into the same slot.
• Ask for user interaction - the backup task will enter the Need Interaction state and wait for the tape, with the required label, to be loaded into the tape library device. • Use a free tape - the backup will be written onto a free tape, so the operation will be paused only if there is no free tape in the library. Always use a free tape If you leave the options below unchanged, then each backup will be written onto the tape specified by the Use a separate tape set option.
Simple backup scheme is disabled, because backup consolidation is impossible for archives located on tapes. Acronis Backup & Recovery 10 provides automation of tape rotation for Grandfather-Father-Son, Tower of Hanoi, and Custom backup schemes. Grandfather-Father-Son (p. 35) (GFS) and Tower of Hanoi (p. 39) (ToH) are the most popular backup schemes to use on tape library devices.
• • the full size of the data to protect is approximately 320 GB • • the approximate size of weekly changes of data is no more than 40 GB the approximate size of daily changes of data is about 16 GB tape capacity is 400 GB. Let’s analyze the results of a combination of GFS and ToH schemes with different tape options for the case. All the below analyzed examples are a simplistic approach to a real case, but provide you with a general conception of backup distribution onto tapes.
• GFS Example 3 (p. 158). The Use a separate tape set option is selected. All the Always use a free tape options are selected. It requires 28 tapes in rotation. These examples demonstrate how the number of tapes required for automated rotation depends on the tape options. If a tape library does not have enough tapes for automated rotation, the Tasks Need Interaction window will sometimes ask you to load a free tape into the library.
• four incremental backups on the 4th week. The next full backup (320 Gb) should be written on Friday of the 4th week. However tape 02 has only 104 Gb of free space at the moment. So after the tape reaches the end, the recording continues from the beginning of free tape 03. Keep in mind, that the Cleanup task is launched after each backup operation for the GFS scheme. This task deletes all the outdated backups.
The next figure shows the actual usage of the tapes with free space instead of the deleted backups on the first Friday of the following year. At the time the differential backup (blue rectangle) is written onto tape 24. The full backup stored on tape 01 is deleted after the next full backup is created onto both tapes 23 and 24 on Friday of the 52nd week. As all backups of tape 01 have been deleted, the tape is considered as free and can be reused.
GFS Example 2 Suppose, the backup plan has the following tape options: • the Use a separate tape set option is selected • the Always use a free tape: For each full backup option is selected • the Always use a free tape: For each incremental backup option is cleared • the Always use a free tape: For each differential backup option is cleared. The example has only one difference from the previous one. That is selection of the Always use a free tape: For each full backup option.
As the GFS backup scheme forces automatic deletion of the outdated backups, on the first Friday of the second year the tapes keep only the backups displayed in the next figure. This figure demonstrates that the GFS Example 2 tape rotation scheme is more suitable for the case than GFS Example 1.
These options define the tape rotation scheme that is classical for GFS. The figure shows the beginning of the rotation scheme that uses 8 tapes for daily backups, 6 tapes for weekly backups and 13 tapes for monthly backups (since there are 13 four-week cycles in a year) for the analyzed case. And one tape is required for the next backup. In total this rotation scheme, combined with the options requires 28 tapes.
go back in the archive) is 8 weeks. Tape rotation for the second case includes 128 daily sessions, i.e. it allows the roll-back period equal 64 days. The roll-back period is always half the number of sessions. Each additional level doubles not only the number of sessions but also the oldest backup age. Let’s return to the analyzed case described in the Case to analyze (p. 152) section, and suppose the ToH settings are the following: • • Schedule: Start the task every 1 day at 11:00 PM. Repeat once.
As the Tower of Hanoi backup scheme forces presence of only one backup on each level, all the outdated backups are deleted automatically. In the next figure the deleted backups are drawn as dark-gray rectangles. Actually the deleted backup is still stored on the tapes, but the information about it is deleted from the storage node database.
The first figure shows the tapes’ usage for the ToH scheme combined with the above mentioned tape options. The recurring part of the scheme contains sixteen backup sessions. The figure displays the backup archive state at the moment when the 17th session is finished. In the figure below the backups deleted at the moment are drawn as dark-gray rectangles.
The figure shows tape rotation for the ToH scheme with these options. Maximal number of tapes used in the rotation is seven that is more than in classical five-level ToH scheme. Two additional tapes used for: 1. keeping an old full backup (postponed deletion) as it is a base for other level backups 2. keeping an old backup on a level until a new backup has been successfully created on the level. The example demonstrates that the tapes’ usage efficiency is reduced.
• • tape rotation scheme ( frequency of backups, retention rules) • requirements to support off-site tape cartridge archives. tape-append options There is no common formula to calculate a number of tapes required in all possible combinations of above listed considerations. But the general way to get a number of tapes for a case includes the following steps: 1. Draw (or write) a chain of backups until the first backup can be deleted 2.
• • average size of incremental backups is I_GB • • compression level provides CL average reduction coefficient average size of differential backups is D_GB selected tape rotation scheme is Custom with the following settings: o full backup - every 10 days o differential backup - every 2 days o incremental backup - every 1 day, every 6 hours o retention rules: delete backups older than 5 days • tape options are the following: o the Use a separate tape set option is selected o the Always use a free tape
• What if I need to use a tape from the tape library in the local tape device and vice versa? Acronis agents create backups on tapes in a format that differs from the format used by the storage node. It is the reason why it is impossible to interchange tapes between tape devices attached to a storage node and attached to a managed machine: a tape written by a storage node cannot be read by an agent in a locally attached tape device. However the storage node can read tapes written by an agent.
name. If you accidentally delete the .meta folder, it will be automatically recreated next time you access the vault. But some information like owner names and machine names may be lost. 4.2.1. Working with the "Personal vault" view This section briefly describes the main elements of the Personal vault view, and suggests the ways to work with them. Vault toolbar The toolbar contains operational buttons that let you perform operations with the selected personal vault.
• [Archive Name] The Actions bar is available when you select an archive in the archives table. Duplicates actions of the archives toolbar. • [Backup Name] The Actions bar is available when you expand the archive and click on any of its backups. Duplicates actions of the archives toolbar. 4.2.2. Actions on personal vaults To perform any operation (except for creation) with a vault, you must select it first.
4.2.2.1. Creating a personal vault To create a personal vault 1. In the Name field, type a name for the vault being created. 2. [Optional] In the Comments field, add a description of the vault. 3. In the Path field, click Change... In the opened Personal Vault Path window, specify a path to the folder that will be used as the vault. A personal vault can be organized on detachable or removable media, on a network share, or on FTP. 4. Click OK.
All the operations described below are performed by clicking the corresponding buttons on the toolbar. These operations can be also accessed from the [Archive name] actions bar (on the Actions and tools pane) and from the [Archive name] actions item of the main menu respectively. The following is a guideline for you to perform operations with archives stored in a vault. To Do Validate an archive Click Validate. The Validation (p. 246) page will be opened with the pre-selected archive as a source.
Recover a disk/volume as a virtual machine Validate a backup Right-click the disk backup, then select Recover as virtual machine. The Recover data (p. 225) page will be opened with the pre-selected backup as a source. Select the location and the type of new virtual machine and then proceed as with regular disk or volume recovery. Click Validate. The Validation (p. 246) page will be opened with the pre-selected backup as a source.
There should be enough space in the vault for temporary files created during consolidation. Backups resulting from consolidation always have maximum compression. 4.3.4. Filtering and sorting archives The following is a guideline for you to filter and sort archives in the archives table. To Do Sort backup archives by any column Click the column's header to sort the archives in ascending order. Filter archives by name, owner, or machine.
5. Scheduling Acronis scheduler helps the administrator adapt backup plans to the company’s daily routine and each employee’s work style. The plans’ tasks will be launched systematically keeping the critical data safely protected. The scheduler uses local time of the machine the backup plan exists on. Before creating a schedule, be sure the machine’s date and time settings are correct. Schedule To define when a task has to be executed, you need to specify an event or multiple events.
The specified period of time has passed since the last successful backup completed + + The scheduler behavior, in case the event occurs but the condition (or any of multiple conditions) is not met is defined by the Task start conditions (p. 119) backup option. What-ifs • What if an event occurs (and a condition, if any, is met) while the previous task run has not completed? The event will be ignored.
Examples "Simple" daily schedule Run the task every day at 6PM. The schedule's parameters are thus set up as follows. 1. Every: 1 day(s). 2. Once at: 06:00:00 PM. 3. Effective: From: not set. The task will be started on the current day, if it has been created before 6PM. If you have created the task after 6 PM, the task will be started for the first time on the next day at 6 PM. To: not set. The task will be performed for an indefinite number of days.
The obvious way is to add five simple schedules. If you spend one minute for examination, you can think out a more optimal way. As you can see, the time interval between the first and the second task's recurrences is 4 hours, and between the third, fourth and fifth is 2 hours. In this case, the optimal way is to add two schedules to the task. First daily schedule 1. Every: 3 day(s). 2. Every: 4 hours. From: 08:00:00 AM Until: 12:00:00 PM. 3. Effective: From: 09/20/2009. To: not set. Second daily schedule 1.
Advanced scheduling settings (p. 183) are available only for machines registered on Acronis Backup & Recovery 10 Management Server. To specify these settings, click Change in the Advanced settings area. All the settings you made are displayed in the Result field at the bottom of the window. Examples "One day in the week" schedule Run the task every Friday at 10PM, starting from a certain date (say 05/14/2009) and ending after six months. The schedule's parameters are thus set up as follows. 1.
Several weekly schedules for one task In the case when the task needs to be run on different days of the weeks with different time intervals, consider adding a dedicated schedule to every desired day of the week, or to several days. For example, you need the task to be run with the following schedule: • • • • Monday: twice at 12 PM (noon) and 9 PM • • • Friday: twice at 12 PM and 9 PM (i.e.
5.3. Monthly schedule Monthly schedule is effective in Windows and Linux operating systems. To specify a monthly schedule In the Schedule area, select the appropriate parameter as follows: Months: <...> Select a certain month(s) you want to run the task in. Days: <...> Select specific days of the month to run the task on. You can also select the last day of the month, irrespective of its actual date. On: <...> <...> Select specific days of the weeks to run the task on.
This schedule is widely used when creating a custom backup scheme. The "Last day of every month" schedule is added to the full backups, while the differential backups are scheduled to be performed once a week and incremental on workdays. For more details, see the Monthly full, weekly differential, and daily incremental backups plus cleanup example in the Custom backup scheme (p. 220) section. "Season" schedule Run the task on all workdays during the northern autumn seasons of 2009 and 2010.
2. On: . 3. Every: 12 hours From: 12:00:00 AM Until: 12:00:00 PM. 4. Effective: From: 11/01/2009. To: not set. Third schedule 1. Months: June, July, August. 2. Days: 1, 15. 3. Once at: 10:00:00 PM. 4. Effective: From: 11/01/2009. To: not set. 5.4. At Windows Event Log event This type of schedule is effective only in Windows operating systems.
Examples "Bad block" emergency backup One or more bad blocks that have suddenly appeared on a hard disk usually indicate that the hard disk drive will soon fail. Suppose that you want to create a backup plan that will back up hard disk data as soon as such a situation occurs. When Windows detects a bad block on a hard disk, it records an event with the event source disk and the event number 7 into the System log; the type of this event is Error.
To view properties of an event, including the event source and event number 1. In Event Viewer, click the name of a log that you want to view—for example, Application. Note: To be able to open the security log (Security), you must be a member of the Administrators group. 2. In the list of events in the right pane, double-click the name of an event whose properties you want to view. 3.
Run the task: Daily Once at: 09:00:00 AM Distribute start time within the time window Maximum delay: 1 Hour(s) Distribution method: Random Then the task's start time on each machine may be any time between 09:00:00 AM and 09:59:59 AM—for instance: First machine: Every day at 09:30:03 AM Second machine: Every day at 09:00:00 AM Third machine: Every day at 09:59:59 AM Example 2 Suppose that you are deploying a backup policy with the following schedule to three machines: Run the task: Daily Every: 2 Hour(s) Fr
The scheduler behavior in case the event occurs but the condition (or any of multiple conditions) is not met, is defined by the Task start conditions (p. 119) backup option. There, you can specify how important the conditions are for the backup strategy: • • • conditions are obligatory - put the backup task run on hold until all the conditions are met. conditions are preferable, but a backup task run has higher priority - put the task on hold for the specified time interval.
(2) If the user becomes idle between 9PM and 11PM, the backup task will start immediately after the user becomes idle. (3) If the user is still active at 11PM, the backup task starts anyway. 5.6.2. Location's host is available Applies to: Windows, Linux "Location's host is available" means that the machine hosting the destination for storing archives on a networked drive is available. Example: Backing up data to the networked location is performed on workdays at 9:00 PM.
As a result, (1) if the user logs off between 04:30:00 PM and 10:00:00 PM, the backup task will start immediately following the logging off. (2) if the user logs off at any other time, the task will be skipped. What if... What if a task is scheduled to be executed at a certain time and this time is outside the specified time interval? For example: • • Event: Daily, Every 1 day(s); Once at 03:00:00 PM. Condition: Fits time interval, from 06:00:00 PM until 11:59:59 PM.
5.6.5. Time since last backup Applies to: Windows, Linux Enables to put a backup task run on hold until the specified time interval since the last successful backup completion passes. Example: Run the backup task after free space on the managed machine has changed by at least 1 GB, but only if more than 12 hours have passed since the last successful backup. • • • Event: When free space changed, Run task if free space has changed by at least: 1 GB.
6. Direct management This section covers operations that can be performed directly on a managed machine by using the direct console-agent connection. The content of this section is applicable to both stand-alone and advanced editions of Acronis Backup & Recovery 10. 6.1. Administering a managed machine This section describes the views that are available through the navigation tree of the console connected to a managed machine, and explains how to work with each view. 6.1.1.
server and run Acronis License Server to manage licenses. license key data was not corrupted. After a successful license check the agent will start working. Please make sure you have a valid license on Acronis License Server. Trial version of product expires in X day(s) Connect Once the trial version of the product is installed, the program starts the countdown of days remaining until the trial period expires. Connect 15 day trial period has expired. Enter a full license key.
How it is determined Errors Highlight the date in red if at least one "Error" entry appeared in the log on this date. Warnings Highlight the date in yellow if no "Error" entries appeared and at least one "Warning" entry appeared in the log on this date. Information Highlight the date in green if only "Information" log entries appeared on this date (normal activity.) The Select current date link focuses selection to the current date.
unneeded columns and show the hidden ones. See the Filtering and sorting backup plans and tasks (p. 198) section for details. • • • In the backup table, select the backup plan (task). Use the toolbar's buttons to take an action on the selected plan (task). See the Actions on backup plans and tasks (p. 195) section for details. You can run, edit, stop and delete the created plans and tasks. Use the Information panel to review detailed information on the selected plan (task). The panel is chevron.
Backup plan statuses A backup plan can have one of the following statuses: Error; Warning; OK. A backup plan status is derived from the results of the last run of the plans' tasks. 1 State How it is determined How to handle Error At least one task has failed.
Need interaction Any running task can put itself into the Need interaction state when it needs human interaction such as changing media or ignoring a read error. The next state may be Stopping (if the user chooses to stop the task) or Running (on selecting Ignore/Retry or another action, such as Reboot, that can put the task to the Running state.) Stopping The user can stop a running task or a task that needs interaction. The task changes to the Stopping state and then to the Idle state.
• Edit the backup policy on the management server in case a centralized plan has failed 2 Warning Last result is "Succeeded with warning" View the log to read the warnings -> [optionally] Perform actions to prevent the future warnings or failure. 3 OK Last result is "Succeeded", "-", or "Stopped" No action is required. 6.1.2.2. The "-" state means that the task has never been started or has been started, but has not finished yet and so its result is not available.
Run a plan/task Backup plan Click Run. In the Run Backup Plan (p. 199) window, select the task you need to be run. Running the backup plan starts the selected task of that plan immediately in spite of its schedule and conditions. Why can't I run the backup plan? • Do not have the appropriate privilege Without the Administrator privileges on the machine, a user cannot run plans owned by other users. Task Click Run. The task will be executed immediately in spite of its schedule and conditions.
Edit a plan/task Backup plan Click Edit. Backup plan editing is performed in the same way as creation (p. 205), except for the following limitations: It is not always possible to use all scheme options, when editing a backup plan if the created archive is not empty (i.e. contains backups). 1 It is not possible to change the scheme to Grandfather-Father-Son or Tower of Hanoi. 2 If the Tower of Hanoi scheme is used, it is not possible to change the number of levels.
Delete a plan/task Backup plan Click Delete. What will happen if I delete the backup plan? The plan's deletion deletes all its tasks. Why can't I delete the backup plan? • The backup plan is in the "Running" state A backup plan cannot be deleted, if at least one of its tasks is running. • Do not have the appropriate privilege Without the Administrator's privileges on the machine, a user cannot delete plans owned by other users. • The backup plan has a centralized origin.
Configuring backup plans and the tasks table By default, the table has six columns that are displayed, others are hidden. If required, you can hide the displayed columns and show hidden ones. To show or hide columns 1. Right-click any column header to open the context menu. The menu items that are ticked off correspond to column headers presented in the table. 2. Click the items you want to be displayed/hidden.
Recovery (disk) Disk backup recovery Recovery (file) File and folder recovery Recovery (volume) Recovery of volumes from a disk backup Recovery (MBR) Master boot record recovery Recovery (disk to existing VM) Recovery of a disk/volume backup to an existing virtual machine Recovery (disk to new VM) Recovery of a disk/volume backup to a new virtual machine Recovery (existing VM) Recovery of a virtual machine backup to an existing virtual machine Recovery (new VM) Recovery of a virtual machine b
Settings The Settings tab displays information on scheduling and the options changed against the default values. Progress The Progress tab is available while the task is running. It is common for all types of tasks. The tab provides information about task progress, elapsed time and other parameters. Backup plan details The Backup plan details window (also duplicated on the Information panel) aggregates in four tabs all the information on the selected backup plan.
• • Archive name - name of the archive. Archive comments - comments on the archive (if provided). Settings The Settings tab displays the following information: • • • Backup scheme - the selected backup scheme and all its settings with schedules. Validation (if selected) - events before or after which the validation is performed, and validation schedule. Backup options - backup options changed against the default values. 6.1.3.
To Do Select a single log entry Click on it. Select multiple log entries • non-contiguous: hold down CTRL and click the log entries one by one • contiguous: select a single log entry, then hold down SHIFT and click another entry. All the entries between the first and last selections will be selected too. View a log entry’s details 1 Select a log entry. 2 Do one of the following • Click View Details. The log entry's details will be displayed in a separate window.
Filter log entries by task, managed entity, machine, code, owner Type the required value (task name, machine name, owner name, etc.) in the field below the respective column header. Sort log entries by date and time Click the column's header to sort the log entries in ascending order. Click it once again to sort the log entries in descending order. As a result you will see that the list of log entries fully or just partly coincide with the entered value.
6.2. Creating a backup plan Before creating your first backup plan (p. 383), please familiarize yourself with the basic concepts (p. 27) used in Acronis Backup & Recovery 10. To create a backup plan, perform the following steps. General Plan name [Optional] Enter a unique name for the backup plan. A conscious name lets you identify the plan among others. Plan's credentials (p. 207) [Optional] The backup plan will run on behalf of the user who is creating the plan.
Archive comments [Optional] Enter comments on the archive. To access this option, select the Advanced view check box. How to back up Backup scheme (p. 213) Specify when and how often to back up your data; define for how long to keep the created backup archives in the selected location; set up schedule for the archive cleanup procedure. Use well-known optimized backup schemes, such as Grandfather-Father-Son and Tower of Hanoi; create a custom backup scheme, or back up data once.
Host (p. 223) Specify the machine that will perform the conversion. The machine has to have Acronis Backup & Recovery 10 Agent for Windows, Agent for ESX/ESXi or Agent for Hyper-V installed. Virtualization server (p. 223) Here you select the resulting virtual machine type and location. Available options depend on the host you selected in the previous step. Storage (p. 223) Choose the storage on the virtualization server or the folder to place the virtual machine files in.
To learn more about operations available depending on the user privileges, see the Users' privileges on a managed machine (p. 31) section. 6.2.3. Source type Select the type of data you want to be backed up on the managed machine. The list of available data types depends on the agents running on the machine: Files Available if the Acronis Backup & Recovery 10 Agent for Windows (or for Linux) is installed. Select this option to back up specific files and folders.
What does a disk or volume backup store? For supported file systems, with the sector-by-sector option turned off, a disk or volume backup stores only those sectors that contain data. This reduces the resulting backup size and speeds up the backup and recovery operations. Windows The swap file (pagefile.sys) and the file that keeps the RAM content when the machine goes into hibernation (hiberfil.sys) are not backed up. After recovery, the files will be re-created in the appropriate place with the zero size.
The program will access the source data using the credentials you specify. Use this option if the plan's account does not have access permissions to the data. Specify: • User name. When entering the name of an Active Directory user account, be sure to also specify the domain name (DOMAIN\Username or Username@domain) • Password. The password for the account. 2. Click OK. 6.2.6. Exclusions Set up exclusions for the specific types of files you do not wish to back up.
6.2.7. Archive Specify where the archive will be stored and the name of the archive. 1. Selecting the destination Enter the full path to the destination in the Path field, or select the desired destination in the folders tree. • • • • To back up data to a centralized vault, expand the Centralized group and click the vault. To back up data to a personal vault, expand the Personal group and click the vault.
Backing up to an existing archive You can configure the backup plan to back up to an existing archive. To do so, select the archive in the archives table or type the archive name in the Name field. If the archive is protected with a password, the program will ask for it in the pop-up window. By selecting the existing archive, you are meddling in the area of another backup plan that uses the archive.
6.2.9. Backup schemes Choose one of the available backup schemes: • Back up now – to create a backup task for manual start and run the task immediately after its creation. • Back up later – to create a backup task for manual start OR schedule one-time task execution in the future. • • Simple – to schedule when and how often to backup data and specify retention rules. Grandfather-Father-Son – to use the Grandfather-Father-Son backup scheme.
6.2.9.3. Simple scheme With the simple backup scheme you just schedule when and how often to back up data and set the retention rule. At the first time a full backup will be created. The next backups will be incremental. To set up the simple backup scheme, specify the appropriate settings as follows. Backup Set up the backup schedule - when and how often to back up the data. To learn more about setting up the schedule, see the Scheduling (p. 173) section. Retention rule 6.2.9.4.
• Daily ("Son") backups are incremental. Parameters You can set up the following parameters of a Grandfather-Father-Son (GFS) scheme. Start backup at: Specifies when to start a backup. The default value is 12:00 PM. Back up on: Specifies the days on which to perform a backup. The default value is Workdays. Weekly/Monthly: Specifies which of the days selected in the Back up on field you want to reserve for weekly and monthly backups. A monthly backup will be performed every fourth such day.
• • Start backup at: 11:00 PM • • Weekly/monthly: Saturday (for example) Back up on: All days Keep backups: o Daily: 1 week o Weekly: 1 month o Monthly: indefinitely As a result, an archive of daily, weekly, and monthly backups will be created. Daily backups will be available for seven days since creation.
• Have a monthly full backup of your files. Moreover, assume that you want to retain access to all backups, including the daily ones, for at least six months. The following GFS scheme suits such purposes: • • • Start backup at: 11:30 PM • Keep backups: o Daily: 6 months o Weekly: 6 months o Monthly: 5 years Back up on: Tuesday, Thursday, Friday Weekly/monthly: Friday Here, daily incremental backups will be created on Tuesdays and Thursdays, with weekly and monthly backups performed on Fridays.
Parameters You can set up the following parameters of a Tower of Hanoi scheme. Schedule Set up a daily (p. 174), weekly (p. 176), or monthly (p. 179) schedule. Setting up schedule parameters allows creating simple schedules (example of a simple daily schedule: a backup task will be run every 1 day at 10 AM) as well as more complex schedules (example of a complex daily schedule: a task will be run every 3 days, starting from January 15.
Roll-back period The number of days we can go back in the archive is different on different days. The minimum number of days we are guaranteed to have is called the roll-back period. The following table shows full backup and roll-back periods for schemes of various levels.
6.2.9.6. Custom backup scheme At a glance • Custom schedule and conditions for backups of each type • Custom schedule and retention rules Parameters Parameter Meaning Full backup Specifies on what schedule and under which conditions to perform a full backup. For example, the full backup can be set up to run every Sunday at 1:00 AM as soon as all users are logged off. Incremental Specifies on what schedule and under which conditions to perform an incremental backup.
backup for some reason. Apply the rules Specifies when to apply the retention rules (p. 41). (only if the retention rules are set) For example, the cleanup procedure can be set up to run after each backup, and also on schedule. This option is available only if you have set at least one retention rule in Retention rules. Cleanup schedule Specifies a schedule for archive cleanup. (only if On schedule is selected) For example, the cleanup can be scheduled to start on the last day of each month.
Incremental: Schedule: Weekly, every workday, at 7:00 PM Differential: Schedule: Weekly, every Saturday, at 8:00 PM Further, we want to add conditions that have to be satisfied for a backup task to start. This is set up in the Conditions fields for each backup type.
If you have also specified the retention rules in your backup scheme, the scheme will result in four tasks: three backup tasks and one cleanup task. 6.2.10. Archive validation Set up the validation task to check if the backed up data is recoverable. If the backup could not pass the validation successfully, the validation task fails and the backup plan gets the Error status. To set up validation, specify the following parameters 1. When to validate – select when to perform the validation.
Take into account the following considerations. Which agent is installed on the host? The resulting virtual machine type and location depend on the agent that resides on the selected host. • Agent for Windows is installed on the host You have a choice of virtual machine types: VMware Workstation, Microsoft Virtual PC, or Parallels Workstation. Files of the new virtual machine will be placed in the folder you select.
6.3. Recovering data When it comes to data recovery, first consider the most functional method: connect the console to the managed machine running the operating system and create the recovery task. If the managed machine's operating system fails to start or you need to recover data to bare metal, boot the machine from the bootable media (p. 384) or using Acronis Startup Recovery Manager (p. 53). Then, create a recovery task. Acronis Universal Restore (p.
Data type (p. 228) Applies to: disk recovery Choose the type of data you need to recover from the selected disk backup. Content (p. 229) Select the backup and content to be recovered. Access credentials (p. 229) [Optional] Provide credentials for the archive location if the task account does not have the right to access it. To access this option, select the Advanced view check box. Where to recover This section appears after the required backup is selected and the type of data to recover is defined.
Automatic drivers search Specify where the program should search for HAL, mass storage and network adapter drivers. Acronis Universal Restore will install drivers that better fit the target hardware. Mass storage drivers to install anyway [Optional] Specify the mass storage drivers manually if the automatic drivers search has not found the appropriate drivers. To access this option, select the Advanced view check box.
To learn more about operations available depending on the user privileges, see the User privileges on a managed machine (p. 31) section. 6.3.2. Archive selection Selecting the archive 1. Enter the full path to the location in the Path field, or select the desired folder in the folders tree. o If the archive is stored in a centralized vault, expand the Centralized group and click the vault. o If the archive is stored in a personal vault, expand the Personal group and click the vault.
6.3.4. Content selection The representation of this window depends on the type of data stored in the archive. 6.3.4.1. Disks/volumes selection To select a backup and disks/volumes to recover: 1. Select one of the successive backups by its creation date and time. Thus, you can revert the disk data to a certain moment in time. Specify the items to recover. By default, all items of the selected backup will be selected. If you do not want to recover certain items, just uncheck them.
To specify credentials 1. Select one of the following: o Use the task credentials The program will access the location using the credentials of the task account specified in the General section. o Use the following credentials The program will access the location using the credentials you specify. Use this option if the task account does not have access permissions to the location. You might need to provide special credentials for a network share or a storage node vault. Specify: • User name.
Existing virtual machine Available when the Acronis Backup & Recovery 10 Agent for Hyper-V or Agent for ESX/ESXi is installed. On selecting this, you specify the virtualization server and the target virtual machine. Then you proceed to the regular disk mapping procedure described below. Please be aware that the target machine will be powered off automatically before the recovery. If you prefer to power it off manually, modify the VM power management option. Disk #: Disk # (MODEL) (p.
o o o o • Acronis Backup & Recovery 10 creates scheduled tasks using the signature of the source hard disk.
Select the way the disk's signature contained in the MBR will be handled. The disk signature is used by Windows and the Linux kernel version 2.6 and later. Recover [Volume] [Letter] to: Disk # /Volume (p. 233) Sequentially map each of the source volumes to a volume or an unallocated space on the destination disk. Size (p. 233): [Optional] Change the recovered volume size, location and other properties. MBR destination To specify a destination disk: 1. Select the disk to recover the MBR to. 2. Click OK.
Properties Type A basic MBR disk can contain up to four primary volumes or up to three primary volumes and multiple logical drives. By default, the program selects the original volume's type. You can change this setting, if required. • Primary. Information about primary volumes is contained in the MBR partition table. Most operating systems can boot only from the primary volume of the first hard disk, but the number of primary volumes is limited.
To select the virtualization server the new virtual machine will be created on 1. Choose the Place on the virtualization server that I select option. 2. In the left part of the window, select the virtualization server. Use the right part of the window to review details on the selected server. 3. Click OK to return to the Data recovery page. To select the type of virtual machine 1. Choose the Save as files of the VM type that I select to the folder that I specify option. 2.
This is the number of processors of the new virtual machine. In most cases it is set to one. The result of assignment of more than one processor to the machine is not guaranteed. The number of virtual processors may be limited by the host CPU configuration, the virtualization product and the guest operating system. Multiple virtual processors are generally available on multi-processor hosts. A multicore host CPU or hyperthreading may enable multiple virtual processors on a single-processor host. 6.3.6.5.
Exclusion examples Criterion Example Description By name File1.log Excludes all files named File1.log. By path C:\Finance\test.log Excludes the file named test.log located in the folder C:\Finance Mask (*) *.log Excludes all files with the .log extension. Mask (?) my???.log Excludes all .log files with names consisting of five symbols and starting with “my”. The above settings are not effective for the files or folders that were explicitly selected for recovery.
• Password. The password for the account. 2. Click OK. 6.3.8. When to recover Select when to start the recovery task: • • Recover now - the recovery task will be started immediately after you click the final OK. Recover later - the recovery task will be started at the date and time you specify. If you do not need to schedule the task and wish to start it manually afterwards, select the Task will be started manually (do no schedule the task) check box. 6.3.9.
- If the drivers are on a vendor's disc or other removable media, turn on the Search removable media. - If the drivers are located in a networked folder or on the bootable media, specify the path to the folder in the Search folder field. During recovery, Universal Restore will perform the recursive search in all the sub-folders of the specified folder, find the most suitable HAL and HDD controller drivers of all those available, and install them into the recovered system.
XenServer virtual appliance can be imported to a XenServer using Citrix XenCenter. The VMware Workstation machine can be converted to the open virtualization format (OVF) using the VMware OVF tool. With Acronis Backup & Recovery 10 Agent for Hyper-V or Agent for ESX/ESXi, you can recover a disk (volume) backup to a new virtual machine on the respective virtualization server. To convert a disk backup to a virtual machine: 1.
6.3.11. Bootability troubleshooting If a system was bootable at the time of backup, you expect that it will boot after recovery. However, the information the operating system stores and uses for booting up may become outdated during recovery, especially if you change volume sizes, locations or destination drives. Acronis Backup & Recovery 10 automatically updates Windows loaders after recovery. Other loaders might also be fixed, but there are cases when you have to re-activate the loaders.
• The system loader points to the wrong volume This may happen when system or boot volumes are not recovered to their original location. Solution: Modification of the boot.ini or the boot\bcd files fixes this for Windows loaders. Acronis Backup & Recovery 10 does this automatically and so you are not likely to experience the problem. For the GRUB and LILO loaders, you will need to correct the GRUB configuration files.
The lines starting with title, root, kernel, and initrd respectively determine: o The title of the menu item. o The device on which the Linux kernel is located—typically, this is the boot partition or the root partition, such as root (hd0,0) in this example. o The path to the kernel on that device and the root partition—in this example, the path is /vmlinuz-2.6.24.4 and the root partition is /dev/sda2.
multi(0)disk(0)rdisk(0)partition(1)\WINDOWS="Microsoft Windows XP Professional" /noexecute=optin /fastdetect Windows Vista/2008 A part of the loader resides in the partition boot sector, the rest is in the files bootmgr, boot\bcd. At starting Windows, boot\bcd is mounted to the registry key HKLM \BCD00000000. 6.3.12.
• Recover the files as two or more groups. For example, if the problem occurs when recovering 1 million files, try recovering the first 500,000 of them and then the remaining 500,000. • Modify the registry as follows: Note: This procedure requires restarting the machine. Use standard precautions when modifying the registry. 1. In Registry Editor, open the following registry subkey: HKEY_LOCAL_MACHINE\SYSTEM\CurrentControlSet\Control\Session Manager\Memory Management 2.
Note: All vaults managed by the storage node will also be removed from the management server. No archives will be lost. 2. Add the storage node to the management server again, by specifiying the machine on which the recovered storage node is installed. 3. Re-create the necessary managed vaults. 6.4. Validating vaults, archives and backups Validation is an operation that checks the possibility of data recovery from a backup.
What to validate Validate Choose an object to validate: Archive (p. 248) - in that case, you need to specify the archive. Backup (p. 248) - specify the archive first, and then select the desired backup in this archive. Vault (p. 249) - select a vault (or other location), which archives to validate. Access Credentials (p. 249) [Optional] Provide credentials for accessing the source if the task account does not have enough privileges to access it. To access this option, select the check box for Advanced view.
6.4.2. Archive selection Selecting the archive 1. Enter the full path to the location in the Path field, or select the desired folder in the folders tree. o If the archive is stored in a centralized vault, expand the Centralized group and click the vault. o If the archive is stored in a personal vault, expand the Personal group and click the vault. o If the archive is stored in a local folder on the machine, expand the Local folders group and click the required folder.
6.4.4. Location selection To select a location Enter the full path to the location in the Path field or select the desired location in the folders tree. • • To select a centralized vault, expand the Centralized group and click the appropriate vault. • To select a local folder (CD/DVD drive, or locally attached tape device), expand the Local folders group and click the required folder.
6.4.6. When to validate As validation is a resource-intensive operation, it makes sense to schedule validation to the managed machine's off-peak period. On the other hand, if you prefer to be immediately informed whether the data is not corrupted and can be successfully recovered, consider starting validation right after the task creation. Choose one of the following: • Now - to start the validation task right after its creation, that is, after clicking OK on the Validation page.
Backup (p. 252) Select the backup. Access credentials (p. 252) [Optional] Provide credentials for the archive location. To access this option, select the Advanced view check box. Mount settings Volumes (p. 252) Select volumes to mount and configure the mount settings for every volume: assign a letter or enter the mount point, choose the read/write or read only access mode. When you complete all the required steps, click OK to mount the volumes. 6.5.1. Archive selection Selecting the archive 1.
While you are reviewing the location content, archives can be added, deleted or modified by another user or by the program itself according to scheduled operations. Use the Refresh button to refresh the list of archives. 3. Click OK. 6.5.2. Backup selection To select a backup: 1. Select one of the backups by its creation date/time. 2. To assist you with choosing the right backup, the bottom table displays the volumes contained in the selected backup.
o o Assign letter (in Windows) - Acronis Backup & Recovery 10 will assign an unused letter to the mounted volume. If required, select another letter to assign from the drop-down list. Mount point (in Linux) - specify the directory where you want the volume to be mounted. 3. If several volumes are selected for mounting, click on every volume to set its mounting parameters, described in the previous step. 4. Click OK. 6.6.
Usage scenarios Export enables you to separate a specific backup from a chain of incremental backups for fast recovery, writing onto removable or detachable media or other purposes.
Tip. When configuring export to a deduplicating managed vault, choose a machine where the deduplication add-on to the agent is installed. Otherwise the export task will fail. Operations with an export task An export task starts immediately after you complete its configuration. An export task can be stopped or deleted in the same way as any other task. Once the export task is completed, you can run it again at any time.
Where to export Archive (p. 258) Enter the path to the location where the new archive will be created. Be sure to provide a distinct name and comment for the new archive. Access credentials (p. 259) [Optional] Provide credentials for the destination if the task credentials do not have enough privileges to access it. To access this option, select the Advanced view check box. After you have performed all the required steps, click OK to start the export task. 6.7.1.
o If the archive is stored on a network share, expand the Network folders group, then select the required networked machine and then click the shared folder. If the network share requires access credentials, the program will ask for them. Note for Linux users: To specify a Common Internet File System (CIFS) network share which is mounted on a mount point such as /mnt/share, select this mount point instead of the network share itself.
o The program will access the location using the credentials of the task account specified in the General section. Use the following credentials The program will access the location using the credentials you specify. Use this option if the task account does not have access permissions to the location. You might need to provide special credentials for a network share or a storage node vault. Specify: • User name.
• To export data to a locally attached tape device, expand the Tape drives group, then click the required device. For the management server the folders tree contains: • • Local folders group to export data onto the hard drives that are local to the storage node. Network folders group to export data to a network share. If the network share requires access credentials, the program will ask for them.
• User name. When entering the name of an Active Directory user account, be sure to also specify the domain name (DOMAIN\Username or Username@domain) • Password. The password for the account. 2. Click OK. According to the original FTP specification, credentials required for access to FTP servers are transferred through a network as plaintext. This means that the user name and password can be intercepted by an eavesdropper using a packet sniffer. 6.8.
To allocate space for Acronis Secure Zone 1. Choose a hard disk (if several) on which to create the zone. The unallocated space is selected by default. The program displays the total space available for the Acronis Secure Zone. 2. If you need to allocate more space for the zone, you can select volumes from which free space can be taken. Again, the program displays the total space available for the Acronis Secure Zone depending on your selection.
• Acronis Secure Zone is always created at the end of the hard disk. When calculating the final layout of the volumes, the program will first use unallocated space at the end. • If there is no or not enough unallocated space at the end of the disk, but there is unallocated space between volumes, the volumes will be moved to add more unallocated space to the end.
o o first, it will use the unallocated space. Volumes will be moved, if necessary, but not resized. Moving of locked volumes requires a reboot. If there is not enough unallocated space, the program will take free space from the selected volumes, proportionally reducing the volumes' size. Resizing of locked partitions requires a reboot. Reducing a system volume to the minimum size might prevent the machine's operating system from booting. 4. Click OK. 6.8.2.2.
you have GRUB). If the system fails to boot, you will be able to start the bootable rescue utility, by pressing F11 or by selecting it from the menu, respectively. The system disk (or, the /boot partition in Linux) should have at least 70 MB of free space to activate Acronis Startup Recovery Manager. Unless you use the GRUB boot loader and it is installed in the Master Boot Record (MBR), Acronis Startup Recovery Manager activation overwrites the MBR with its own boot code.
machines with corrupted or non-supported file systems. The operations can be configured and controlled either locally or remotely using the management console. PE-based bootable media PE-based bootable media contains a minimal Windows system called Windows Preinstallation Environment (WinPE) and Acronis Plug-in for WinPE, that is, a modification of Acronis Backup & Recovery 10 Agent that can run in the preinstallation environment.
• Windows Vista SP1 and Windows Server 2008 (PE 2.1) If you already have media with PE1.x distribution, unpack the media ISO to a local folder and start the Bootable Media Builder either from the management console, by selecting Tools > Create Bootable Media or, as a separate component. The wizard will guide you through the necessary operations. Please refer to Adding the Acronis Plug-in to WinPE 1.x (p. 271) for details. To be able to create or modify PE 2.
o o If not configured, the Acronis loader waits for someone to select whether to boot the operating system (if present) or the Acronis component. If you set, say, 10 sec. for the bootable agent, the agent will launch 10 seconds after the menu is displayed. This enables unattended onsite operation when booting from a PXE server or WDS/RIS. 4. [optional] Remote logon settings: o user name and password to be entered on the console side at connection to the agent.
vga=ask Prompts for the video mode to be used by the bootable media's graphical user interface. Without the vga parameter, the video mode is detected automatically. vga=mode_number Specifies the video mode to be used by the bootable media's graphical user interface. The mode number is given by mode_number in the hexadecimal format—for example: vga=0x318 Screen resolution and the number of colors corresponding to a mode number may be different on different machines.
pci=nobios Disables the use of PCI BIOS; only direct hardware access methods will be allowed. You may want to use this parameter when the bootable media fails to start, which may be caused by the BIOS. pci=biosirq Uses PCI BIOS calls to get the interrupt routing table. You may want to use this parameter if the kernel is unable to allocate interrupt requests (IRQs) or discover secondary PCI buses on the motherboard. These calls might not work properly on some machines.
Example The bootable agent could use one of the network adapters for communication with the management console through the production network. Automatic configuration could be done for this connection. Sizeable data for recovery could be transferred through the second NIC, included in the dedicated backup network by means of static TCP/IP settings. Network port While creating bootable media, you have an option to pre-configure the network port that the bootable agent listens for incoming connection.
The drivers can be removed from the list only in groups, by removing INF files. To remove drivers: 1. Select the INF file. 2. Click Remove. 6.10.1.2. Adding the Acronis Plug-in to WinPE 1.x Acronis Plug-in for WinPE can be added to: • Windows PE 2004 (1.5) (Windows XP Professional with Service Pack 2) • Windows PE 2005 (1.6) (Windows Server 2003 with Service Pack 1). To add Acronis Plug-in to WinPE 1.x: 1. Unpack all files of your WinPE 1.x ISO to a separate folder on the hard disk. 2.
Adding Acronis Plug-in to WinPE 2.x ISO To add Acronis Plug-in to WinPE 2.x ISO: 1. When adding the plug-in to the existing Win PE 2 ISO, unpack all files of your Win PE 2 ISO to a separate folder on the hard disk. 2. Start the Bootable Media Builder either from the management console, by selecting Tools > Create Bootable Media or, as a separate component. 3. Select Bootable media type: Windows PE. When creating a new PE 2 ISO: o Select Create Windows PE 2.
If the plug-in is installed in a folder other than the default folder, change the path accordingly (check the registry key HKEY_LOCAL_MACHINE\SOFTWARE\Acronis\Bootable Components\Settings\WinPE for the plug-in location.) 4. Run the following command: export_license.bat 5. Copy the contents of the current folder—by default: C:\Program Files\Acronis\Bootable Components\WinPE—to the %BartPE folder%\plugins\Acronis. 6.
2. The Linux-style bootable media shows local disks and volumes as unmounted (sda1, sda2...). 3. The Linux-style bootable media cannot write a backup to an NTFS-formatted volume. Switch to the Windows style if you need to do so. 4. You can switch the bootable media between the Windows style and the Linux style by selecting Tools > Change volume representation. 5. There is no Navigation tree in the media GUI. Use the Navigation menu item to navigate between views. 6.
2. Click Configure iSCSI/NDAS devices (in a Linux-based media) or Run the iSCSI Setup (in a PEbased media). 3. Specify the IP address and port of the iSCSI device's host, and the name of the iSCSI initiator. 4. If the host requires authentication, specify the user name and password for it. 5. Click OK. 6. Select the iSCSI device from the list, and then click Connect. 7. If prompted, specify the user name and password to access the iSCSI device. To add an NDAS device 1.
cp ln scsi_id dd ls sed df lspci sg_map26 dmesg lvm sh dmraid mc sleep e2fsck mdadm ssh e2label mkdir sshd echo mke2fs strace egrep mknod swapoff fdisk mkswap swapon fsck more sysinfo fxload mount tar gawk mtx tune2fs gpm mv udev grep parted udevinfo growisofs pccardctl udevstart grub ping umount gunzip pktsetup uuidgen halt poweroff vconfig hexdump ps vi hotplug raidautorun zcat 6.10.5.
6.10.5.1. Creating the volume structure automatically Suppose that you saved the volume structure to the /etc/Acronis directory—see Backing up LVM volumes (Linux) (p. 46)—and that the volume with this directory is included in the archive. To recreate the volume structure in Linux-based bootable media, use either of the methods described below. Caution: As a result of the following procedures, the current volume structure on the machine will be replaced with the one stored in the archive.
To recover MD devices and logical volumes 1. Boot the machine from a Linux-based bootable media. 2. Click Acronis Bootable Agent. Then, click Run management console. 3. On the toolbar, click Actions, and then click Start shell. Alternatively, you can press CTRL+ALT+F2. 4. If necessary, examine the structure of volumes which are stored in the archive, by using the trueimagecmd utility.
The following picture illustrates this configuration. Do the following to recover data from this archive. Step 1: Creating the volume structure 1. Boot the machine from a Linux-based bootable media. 2. In the management console, press CTRL+ALT+F2. 3. Run the following commands to create the MD devices: mdadm --create /dev/md0 --level=1 --raid-devices=2 /dev/sd[ab] mdadm --create /dev/md1 --level=1 --raid-devices=2 /dev/sd[cd] 4.
7. Press CTRL+ALT+F1 to return to the management console. Step 2: Starting the recovery 1. In the management console, click Recover. 2. In Archive, click Change and then specify the name of the archive. 3. In Backup, click Change and then select the backup from which you want to recover data. 4. In Data type, select Volumes. 5. In Items to recover, select the check box next to my_volgroup-my_logvol. 6. Under Where to recover, click Change, and then select the logical volume that you created in Step 1.
6.10.6. Acronis PXE Server Acronis PXE Server allows for booting machines to Acronis bootable components through the network. Network booting: • eliminates the need to have a technician onsite to install the bootable media into the system that must be booted • during group operations, reduces the time required for booting multiple machines as compared to using physical bootable media. Bootable components are uploaded to Acronis PXE Server using Acronis Bootable Media Builder.
On a machine that has an operating system on the hard disk, the BIOS must be configured so that the network interface card is either the first boot device, or at least prior to the Hard Drive device. The example below shows one of reasonable BIOS configurations. If you don’t insert bootable media, the machine will boot from the network. In some BIOS versions, you have to save changes to BIOS after enabling the network interface card so that the card appears in the list of boot devices.
Sometimes after the volume has been backed up and its image placed into a safe storage, the machine disk configuration might change due to a HDD replacement or hardware loss. In such case with the help of Acronis Disk Director Lite, the user has the possibility to recreate the necessary disk configuration so that the volume image can be recovered exactly “as it was” or with any alteration of the disk or volume structure the user might consider necessary.
6.11.3. Choosing the operating system for disk management On a machine with two or more operating systems, representation of disks and volumes depends on which operating system is currently running. A volume may have a different letter in different Windows operating systems. For example, volume E: might appear as D: or L: when you boot another Windows operating system installed on the same machine.
shown in the table, as well as in graphical form at the bottom of the view. Any volume changes, including changing the volume letter or label, are also immediately displayed in the view. 6.11.5. Disk operations Acronis Disk Director Lite includes the following operations that can be performed on disks: • • • • • • Disk Initialization (p. 285) - initializes the new hardware added to the system Basic disk cloning (p.
6.11.5.2. Basic disk cloning Sometimes it is necessary to transfer all the disk data onto a new disk. It can be a case of expanding the system volume, starting a new system layout or disk evacuation due to a hardware fault. In any case, the reason for the Clone basic disk operation can be summed up as the necessity to transfer all the source disk data to a target disk exactly as it is. Acronis Disk Director Lite allows the operation to be carried out to basic MBR disks only.
source disk data to the target disk is impossible even with the proportional resizing of the volumes, then the Clone basic disk operation will be impossible and the user will not be able to continue. If you are about to clone a disk comprising of a system volume, pay attention to the Advanced options. By clicking Finish, you'll add the pending operation of the disk cloning. (To finish the added operation you will have to commit (p. 297) it.
4. Click Commit on the toolbar and then click Proceed in the Pending Operations window. 5. Wait until the task is finished. 6.11.5.3. Disk conversion: MBR to GPT You would want to convert an MBR basic disk to a GPT basic disk in the following cases: • If you need more than 4 primary volumes on one disk. • If you need additional disk reliability against any possible data damage. If you need to convert a basic MBR disk to basic GPT: 1. Select a basic MBR disk to convert to GPT. 2.
system, the operating system will stop loading after such conversion or some volumes on the selected GPT disk will not be accessible with MBR (e.g. volumes located more than 2 TB from the beginning of the disk) you will be warned here about such damage. Please note, a volume, belonging to a GPT disk to convert, will be a logical one after the operation and is irreversible. 3. By clicking OK, you'll add a pending operation of GPT to MBR disk conversion.
If you need to convert a dynamic disk to basic: 1. Select the dynamic disk to convert to basic. 2. Right-click on the selected volume, and then click Convert to basic in the context menu. You will receive a final warning about the dynamic disk being converted to basic. You will be advised about the changes that will happen to the system if the chosen disk is converted from dynamic into basic. E.g.
• Offline The offline status means that a disk is accessible in the read-only mode. To bring the selected offline disk back to online, select Change disk status to online from the Operations menu. If the disk has the offline status and the disk's name is Missing, this means that the disk cannot be located or identified by the operating system. It may be corrupted, disconnected, or powered off.
A volume created from free disk space virtually linked together by the LDM from several physical disks. Up to 32 disks can be included into one volume, thus overcoming the hardware size limitations, but if at least one disk fails, all data will be lost, and no part of a spanned volume may be removed without destroying the entire volume. So, a spanned volume provides no additional reliability, nor a better I/O rate.
If you want to create a volume: Run the Create volume wizard by selecting Create volume on the Wizards bar, or right-click any unallocated space and select Create volume in the appearing context menu. Select the type of volume being created At the first step you have to specify the type of volume you want to create.
If need be, you will be prompted to add the necessary number of disks to your selection, according to the chosen type of the future volume. If you click the Back button, you will be returned to the previous page: Select the type of volume being created (p. 293). If you click the Next button, you will proceed to the next page: Set the volume size (p. 294). Set the volume size On the third wizard page, you will be able to define the size of the future volume, according to the previously made selections.
A Basic disk can contain up to four primary volumes. If they already exist, the disk will have to be converted into dynamic, otherwise or Active and Primary options will be disabled and you will only be able to select the Logical volume type. The warning message will advise you that an OS installed on this volume will not be bootable.
If there is no other active volume in the system, the pending operation of setting active volume will be added. Please note, that due to setting the new active volume, the former active volume letter might be changed and some of the installed programs might stop running. 3. If another active volume is present in the system, you will receive the warning that the previous active volume will have to be set passive first.
If you need to change a volume label: 1. Right-click on the selected volume, and then click Change label. 2. Enter a new label in the Change label window text field. 3. By clicking OK in the Change label window, you'll add the pending operation of changing the volume label . If when setting a new volume label you use characters that are unsupported by the currently installed operating system, you will get the appropriate warning and the OK button will be disabled.
This approach enables you to control all planned operations, double-check the intended changes, and, if necessary, cancel operations before they are executed. To prevent you from performing any unintentional change on your disk, the program will first display the list of all pending operations. The Disk management view contains the toolbar with icons to launch the Undo, Redo and Commit actions intended for pending operations. These actions might also be launched from the Disk management menu of the console.
7. Centralized management This section covers operations that can be performed centrally by using the components for centralized management. The content of this section is only applicable to advanced editions of Acronis Backup & Recovery 10. 7.1. Administering Acronis Backup & Recovery 10 Management Server This section describes the views that are available through the navigation tree of the console connected to the management server, and explains how to work with each view. 7.1.1.
Vaults with low free space: X View vaults The alert is displayed if at least one centralized vault has less than 10% free space. View vaults will take you to the Centralized vaults (p. 136) view where you can examine the vault size, free space, content and take the necessary steps to increase the free space.
Activities The stacked column chart lets you explore the daily history of the Acronis Backup & Recovery 10 agents' activities. The history is based on the log entries, collected from the registered machines and from the management server. The chart shows the number of log entries of each type (error, warning, information) for a particular day. Statistics for the selected date are displayed to the right of the chart. All the statistics fields are interactive, i.e.
• Use the Information pane's tabs to view detailed information about the selected policy and perform additional operations, such as revoke the policy, view details of the machine (group) the policy is applied to, etc. The panel is collapsed by default. To expand the panel, click the chevron. The content of the pane is also duplicated in the Policy details (p. 305) window. • Use the filtering and sorting (p. 305) capabilities of the policy table for easy browsing and examination. 7.1.2.1.
o o Select the policy and click View tasks. Check the tasks that have Failed as their last result: select a task and then click View log. Select a log entry and then click View details. This approach comes in handy if the policy state is Deployed, that is, the policies' tasks already exist on the managed machines. Select the policy and click View log. Check the "error" log entries to find out the reason of the failure: select a log entry and then click View details.
To Do Create a backup policy Click Create backup policy. The procedure of creating a backup policy is described in-depth in the Creating a backup policy (p. 360) section. Apply policy to machines or groups Click Edit a policy Click Apply to. In the Machines selection (p. 304) window, specify the machines (groups) the selected backup policy will be applied to. If the machine is currently offline, the policy will be deployed when the machine comes online again. Edit.
The Acronis Backup & Recovery 10 Management Server will deploy the policy to the selected machines and machines belonging to the selected groups. Filtering and sorting backup policies The following is a guideline for you to filter and sort backup policies. To Do Sort backup policies by any column Click the column's header to sort the backup policies in ascending order. Filter backup policies by name/owner Type a policy's name / owner's name in the fields below the corresponding column's header.
Settings The tab displays information about the backup scheme used by the policy and backup options that were modified against the default settings. Applied to The tab displays a list of machines and groups the selected policy is applied to. Actions To Do View details of the machine (group). Click In the Machine details (p. 313)/Group details (p. 322) window, examine all information on the selected machine (or the selected group). View tasks of the machine (group).
The main goal of grouping is protection of multiple machines with one policy. Once a machine appears in a group, the policy applied to the group is applied to the machine and the new tasks are created by the policy on the machine. Once a machine is removed from a group, the policy applied to the group will be revoked from the machine and the tasks created by the policy will be removed. Built-in group - a group that always exists on a management server. The group cannot be deleted or renamed.
7.1.3.1. Actions on machines Registering machines on the management server Once the machine is added or imported to the All physical machines group, it becomes registered on the management server. Registered machines are available for deploying backup policies and for performing other centralized management operations. Registration provides a trusted relationship between the agent, residing on the machine, and the management server.
Add a machine to another static group Click Add to another group. In the Add to group (p. 312) window, specify the group to copy the selected machine to. The backup policies applied to the groups the machine is a member of will be applied to the machine. For machines in custom groups Add machines to a static group Click Move a machine to another static group Click Add machines to group. In the Add machines to group (p. 313) window, select the machines that you need to add. Move to another group.
View tasks existing on a machine Click View tasks. The Tasks (p. 331) view will display a list of the tasks, existing on the machine. View log entries of a machine Click Update all information related to the machine Click Refresh a list of machines Click View log. The Log (p. 333) view will display a list of the machine's log entries. Synchronize. The management server will query the machine and update the database with the most recent information.
To perform registration through a local or remote console-agent connection, you have to be connected with the management server administrator's credentials or provide the management server administrator's credentials. On connecting, select from the menu Options - Machine options Machine management, then opt for Centralized management and then enter the management server's name or IP address and the management server administrator's credentials.
A registered machine has to be specified by its registration address, that is, you need to provide exactly the same host name, fully qualified domain name (FQDN), or IP address as was specified when the machine was initially added to the management server. Otherwise, the machine will be deleted and added again as if it were another machine. This means all policies, both inherited and directly applied, will be revoked from the machine and its static group membership will be lost.
The machine being added becomes a member of more than one group. As a result, the backup policies applied to the first group will remain on the machine, and the backup policies applied to the second, third, etc. group will be deployed to the machine. Moving a machine to another group To move the selected machine to another group 1. In the group tree, select the group the machine will be moved to. 2. Click OK. The machine being moved leaves one group and becomes a member of another group.
Online - the machine is available for the management server. This means that the management server's last connection to the machine was successful. Connection is established every 2 minutes. o Offline - the machine is unavailable for the management server: it is turned off, or its network cable is unplugged. o Unknown - this status is displayed until the first connection between the management server and the machine is established after adding the machine or starting the management server's service.
Filtering and sorting Filtering and sorting of the backup policies is performed in the same way as for the Backup policies view. See the Filtering and sorting backup policies (p. 305) section for details. Plans and tasks Displays a list of the plans (both local and centralized) and tasks existing on the selected machine. Operations The following is a guideline for you to perform operations with backup plans and tasks. To Do View details of a plan/task Backup plan Click View details.
Stop a plan/task Backup plan Click Stop. Stopping the running backup plan stops all its tasks. Thus, all the task operations will be aborted. Task Click Stop. What will happen if I stop the task? Generally, stopping the task aborts its operation (backup, recovery, validation, exporting, conversion, migration). The task enters the Stopping state first, then becomes Idle. The task schedule, if created, remains valid. To complete the operation you will have to run the task again.
Only tasks that do not belong to a backup plan, such as a recovery task, can be modified by direct editing. When you need to modify a task belonging to a local backup plan, edit the backup plan. A task belonging to a centralized backup plan can be modified by editing the centralized policy that spawned the plan. Delete a plan/task Backup plan Click Delete. What will happen if I delete the backup plan? The plan's deletion deletes all its tasks.
View tasks related to a group View log related to a group Remove machine from a group. Click View tasks. You will be taken to the Tasks view with pre-filtered tasks related to the selected backup group. Click View log. This opens Log view with pre-filtered log entries of the selected group. Click Remove. The centralized plans, which were deployed to the parent group, will no longer affect this machine.
Configuring the machines table By default, the table has five columns that are displayed, others are hidden. If required, you can hide the shown columns and show the hidden ones. To show or hide columns 1. Right-click any column header to open the context menu. The menu items that are ticked off correspond to column headers presented in the table. 2. Click the items you want to be displayed/hidden. 7.1.3.2. Actions on groups Actions are available when you select the click on a group.
Refresh a list of groups Click Refresh. The management console will update the list of groups from the management server with the most recent information. Though the list of groups is refreshed automatically based on events, the data may not be retrieved immediately from the management server due to some latency. Manual Refresh guarantees that the most recent data is displayed. Creating a custom static or dynamic group To create a group 1.
For example, the following set of criteria Operating system: Windows Server 2008 Operating system: Windows Server 2003 Organizational unit: SERVERS IP range: 192.168.17.0 - 192.168.17.55 will add to the same group all the machines whose operating system is Windows 2000 or Windows 2003 and belong to the SERVERS organizational unit and whose IP addresses are within the range 192.168.17.0 - 192.168.17.55.
Example: Machine_name_1 Machine_name_2 192.168.1.14 192.168.1.15 A registered machine has to be specified by its registration address, that is, you need to provide exactly the same host name, fully qualified domain name (FQDN), or IP address as was specified when the machine was initially added to the management server. Otherwise, the machine will not be added to the group.
• • Type - type of the group (static, or dynamic) • Comments - the group description (if specified) Criteria (for dynamic groups only) - grouping criteria Backup policies Displays a list of backup policies related to the group and allows performing the following operations: To Do View details of a policy Click View details. In the Policy details (p. 305) window, examine all information related to the selected backup policy. View tasks of a policy Click View tasks. The Tasks (p.
7.1.4. Virtual machines You can centrally manage virtual machines using either of the following methods or both: Adding a virtual machine as a physical machine Install Acronis Backup & Recovery 10 Agent for Windows or Agent for Linux on the virtual machine and register (p. 310) it on the management server. The machine will be treated as a physical one. You will be able to apply any backup policy to the machine, including policies that back up files.
7.1.4.1. Virtual machines on a management server Availability of virtual machines Virtual machines are displayed as available when both the agent is available for the management server and the machines are available for the agent. The list of virtual machines is refreshed dynamically every time the management server synchronizes with the agents. When the virtualization server or the virtual appliance becomes unavailable or is withdrawn, the virtual machines are grayed out.
• Host/VA Using this criterion, you can create a dynamic group of virtual machines hosted on a specified virtualization server or managed by the specified virtual appliance. 7.1.4.2. Deploying Agent for ESX/ESXi Acronis Backup & Recovery 10 Management Server provides an easy way to deploy Agent for ESX/ESXi to every VMware ESX or ESXi server whose virtual machines you want to back up.
5. Licenses Click Provide license. When installing the trial product version, select Use the following trial license key and enter the trial license key. Deduplication is always enabled in the trial version. When installing the purchased product, select Use a license from the following Acronis License Server and specify the license server that has the appropriate number of licenses for Acronis Backup & Recovery 10 Advanced Server Virtual Edition. You need one license for every host you selected.
The group that has the same name as the vCenter Server will be removed and the policies applied to this group or its child groups will be revoked. Virtual machines remain in the All virtual machines group and in other groups if their host is managed by Agent for ESX/ESXi. Policies applied to these groups or directly to the machines continue functioning on the machines. This way, by removing the integration you remove only the machines that are not manageable. 7.1.5.
7.1.5.1. Actions on storage nodes All the operations described here, are performed by clicking the corresponding buttons on the toolbar. The operations can be also accessed from the Storage nodes bar (on the Actions and tools pane) and from the Storage nodes item of the main menu. To perform an operation with a storage node added to the management server, first select the storage node. The following is a guideline for you to perform operations with storage nodes.
Refresh the list of storage nodes Click Refresh. The management console will update the list of storage nodes from the management server with the most recent information. Though the list of storage nodes is refreshed automatically based on events , the data may not be retrieved immediately from the management server due to some latency. Manual refresh guarantees that the most recent data is displayed. Adding a storage node To add a storage node 1.
o • • Withdrawn - the storage node was registered on another management server. As a result, it is not possible to control the node from the current management server. Archives - the total number of archives stored in all the vaults managed by the storage node Backups - the total number of backups stored within the archives in all the vaults managed by the storage node. Vaults This tab displays a list of the vaults, managed by the storage node.
or the backup plan will run. View details of a task Click View details. In the Tasks details (p. 199) window, examine all information related to the selected task. View a task's log Click View log. The Log (p. 333) view will display a list of the log entries related to the selected task. Run a task Click Run. The task will be executed immediately in spite of its schedule. Stop a task Click Stop.
• This is a built-in compacting task Each storage node has a built-in service task called a compacting task. This task cannot be deleted. Refresh tasks table Click Refresh. The management console will update the list of tasks existing on the machines with the most recent information. Though the list of tasks is refreshed automatically based on events, the data may not be retrieved immediately from the managed machine due to some latency. Manual refresh guarantees that the most recent data is displayed.
Local and centralized logging in Acronis Backup & Recovery 10 Acronis Backup & Recovery 10 has local and centralized logs of events. Local event log A local event log holds information about Acronis Backup & Recovery 10 operations on a managed machine. For example, creating a backup plan, executing a backup plan, managing archives in personal vaults, executing a recovery task, will generate events logged in the local event log.
7.1.7.1. Actions on log entries All the operations described below are performed by clicking the corresponding items on the log toolbar. All these operations can also be performed with the context menu (by right-clicking the log entry), or with the Log actions bar (on the Actions and tools pane). The following is a guideline for you to perform actions on log entries. To Do Select a single log entry Click on it.
Filter log entries by type Press or release the following toolbar buttons: to filter error messages to filter warning messages to filter information messages Filter log entries by the original backup plan or managed entity type Under the Backup plan (or Managed entity type) column header, select the backup plan or the type of managed entity from the list. Filter log entries by task, managed entity, machine, code, owner Type the required value (task name, machine name, owner name, etc.
• Module - Blank or the number of program module where an error was occurred. It is an integer number that may be used by Acronis support service to solve the problem. • Owner - User name of the policy/backup plan owner (p. 32) • Message - The event text description. The log entry's details that you copy will have the following appearance: ---------------------------Log Entry Details--------------------------Type: Information Date and time: DD.MM.
Generating reports To start generating a report, select a report template in the Reports view, and then click Generate on the toolbar. There are two types of report templates: customizable and predefined. In a customizable report template, you can specify which entries to include in the report, by using filters. A predefined report template is preset so that you can generate a report with one click. The report will contain the information selected, grouped and sorted according to the template settings.
Filters Under Filters, choose which backup policies to include in the report. Only the backup policies that meet all filter criteria are included. • Backup policies: The list of backup policies. • • • • Source type: The type of data backed up under the backup policies—Disks/volumes and/or Files. • Deployment state: The deployment states of the backup policies—for example, Deployed. Status: The statuses of the backup policies—OK, Warning, and/or Error.
Report view Under Report view, choose how the report will look: • Select whether to show all items in a single table or to group them by a particular column. • • Specify which table columns to show, and in which order. Specify how to sort the table. 7.1.8.4. Report about the tasks In this view, you can generate a report about the tasks that run on registered machines. This report consists of one or more tables. Filters Under Filters, choose which tasks to include in the report.
• • Vaults: The list of centralized managed vaults that store the archives. • • • • • Type: The archive types—disk-level archives and/or file-level archives. • Machines: The list of registered machines from which the archives were created. Owner: The list of users who created the archives. Creation time: The period within which the newest backup was created in each of the archives. Occupied space: The limits for the space occupied by each of the archives.
7.1.8.7. Report about the task activities In this view, you can generate a report about the tasks that existed on registered machines within a chosen period. This report consists of one or more diagrams, one diagram per machine. The diagrams show how many times each task finished on a particular day with each of these results: “Succeeded”, “Succeeded with warnings”, and “Failed”. Report coverage Under Report coverage, choose the time interval for which you want to generate the report.
To allow active content permanently in Internet Explorer 1. On the Tools menu, click Internet Options, and then click the Advanced tab. 2. Select the Allow active content to run files on My Computer check box under Security. 3. Click OK. in Mozilla Firefox 1. On the Options menu, click Content. 2. Make sure, that the Enable JavaScript check box is selected. 3. Click OK. 7.2.
To load the Acronis Administrative Template 1. Run Windows Group Policy Objects Editor (%windir%\system32\gpedit.msc.) 2. Open the Group Policy object (GPO) you want to edit. 3. Expand Computer Configuration. 4. Right click Administrative Templates. 5. Click Add/Remove Templates. 6. Click Add. 7. Browse to the Acronis Administrative Template (\Program files\Common Files\Acronis\Agent \Acronis_agent.adm or \Program files\Acronis\BackupAndRecovery\Acronis_agent.adm), and click Open.
Possible values: Any integer number between 1 and 2147483647 Default value: 10 Acronis Backup & Recovery 10 agents connect to the storage node to access its managed vaults during backup or recovery. The Client Connection Limit parameter determines the maximum number of such connections that the storage node can handle simultaneously. When this limit is reached, the storage node will use the backup queue (see the next parameter) for the agents that are awaiting connection.
For example, suppose that two vaults, Vault A and Vault B, are both stored on a disk volume. Suppose further that the size of the archives in Vault A is 20 GB and the size of the archives in Vault B is 45 GB. If the volume has 5 GB of free space, then the total size of Vault A is 20 GB + 5 GB = 25 GB, and that of Vault B is 45 GB + 5 GB = 50 GB, regardless of the size of the volume. The percentage of free space in a vault is the vault's free space divided by the vault's total size.
The database is stored on the storage node in a local folder whose name is specified in Database path when creating the vault. 7.2.1.3. Acronis Backup & Recovery 10 Management Server The following are the parameters of Acronis Backup & Recovery 10 Management Server that can be set by using Acronis Administrative Template. Collecting Logs Specifies when to collect log entries from machines managed by Acronis Backup & Recovery 10 Management Server.
Trace State Description: Specifies whether to record Acronis Backup & Recovery 10 Management Server's events into the event log. Possible values: True or False Default value: False Trace Level Description: Specifies the minimum level of severity of events to be recorded into the event log. Only events of levels greater than or equal to the value in Trace Level will be recorded.
Synchronization Specifies how Acronis Backup & Recovery 10 Management Server connects to registered machines for deployment of centralized policies, retrieval of logs and backup plan states, and similar actions—collectively called synchronization. This parameter has the following settings: Maximum Connections Description: Specifies the maximum number of simultaneous synchronization connections to keep.
If there are fewer worker threads than normal-priority machines, the actual interval between synchronizations may be longer than the value of this parameter. Period-High Priority (in seconds) Description: Specifies how often, in seconds, to perform synchronization for machines that have a high synchronization priority—typically, the machines with currently running centralized backup tasks.
Offline Period Threshold (in seconds) Description: Specifies the maximum interval, in seconds, between attempts to connect to a registered machine which appears to be offline. Possible values: Any integer number between 120 and 2147483647 Default value: 1800 Normally, the management server connects to each registered machine with a certain time interval (see Period and Period-High Priority earlier in this section).
Snapshot Storage Relative Size This setting is effective only when the Snapshot Storage Absolute Size setting is 0. Description: Specifies the initial size of the snapshot storage as a percentage of the disk space that is available at the time of starting the backup. Possible values: Any integer number between 0 and 100 Default value: 50 If this setting is 0, the snapshot storage will not be created. The initial size will not exceed the available space minus 50 MB.
If Acronis License Server is unavailable, Acronis Backup & Recovery 10 will continue working with full functionality for the number of days specified in Maximum Time Without License Server, as counted from the moment of installation or from the last successful check. License Server Connection Retry Interval (in hours) Description: Specifies the interval, in hours, between connection attempts when Acronis License Server is unavailable.
Trace Level Description: Specifies the minimum level of severity of events to be recorded into the event log. Only events of levels greater than or equal to the value in Trace Level will be recorded.
This parameter is used when creating a backup plan. Changes to this parameter do not affect already existing backup plans. This parameter has the following settings: Snapshot Storage Path Description: Specifies the folder in which to create the snapshot storage. Possible values: Any string 0 to 32765 characters long Default value: Empty string An empty string means a temporary files folder, which is typically given by the TMP or TEMP environment variable.
Select one of the following: Not Configured The component will use the default TCP port number 9876. Enabled The component will use the specified port; type the port number in the Server TCP Port box. Disabled The same as Not configured. Client Encryption options Specifies whether to encrypt the transferred data when the component acts as a client application, and whether to trust self-signed SSL certificates.
Always use The use of SSL certificates is enabled. The connection will be established only if the use of SSL certificates is enabled on the server application. Disabled The same as Not configured. Server Encryption options Specifies whether to encrypt the transferred data when the component acts as a server application. Select one of the following: Not Configured The component will use the default setting, which is to use encryption if possible (see the following option). Enabled Encryption is enabled.
Each event has a level from zero to five based on the event's severity, as shown in the following table: Level Name Description 0 Unknown Event whose level of severity is unknown or not applicable 1 Debug Event used for debug purposes 2 Information Informational event, such as one about the successful completion of an operation or startup of a service 3 Warning Event which is a possible impending problem, such as low free space in a vault 4 Error Event that resulted in a loss of data or fun
You will find the description of these parameters in the correspondent topic about configuration through the administrative template. 7.2.3. Parameters set through Windows registry The following two parameters determine paths to Acronis Backup & Recovery 10 Storage Node's internal databases, which contain information about managed vaults. They can be modified only by editing the registry.
7.3. Creating a backup policy A backup policy can be applied to both Windows and Linux machines. To create a backup policy, perform the following steps. General Policy name [Optional] Enter a unique name for the backup policy. A conscious name lets you identify the policy among the others. Source type Select the type of items to back up: Disk/volumes or Files. Policy credentials (p. 362) [Optional] You can change the policy account credentials if necessary.
[Optional] Enter comments to the archive. To access this option, select the Advanced view check box. How to back up Backup scheme (p. 370) Specify when and how often to back up your data, define for how long to keep the created backup archives in the selected location, set up a schedule for the archive cleanup procedure. Use well-known optimized backup schemes, such as Grandfather-Father-Son and Tower of Hanoi, create a custom backup scheme or back up data once.
Host (p. 223) Specify the machine that will perform the conversion. The machine has to have Acronis Backup & Recovery 10 Agent for Windows, Agent for ESX/ESXi or Agent for Hyper-V installed. Virtualization server (p. 223) Here you select the resulting virtual machine type and location. Available options depend on the host you selected in the previous step. Storage (p. 223) Choose the storage on the virtualization server or the folder to place the virtual machine files in.
7.3.2. Items to back up Specify selection rules for backing up items, selected in the Source type field of the General section. Volumes to back up selection rules (p. 363) Files to back up selection rules (p. 365) 7.3.2.1. Volumes to back up selection rules Define volume selection rules, according to which the volumes will be backed up on the machines the policy will be applied to. To define volume selection rules In the first line, select the rule from the list, or type it manually.
All fixed volumes Type or select: [Fixed Volumes] Refers to all volumes other than removable media. Fixed volumes include volumes on SCSI, ATAPI, ATA, SSA, SAS and SATA devices, and on RAID arrays. Linux volumes First partition on the first IDE hard disk of a Linux machine Type or select: /dev/hda1 hda1 is the standard device name for the first partition of the first IDE hard disk drive. For more details, see Note on Linux machines.
For instance, it is possible to set up a policy to back up volume C: on Windows machines and partition /dev/hda1 on Linux machines. Unlike Windows, there is no clear distinction between a volume (partition) and a folder (directory) in Linux. Linux has the root partition (denoted as /), to which elements of various types—including hard disks, directories, and system devices—are attached (mounted), forming a tree similar to the file and folder structure in Windows.
To define file selection rules In the first line, select the rule from the list, or type it manually. To add another rule, click the next empty line, and select the rule from the list, or type it manually. The program remembers the rules typed manually, and the next time you open the window, these rules will be available for selection in the list along with the default ones. Windows Full path Point to the folders and files to be backed up.
All user profiles existing on a machine [All Profiles Folder] Points to the folder where all user profiles are located (typically, C:\Documents and Settings in Windows XP, and C:\Users in Windows Vista). Linux To include In the Files and folders column, type or select: Text file file.txt on the volume /dev/hda3 mounted on /home/usr/docs /dev/hda3/file.
• Exclude all hidden files and folders Select this check box to skip files and folders with the Hidden attribute. If a folder is Hidden, all of its contents — including files that are not Hidden — will be excluded. • Exclude all system files and folders Select this check box to skip files and folders with the System attribute. If a folder is System, all of its contents — including files that are not System — will be excluded.
• Store each machine's archive in the specified folder on the machine Enter the full path to the folder in the Path field. This path will be created on each machine the policy will be applied to. • Store each machine's archive in the machine's Acronis Secure Zone Acronis Secure Zone has to be created on each machine the policy will be applied to. For information on how to create Acronis Secure Zone, see the Creating Acronis Secure Zone (p. 260) section. 2.
Specify: • User name. When entering the name of an Active Directory user account, be sure to also specify the domain name (DOMAIN\Username or Username@domain) • Password. The password for the account. 2. Click OK. Warning: According to the original FTP specification, credentials required for access to FTP servers are transferred through a network as plaintext. This means that the user name and password can be intercepted by an eavesdropper using a packet sniffer. 7.3.7.
Backup type Select the type of backup: full, incremental, or differential. If there is no full backup in the archive, a full backup will be created regardless of your selection. Date and time Specify when to start the backup. The task will be started manually Select this check box, if you do not need to put the backup task on a schedule and wish to start it manually afterwards. 7.3.7.3.
Feb 26—Mar 4 D D D D W - - Daily backups run every workday except Friday, which is left for weekly and monthly backups. Monthly backups run every fourth Friday, and weekly backups run on all other Fridays. • Monthly ("Grandfather") backups are full; • • Weekly ("Father") backups are differential; Daily ("Son") backups are incremental. Parameters You can set up the following parameters of a Grandfather-Father-Son (GFS) scheme. Start backup at: Specifies when to start a backup.
Examples Each day of the past week, each week of the past month Let us consider a GFS backup scheme that many may find useful. • • • • Back up files every day, including weekends Be able to recover files as of any date over the past seven days Have access to weekly backups of the past month Keep monthly backups indefinitely. Backup scheme parameters can then be set up as follows.
With this scheme, you will have a week to recover a previous version of a damaged file from a daily backup; as well as 10-day access to weekly backups. Each monthly full backup will be available for six months since the creation date. Work schedule Suppose you are a part-time financial consultant and work in a company on Tuesdays and Thursdays. On these days, you often make changes to your financial documents, statements, and update the spreadsheets etc. on your laptop.
Even though it is possible to use GFS to create such an archive, the Custom scheme is more flexible in this situation. 7.3.7.5. Tower of Hanoi scheme At a glance • • • • Up to 16 levels of full, differential, and incremental backups Next-level backups are twice as rare as previous-level backups One backup of each level is stored at a time Higher density of more recent backups Parameters You can set up the following parameters of a Tower of Hanoi scheme. Schedule Set up a daily (p. 174), weekly (p.
A cleanup mechanism ensures that only the most recent backups of each level are kept. Here is how the archive looks on day 8, a day before creating a new full backup. 1 2 3 4 5 6 7 8 4 1 2 1 3 1 2 1 The scheme allows for efficient data storage: more backups accumulate toward the current time. Having four backups, we could recover data as of today, yesterday, half a week, or a week ago. Roll-back period The number of days we can go back in the archive is different on different days.
On day 14, the interval is five days. It increases on subsequent days before decreasing again, and so on. 1 2 3 4 5 6 7 8 9 10 11 12 13 14 4 1 2 1 3 1 2 1 4 1 2 1 3 1 The roll-back period shows how many days we are guaranteed to have even in the worst case. For a four-level scheme, it is four days. 7.3.7.6.
then delete the last full incremental/differential backups • backup with all dependent If there is only one full backup left, and an incremental or differential backup is in progress, an error occurs saying there is a lack of available space This setting is recommended when backing up to a USB drive or Acronis Secure Zone. This setting is not applicable to managed vaults.
By default, a one-year-old full backup will not be deleted until all incremental backups that depend on it become subject to deletion too. For more information, see Retention rules (p. 41). Monthly full, weekly differential, and daily incremental backups plus cleanup This example demonstrates the use of all options available in the Custom scheme. Suppose that we need a scheme that will produce monthly full backups, weekly differential backups, and daily incremental backups.
In the first of the previous examples, we set up a schedule only for full backups. However, the scheme will still result in three backup tasks, enabling you to manually start a backup of any type: • • • Full backup, runs every Friday at 10:00 PM Incremental backup, runs manually Differential backup, runs manually You can run any of these backup tasks by selecting it from the list of tasks in the Backup plans and tasks section in the left pane.
Glossary A Acronis Active Restore The Acronis proprietary technology that brings a system online immediately after the system recovery is started. The system boots from the backup (p. 387) and the machine becomes operational and ready to provide necessary services. The data required to serve incoming requests is recovered with the highest priority; everything else is recovered in the background.
Agent (Acronis Backup & Recovery 10 Agent) An application that performs data backup and recovery and enables other management operations on the machine (p. 390), such as task management and operations with hard disks. The type of data that can be backed up depends on the agent type. Acronis Backup & Recovery 10 includes the agents for backing up disks and files and the agents for backing up virtual machines residing on virtualization servers. Agent-side cleanup Cleanup (p. 386) performed by an agent (p.
Backup options Configuration parameters of a backup operation (p. 382), such as pre/post backup commands, maximum network bandwidth allotted for the backup stream or data compression level. Backup options are a part of a backup plan (p. 383). Backup plan (Plan) A set of rules that specify how the given data will be protected on a given machine. A backup plan specifies: • • • what data to back up where to store the backup archive (p. 382) (the backup archive name and location) the backup scheme (p.
3. The management server deploys the policy to the machines. 4. On each machine, the agent (p. 382) installed on the machine finds data items using the selection rules. For example, if the selection rule is [All volumes], the entire machine will be backed up. 5. On each machine, the agent installed on the machine creates a backup plan (p. 383) using other rules specified by the policy. Such backup plan is called a centralized plan (p. 385). 6.
A management server has two built-in groups that contain all machines of each type: All physical machines (p. 391), All virtual machines (p. 394). Built-in groups cannot be deleted, moved to other groups or manually modified. Custom groups cannot be created within built-in groups. There is no way to remove a physical machine from the built-in group except for deleting the machine from the management server. Virtual machines are deleted as a result of their host server deletion. A backup policy (p.
On a machine that is not registered on the management server, a user having the privilege to back up to the centralized vault can do so by specifying the full path to the vault. If the vault is managed, the user's archives will be managed by the storage node as well as other archives stored in the vault. Cleanup Deleting backups (p. 382) from a backup archive (p. 382) in order to get rid of outdated backups or prevent the archive from exceeding the desired size.
Differential backup A differential backup stores changes to the data against the latest full backup (p. 390). You need access to the corresponding full backup to recover the data from a differential backup. Direct management Any management operation that is performed on a managed machine (p. 390) using the direct console (p. 386)-agent (p. 382) connection (as opposed to centralized management (p. 385) when the operations are configured on the management server (p.
and the foreign disks so that they form a single entity. A foreign group is imported as is (will have the original name) if no disk group exists on the machine. For more information about disk groups please refer to the following Microsoft knowledge base article: 222189 Description of Disk Groups in Windows Disk Management http://support.microsoft.com/kb/222189/EN-US/ Dynamic disk A hard disk managed by Logical Disk Manager (LDM) that is available in Windows starting with Windows 2000.
• IP address range. A machine remains in a dynamic group as long as the machine meets the group's criteria. The machine is removed from the group automatically as soon as • • the machine's properties change so that the machine does not meet the criteria anymore OR the administrator changes the criteria so that the machine does not meet them anymore. There is no way to remove a machine from a dynamic group manually except for deleting the machine from the management server.
F Full backup A self-sufficient backup (p. 382) containing all data chosen for backup. You do not need access to any other backup to recover the data from a full backup. G GFS (Grandfather-Father-Son) A popular backup scheme (p. 384) aimed to maintain the optimal balance between a backup archive (p. 382) size and the number of recovery points (p. 392) available from the archive.
Managed vault A centralized vault (p. 385) managed by a storage node (p. 392). Archives (p. 382) in a managed vault can be accessed as follows: bsp://node_address/vault_name/archive_name/ Physically, managed vaults can reside on a network share, SAN, NAS, on a hard drive local to the storage node or on a tape library locally attached to the storage node. The storage node performs storage node-side cleanup (p. 393) and storage node-side validation (p. 393) for each archive stored in the managed vault.
Plan See Backup plan (p. 383). Policy See Backup policy (p. 383). R Recovery point Date and time to which the backed up data can be reverted to. Registered machine A machine (p. 390) managed by a management server (p. 391). A machine can be registered on only one management server at a time. A machine becomes registered as a result of the registration (p. 392) procedure. Registration A procedure that adds a managed machine (p. 390) to a management server (p. 391).
• prevent access to the backup archives, even in case the storage medium is stolen or accessed by a malefactor, by using encrypted vaults (p. 389). Storage node-side cleanup Cleanup (p. 386) performed by a storage node (p. 392) according to the backup plans (p. 383) that produce the archives (p. 382) stored in a managed vault (p. 390). Being an alternative to the agentside cleanup (p. 382), the cleanup on the storage node side relieves the production servers of unnecessary CPU load.
U Universal Restore (Acronis Backup & Recovery 10 Universal Restore) The Acronis proprietary technology that helps boot up Windows on dissimilar hardware or a virtual machine. The Universal Restore handles differences in devices that are critical for the operating system start-up, such as storage controllers, motherboard or chipset. The Universal Restore is not available: • • when the machine is booted with Acronis Startup Recovery Manager (p. 381) (using F11) or • when using Acronis Active Restore (p.
Virtual machine On Acronis Backup & Recovery 10 Management Server, a machine (p. 390) is considered virtual if it can be backed up from the virtualization host without installing an agent (p. 382) on the machine. A virtual machine appears on the management server after registration of the virtualization server that hosts the machine, provided that Acronis Backup & Recovery 10 agent for virtual machines is installed on that server.
Actions on a tape library vault • 146 Index Actions on backup plans and tasks • 192, 195 A Actions on backup policies • 301, 303 A policy on a machine or a group • 66 Actions on centralized vaults • 60, 135, 136, 137 About Windows loaders • 243 Access credentials • 251, 252 Access credentials for archive location • 205, 212 Access credentials for destination • 226, 237, 256, 259 Access credentials for location • 226, 229, 360, 369 Actions on groups • 65, 307, 319 Actions on log entries • 202, 334, 3
Archive validation • 206, 223, 380 Backup schemes • 206, 213 At Windows Event Log event • 181 Backup selection • 247, 248, 251, 252, 255, 257 Attaching a managed vault • 138, 142 B Backup splitting • 102, 116 Basic concepts • 8, 27, 57, 205 Back up later scheme • 213, 370 Basic disk cloning • 285, 286 Back up now scheme • 213, 370 Basic precautions • 283 Backing up dynamic volumes (Windows) • 44, 225 Bootability troubleshooting • 47, 241 Backing up LVM volumes (Linux) • 46, 277 Backing up RAID
Communication between Acronis Backup & Recovery 10 components • 85 D Components for centralized management • 19 Daily schedule • 174, 218, 329, 375 Compression level • 102, 111 Data type • 226, 228 Conditions • 119, 184 Decreasing Acronis Secure Zone • 263 Configuring Acronis Backup & Recovery 10 components • 343 Deduplicating vault • 386 Configuring communication settings • 85, 86, 89 Configuring iSCSI and NDAS devices • 274 Connecting to a machine booted from media • 273 Console (Acronis Backup
Drivers for Universal Restore • 267, 270 Format volume • 291, 297 Dual destination • 52, 103, 119 Full backup • 382, 384, 386, 387, 390 Dynamic disk • 44, 381, 387, 388, 389 Full, incremental and differential backups • 27, 33, 213, 370 Dynamic group • 62, 385, 388 Dynamic grouping criteria • 62 G Dynamic volume • 44, 384, 389 Getting started • 8 E Getting started with a tape library • 145 Editing custom groups • 319, 322 GFS (Grandfather-Father-Son) • 384, 390, 393 E-mail • 103, 113, 126, 128
Inheritance order • 314, 318, 323 Management Console • 9, 22 Introducing Acronis® Backup & Recovery™ 10 • 7 Management Server • 8, 20 Inventory • 145, 148, 165 Items to back up • 205, 208, 360, 363 K Kernel parameters • 266, 267 Management server (Acronis Backup & Recovery 10 Management Server) • 10, 20, 57, 93, 383, 384, 385, 386, 387, 388, 391, 392 Management server administrator rights • 82 Management server options • 94 L Managing a tape library • 138, 148 Labeling • 148, 149 Managing Acronis
Operations with panes • 14 Pre-data capture command • 108 Options • 92 Pre-recovery command • 127 Organizational unit criterion • 96, 320, 321 Prerequisites • 145 Overview • 73, 124, 135, 139, 143, 328 Privileges for centralized management • 78 Overwriting • 237 Privileges for local connection • 8, 79 Owners and credentials • 32, 166, 227, 247, 256, 337 Privileges for remote connection in Linux • 8, 80 P Privileges for remote connection in Windows • 79 Parameters set through administrative tem
Rescan • 138, 146, 147, 148, 149, 165 SSL certificates • 85, 87, 89, 356 Result confirmation • 260, 261 Startup page • 92 Retention rules • 41, 214, 220, 221, 222, 371, 377, 378, 379, 386 Static and dynamic groups • 62 Rights for Acronis services • 84, 362 RSM Media Pools • 143, 144 Run backup plan • 196, 199, 315 Running Acronis Disk Director Lite • 283 S Static group • 62, 385, 392 Storage Node • 10, 20, 50, 58, 328 Storage node (Acronis Backup & Recovery 10 Storage Node) • 20, 58, 385, 386, 389,
Temporarily disabling a backup plan • 169, 199 V Time since last backup • 188 Validating vaults, archives and backups • 138, 168, 170, 171, 195, 246, 331 Time-based alerts • 93 ToH Example 1 • 160, 164 ToH Example 2 • 160, 161 ToH Example 3 • 160, 162 Tower of Hanoi • 384, 393 Validation • 27, 143, 382, 393, 394 Validation rules • 383, 394 Vault • 27, 52, 262, 389, 391, 394 Vault database path • 139, 140 Vault encryption • 139, 140 Tower of Hanoi backup scheme • 39, 143, 152, 393 Vault path • 139, 14
WinPE (Windows Preinstallation Environment) • 381, 384, 395 Work across subnets • 282 Working under bootable media • 273 Working with backup plans and tasks • 195 Working with the • 135, 136, 167, 300 404 Copyright © Acronis, Inc.