
APS 2.0 Deployment Guide


16 Copyright © Acronis International GmbH, 2002-2015
To update the package
1. Log on to the endpoint as the root user.
2. Place the .zip file of the APS package to the machine.
3. Extract files from .zip archive:
unzip <APS package name> rpms/*
For example:
unzip AcronisBackupCloud-2.0-XXX.app.zip rpms/*
4. Specify host should be used to connect to Operations Automation Public API
export <POA HOST>
For example:
export POA_HOST=acronis.apsdemo.org
5. Specify the package directory name if it differs from “backupservice”
export APS_DIRECTORY_NAME=<package directory>
For example:
export APS_DIRECTORY_NAME=CloudBackup
6. Install the .rpm file shipped with the package:
rpm –Uvh rpms/<RPM NAME>
For example:
rpm -Uvh rpms/ acronis-backup-cloud-2.0-XXX.x86_64.rpm
If the installation fails because of failed dependences, install required packages using “yum
install” command.
For example:
yum install php-pdo php-xml php-xmlrpc php-soap php-xmlrpc php-mbstring
7. In the Operations Automation Control Panel, go to Services > Applications.
Click the package, click General > Upgrade instances > Upgrade all instances.
7 Post-upgrade actions
1. Configure service templates for end customers
Make sure that all service templates for end customers include a backup profile resource and
that its limit is set to “1”.
Note: For Odin Service Automation 6.0.x, the default backup profile is created automatically during the rpm
package installation or upgrade. For 5.5.x version it must be created manually.
The backup profile can be created from APS Instance Backup Profiles tab.
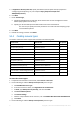
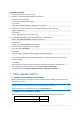
2. Configure service templates for resellers
Make sure that all service templates for resellers include the following set of resources:
Resource name
Limit
Backup Service (Acronis)
1