
User`s guide


50 Copyright © Acronis, Inc., 2000-2010
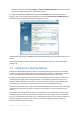
2. Select the partition and then the folder that contains the files you want to recover on the
directory tree in the left pane. The right pane lists the files in that folder. Select the files to
recover. When selecting multiple files you can use the Ctrl and Shift keys like in Windows
Explorer. Having finished selection, right-click on the selected files and choose Recover in the
shortcut menu.
3. Acronis True Image Home opens the Browse for folder dialog. By default the original location
from which the files were backed up will be selected. If necessary, you can select another folder
or create a new folder for the files to be recovered to by clicking the Make New Folder button.
After selecting the folder click OK to proceed with recovery.
If you recover the files to the original folder and Acronis True Image Home finds a file there with the
same name, it will open a dialog window where you can choose what to do with the files: Recover
and replace the file on the disk, Do not recover (to keep the file on the disk), and Recover, but keep
both files (the recovered file will be renamed). If you want to use the choice for all files with identical
names, select the Apply to all files check box.
It is impossible to Recover and replace files on the disk which are being used or locked by the operating system
at the moment of recovery.
If you need to recover a specific version of a file, select the file either in Time Explorer or in Windows
Explorer, right-click and choose View Versions in the shortcut menu. This opens the File Versions
window. Select the required version by its backup time and click Recover on the toolbar. To choose
the right version, you can open the version in the associated application and view the file contents.
Select the file in the right pane and the backup times for all its versions kept on the Nonstop Backup
Storage will be shown in the bottom line of Time Explorer. Choose a version by its backup time, then
right-click on the file in the right pane and choose Open in the shortcut menu. Acronis True Image
Home will recover the file version to a temporary folder and then will open the file using the
associated application.
7.6 Managing Acronis Nonstop Backup storage
Inevitably the Acronis Nonstop Backup Storage becomes full after a period of time which depends on
the selected Nonstop Backup storage and the number and composition of partitions protected by
Acronis Nonstop Backup.
When your selected Acronis Nonstop Backup storage fills up, you can choose another storage
without losing the previously backed up data.
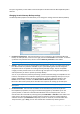
One more way of managing the Acronis Nonstop Backup storage is cleaning up the data you do not
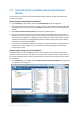
need anymore. To clean up the storage, select Backup → Nonstop Backup on the sidebar and then
click the link to the active Nonstop Backup storage to the right of Storage for nonstop backups: on
the right pane. This will open the Nonstop Backup Options window. To clean up the active Nonstop
Backup storage, click the Storage item, select the active storage, and then click Clean up on the
toolbar.
Acronis True Image Home displays a window allowing you to select a period of time for deleting the
backups created during that period. Select the required period and click OK.