Acronis Backup Advanced for Exchange Version 11.
Copyright Statement Copyright © Acronis International GmbH, 2002-2014. All rights reserved. “Acronis” and “Acronis Secure Zone” are registered trademarks of Acronis International GmbH. "Acronis Compute with Confidence", “Acronis Startup Recovery Manager”, “Acronis Active Restore”, “Acronis Instant Restore” and the Acronis logo are trademarks of Acronis International GmbH. Linux is a registered trademark of Linus Torvalds. VMware and VMware Ready are trademarks and/or registered trademarks of VMware, Inc.
Table of contents 1 Important notices....................................................................................................................... 5 2 Overview .................................................................................................................................... 5 3 General information ................................................................................................................... 6 4 3.1 Agent for Exchange...................................
6.4 Selecting target destinations for mailboxes, public folders, or their contents ...................... 36 6.4.1 6.4.2 6.5 Using Acronis Active Restore for database recovery............................................................ 39 6.6 Usage examples .................................................................................................................. 39 6.6.1 6.6.2 6.6.3 7 8 9 Recovering mailboxes, public folders, and their contents to the Exchange server .....................
1 Important notices This document describes backup and recovery of Microsoft Exchange Server data by using Acronis Backup Advanced for Exchange. For the most comprehensive information about the functionality provided by Acronis Backup, please refer to Acronis Backup Help Web Help: http://www.acronis.eu/support/documentation/AcronisBackup_11.5/ Built-in context-sensitive Help available in Acronis Backup Management Console by clicking the question-mark button .
Acronis Backup supports SCC, CCR and DAG cluster configurations. You can choose to back up database replicas rather than active databases for minimal production impact. If the Mailbox role is moved to another server due to a switchover or a failover, the software will track all relocations of the data and safely back it up. Continuous Data Protection (p. 13) By using Continuous Data Protection, you can revert Exchange data to almost any point in time.
Windows Small Business Server 2003/2003 R2 Windows Server 2008 – Standard, Enterprise, and Datacenter editions (x86, x64) Windows Small Business Server 2008 Windows Server 2008 R2 – Standard, Enterprise, Datacenter, and Foundation editions Windows Small Business Server 2011 – all editions Windows Server 2012/2012 R2 – Standard and Datacenter editions 3.
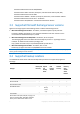
External storages (RDX, USB HDD, USB Flash Drives) in the "Fixed drive" mode. + - + + + Tape devices + - - - - Network folders + - + + + FTP/SFTP + - - + - 3.5 Permissions for Exchange backup and recovery The table below contains the minimal permissions required to back up and recover Exchange server data. When creating a backup plan, make sure that the account with the required permissions is specified in What to back up > Access credentials.
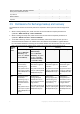
2010 Membership in Organization Management role group. Membership in Organization Management and Server Management role groups. Membership in Organization Management role group. N/A Membership in Organization Management role group. Membership in Organization Management and Server Management role groups. http://technet.micro http://technet.microsof soft.com/en-us/librar http://technet.microsoft t.com/en-us/library/dd http://technet.micros y/dd876854(v=exchg. .com/en-us/library/dd63 876854(v=exchg.
Deleting backups Backups that have no dependencies are deleted without any limitations. A backup that has dependencies cannot be deleted separately from all its dependent backups. To delete a backup with dependencies manually, you should delete the entire backup chain (a full backup and all its dependent transaction log backups or incremental backups).
4 Getting started with Agent for Exchange This section lets you quickly implement the most common backup and recovery scenarios for stand-alone Exchange servers as well as for Exchange cluster environments. 4.1 Simple scenario - a single Exchange server The following steps will guide you through the installation and basic use of Acronis Backup in simple Exchange organizations. Let's assume you have a single Exchange server that hosts all Exchange services and stores all Exchange data.
Backup In this step, you will set nightly full backups and hourly transaction log backups of the entire information store. 1. Make sure that circular logging is disabled for all databases or storage groups of the Exchange server. Otherwise, the transaction log backup will fail. 2. In the management console, click Create backup plan. 3. Under What to back up section, click Items to back up. In Data to back up, select Microsoft Exchange Information Store.
4.2 Advanced scenario - CDP of an Exchange cluster This section gives an example of backing up multiple Exchange servers that are integrated into a cluster. Let's see how to leverage the advanced features: Continuous Data Protection (CDP), express full backup, and data deduplication. To be able to revert Exchange data to any custom point in time, we will use the CDP backup scheme (p. 23). In this scheme, you specify when to perform full backups.
5. Proceed with the installation. Details. The console will also be installed so that you can control the management server locally. Installing Agent for Exchange Perform the following steps on each node of the cluster. 1. Log on to a cluster node as domain administrator and start the setup program. 2. Click Install Acronis Backup. Accept the terms of the license agreement. 3.
4.2.4 Creating a deduplicating vault 1. 2. 3. 4. 5. 6. 7. Connect the console to the management server. Click Storage nodes in the Navigation pane. Select the storage node, then click Create vault. In Name, type the name of the vault. In Deduplication, select On. Click Path and then specify the path to the network share where the backups will be stored. Click Deduplication database and then specify the path to the deduplication database. Details.
Details. You will see the Backup plans and tasks view with the backup plan you have just created. In this view, you can check the backup plan's status, monitor its execution state, run or stop the plan, and more. 4.2.6 Recovery 1. Connect the console to the one of the available cluster nodes. 2. In the Navigation tree, expand Vaults > Centralized and then select the vault where you saved the backups. 3. In the Data view tab, in Show, select Microsoft Exchange Information Store. 4.
5 Backup This section describes only the steps and settings that are specific for backing up Microsoft Exchange Server data. The whole procedure of backup plan creation and common backup plan settings, such as selecting backup locations, setting up backup replication, retention and validation are described in the "Backup" section of the product Help or the User Guide for Acronis Backup Advanced. Back up now Use the Back up now to do a one-time backup of the Exchange server's data in a few simple steps.
Checkpoint file (.chk) Tracks how far Exchange has progressed in writing logged information to the database file. Storage group In Exchange 2003/2007, a storage group is a logical container for Exchange databases (p. 55), the associated transaction log (p. 57), checkpoint (p. 55), and other system files. All databases in a storage group share a single log stream. A storage group is the basic unit for backup and recovery. Starting with Exchange 2010, the concept of a storage group is discontinued.
Information store structure diagram The following diagram illustrates the information store structure for Exchange 2003/2007, Exchange 2010, and Exchange 2013. The data items that you can back up at the database level are red-framed. 19 Copyright © Acronis International GmbH, 2002-2014.
5.2 What data items can be backed up and what backup types are used? While creating a backup plan, you can select either the Microsoft Exchange Information Store or the Microsoft Exchange Mailboxes data type. Microsoft Exchange Information store When you select this data type, the software will perform a database backup. You can select the following items to back up: The entire information store. Individual databases (for Exchange 2010/2013). Individual storage groups (for Exchange 2003/2007).
database backups allows for restoring mailboxes, public folders, e-mails, contacts, calendar events, journal entries, notes and more. Additionally, full backups can be created by using one of the following methods: Express full backup (p. 25). This method allows creating creating full database backups in deduplicating vaults. Although regular data deduplication can be used full database backups, we recommend using the Express full backup method to achieve maximum deduplication effect. Copy-only backup (p.
5.3 Backup schemes When backing up data of Microsoft Exchange server, the following backup schemes are available: Backup schemes Description Database backup types Mailbox backup type Simple (p. 22) Protects the Exchange data with full backups performed automatically on a schedule you specify. Regular full - Express full (p. 25) Full Manual start (p. 24) Regular full Full - Express full Incremental (p. 25) - Copy-only (p.
5.3.2 Continuous Data Protection (CDP) scheme Continuous Data Protection (CDP) allows reverting the Exchange data to almost any custom point in time. With the CDP scheme, transaction log files are backed up automatically as soon as they are closed by Exchange. You only specify when to perform full database backups. The transaction log file backup is paused until the full backup is completed. To set up the CDP backup scheme, specify the appropriate settings as follows.
5.3.3 Manual start scheme With the Manual start scheme, the backup will not start automatically. You can run the backup plan from the Backup plans and tasks view manually at any time afterwards. For the description of the common settings for this backup scheme, such as setting up backup replication and validation see the "Backup" section of the product Help or the User Guide for Acronis Backup Advanced.
Transaction log Specify on what schedule (Add schedule...) to perform a transaction log backup. If the archive contains no full backups at the time of the task run, a full backup is created instead of the transaction log backup. Microsoft Exchange Mailboxes If you selected Microsoft Exchange Mailboxes data type, the following backup types are available: Full backup Specify on what schedule (Add schedule...) to perform a full mailbox backup.
The number of I/O requests to the production server is significantly reduced. 5.4.1.1 How the express full backup method works The express full backup method is based on monitoring Exchange database files performed by Acronis Express Backup Driver. Beginning from the first regular full backup, the driver monitors all modifications performed on the database file.
Solution: Do express full backups to a deduplicating vault. Create a backup plan and schedule the backup to start at the beginning of the night backup window. To create the initial full backup, temporarily expand the night backup window. The subsequent express full backups will fit the backup window. Steps to perform 1. 2. 3. 4. 5. Connect the console to the machine running Agent for Exchange. Click Create backup plan. Under What to back up, select the required server's data.
In Backup type, choose Full. 3. Click OK to create the backup plan. 4. You will see the Backup plans and tasks view with the backup plan you have just created. Select this backup plan and click Run. Exporting the initial backup to a detachable medium 1. 2. 3. 4. 5. 6. After the backup is created, navigate to the vault containing the backup. In the vault view, click the Archive view tab and select the created backup. Click Export.
Solution: Do express full backups to a deduplicating vault. The storage space savings will be about 52 TB or about 92%. Steps to perform 1. 2. 3. 4. 5. Connect the console to the machine running Agent for Exchange. Click Create backup plan. Under What to back up, select the required Exchange databases or storage groups. Under Where to back up, select the managed deduplicating vault. Under How to back up, select the Simple backup scheme. a.
6 Recovery This section describes only the steps and settings that are specific for recovering Microsoft Exchange Server data. The whole procedure of recovery task creation and common recovery task settings are described in the "Creating a recovery task" section of the product Help or the User Guide for Acronis Backup Advanced. 6.
2. Selecting the data The backed-up data can be selected using the Data view tab, or the Archive view tab. The Data view tab displays all the backed-up data by versions (the date and time of backup creation) within the selected archive location. The Archive view tab displays the backed-up data by the archives. 6.2.
Select the recovery point by the date and time of backup creation. The data will be recovered to this time. Custom point in time (available for the database backups only). Specify the date and time to recover the data to. During recovery the software will first recover data to the time of the last created full backup before the specified time and then apply the transaction log files from the transaction log backups. See the "Point in time selection" (p. 33) section for details. 6.
5. Click OK. 6.2.3 Searching for specific items in mailboxes and public folders The search allows you to find specific items (such as e-mails, notes, contacts, tasks, and more) within the selected mailbox or public folder for recovery. The search is performed within the item selected in the backup contents tree (for the Archive view (p. 32)). To make the search faster, you can narrow the selection going deeper to the tree (such as particular mailbox or folder rather than entire database). 1.
6.3 Selecting target destinations for databases or storage groups When creating a recovery task on the management server, you can select the Exchange Server to recover the selected data to. To do this, click Browse and select the required Exchange server with the Agent for Exchange installed. In the Data paths drop-down box, select one the following data paths: Original (p. 34) - recover the databases or storage groups to their original paths (the paths are taken from the backup). Custom (p.
To recover the selected databases (storage groups) over the existing ones 1. To the right of the Recover to, select one of the existing databases (storage groups). The existing database (storage group) will be overwritten (if the overwriting is allowed in the properties of the selected databases). 2. Repeat step 1 for other databases or storage groups that you need to recover over the existing ones.
To recover the databases or storage groups to a folder In Path, specify the destination folder where files of the selected database or storage group will be saved. The storage group or database files will be extracted from the backup along with transaction log files. The extracted databases will be in a Dirty Shutdown state. When recovering databases to their original location, the databases can remain in a Dirty Shutdown state and be mountable by the system.
The mailboxes that are missing on the current Exchange server, but exist on a different Exchange server within the current Exchange organization, will be skipped during recovery. To recover such mailboxes, you should connect the console to the Exchange server hosting these mailboxes and start the mailbox recovery on this server. If the mailboxes are missing within the current Exchange organization, you should specify the mailbox database where these mailboxes will be created (see later in this section).
Outlook 97-2002 - if the created .pst files will be opened by using Microsoft Outlook 97-2002. Note The Outlook 97-2002 format does not support Unicode and limits the file size to 2 GB. Creation of a .pst file in Outlook 97-2002 format does not require a machine with a corresponding version of Microsoft Outlook. The .pst files of that format are created by using native Exchange server mechanisms.
Host machine credentials Available if the Outlook 2003-2013 format is selected. If you connect the console to the Exchange server (host) with Agent for Exchange remotely, the host machine credentials are filled automatically and you do not have to enter them. If the console is connected to the Exchange server locally, specify the user name and password. The user account has to be a member of the Administrators group on the host.
The administrator recovers the required mailboxes as .pst files from the database or the mailbox backup. The administrator then imports the mailbox data from the .pst to into the appropriate mailboxes on another Exchange server by using the MailboxImportRequest cmdlet. Accessing mailbox data without mandatory usage of Exchange server.
6.6.2 Example 2. Recovering mailboxes to a different mailbox database Typical usage scenarios for recovering mailboxes to a different mailbox database are: Migrating mailboxes between different Exchange servers. Example: the administrator needs to safely move mailboxes from the existing Exchange organization to a newer Exchange server version (for example, from Exchange 2007 to Exchange 2010). Having created mailbox backups of the Exchange 2007, the administrator can remove the server.
Steps to perform 1. 2. 3. 4. 5. 6. 42 Connect the console to the Exchange server running Agent for Exchange. In the Navigation tree, select the vault where the required backups are stored. In the Data view tab, in Show, select Microsoft Exchange Mailboxes. By using the search (p. 33) find the required e-mail and select it for recovery. Under Where to recover section in Data paths, select Microsoft Exchange Server. Leave the rest of the settings "as is" and click OK to start the recovery task.
7 Exchange servers on a management server All administrative operations with Exchange servers in Acronis Backup are performed in the Microsoft Exchange Servers view of the management server. Add a machine running Exchange to the management server by using the machine's name or IP address, or add multiple machines running the Exchange server application.
Add multiple Exchange Click Add multiple machines. servers In the Add multiple machines window, specify the machines running Exchange servers to add to the management server. You can add machines by: Machine names or IP addresses. Exchange server application installed on the machines. Browsing the network. Browsing an Active Directory domain. Importing the list of the machines from .txt or .csv files.
Delete the selected Exchange server from the management server Click Delete machine from AMS. As a result, the backup plans that have centralized origin are removed and shortcuts to centralized vaults are deleted from the server. If the server is not available at the moment, these actions will be performed as soon as the server becomes available to the management server. Update all information Click Synchronize.
Progress The Progress tab lists all of the selected machine's activities and tasks that are currently running. The tab provides information about task progress, elapsed time and other parameters. 46 Copyright © Acronis International GmbH, 2002-2014.
8 Backing up and recovering data of Exchange clusters The main idea of Exchange clusters is to provide high database availability with fast failover and no data loss. Usually, it is achieved by having one or more copies of databases or storage groups on the members of the cluster (cluster nodes).
Exchange 2003 Cluster and Single Copy Cluster (SCC) for Exchange 2007 Both configurations are failover cluster solutions based on a shared storage. Each of them uses a single copy of a storage group on storage that is shared between the cluster nodes. Only one cluster node can access (manage) shared data at a time. The node that is currently managing shared data is called an active node. Other nodes are called passive or standby.
Database Availability Group (DAG) for Exchange Server 2010 or later DAG is a failover cluster solution providing high availability and site resilience. DAG uses the combination of two continuous replication technologies found in Exchange 2007: Cluster Continuous Replication and Standby Continuous Replication. DAG is a group of up to 16 Exchange Mailbox servers. Any node can host a copy of mailbox database from any other node. Each node can host passive and active database copies.
Availability of the management server The management server's availability is mandatory for creating and editing the centralized backup plans, since the management server deploys the backup plan to every node of the cluster. However, its availability is not necessary to run backup and recovery tasks. 8.4 Backing up the Exchange cluster data Normally, clustered data is backed up by creating a backup plan on the management server (centralized backup plan).
This mode is available for selection if Agent for Exchange is installed on each node of the cluster. In this mode, the software will back up data from the active copy of the database or the storage group. If the active copy is not available at the moment, the backup will fail. Backing up data from active copies may slow down the Exchange server performance, but the backed-up data will be in the most up-to-date state.
recovered databases. This is required for manual configuration or resumption of cluster replication after recovery. Notes for recovering mailboxes or public folders: When recovering mailboxes, public folders or their contents, configure the settings as described in the "Recovering mailboxes, public folders and their contents to the Exchange server" (p. 36) section. 5. Under When to recover, specify when to perform the recovery. 6.
9 Exchange-specific backup options 9.1 Metadata collection This option applies to database backups. This option defines the amount of metadata collected during a backup. The more detailed the metadata is, the longer the backup creation takes. However, the browsing and recovery of individual e-mails and other items contained in the mailboxes will be faster.
54 Select this check box to skip the Sent Items folders and all their content. Exclude items older than: ... Select this check box and specify the age of backed up items. The items older than the specified age will be skipped from backup. Exclude attachments larger than: ... Select this check box and specify the upper size limit for the backed-up attachments. The attachments whose size is greater than the specified value will be skipped during backup.
10 Glossary C Checkpoint file A file that accompanies an Exchange transaction log (p. 57) stream and tracks how far Exchange has progressed in writing logged information to the database file. Circular logging A Microsoft Exchange Server logging mode. In this mode, Exchange overwrites and reuses the transaction log files (p. 57) rather than creating new log files. Continuous Data Protection (CDP) Continuous Data Protection (CDP) allows reverting the protected data to any point in time.
E Exchange database There are two types of Exchange databases. A mailbox database stores contents of mailboxes. Mailbox content is private to the mailbox user. A public folder database stores public folders data. Public folder content is shared among multiple users. Physically, the data stored in the files of the following types: Database file (.edb) Transaction log files (p. 57) (.log) Checkpoint files (p. 55) (.chk).
P Point of failure The point in time when the most recent transaction log file (p. 57) existing in Exchange was created. This is the most recent state Exchange data can be reverted to. S Storage group In Exchange 2003/2007, a storage group is a logical container for Exchange databases (p. 55), the associated transaction log (p. 57), checkpoint (p. 55), and other system files. All databases in a storage group share a single log stream. A storage group is the basic unit for backup and recovery.
In either case, Exchange deletes only those files that are older than the checkpoint. This means that transactions from these files have already been committed and written to databases. 58 Copyright © Acronis International GmbH, 2002-2014.