Acronis Backup Advanced Version 11.
Copyright Statement Copyright © Acronis International GmbH, 2002-2015. All rights reserved. “Acronis” and “Acronis Secure Zone” are registered trademarks of Acronis International GmbH. "Acronis Compute with Confidence", “Acronis Startup Recovery Manager”, “Acronis Active Restore”, “Acronis Instant Restore” and the Acronis logo are trademarks of Acronis International GmbH. Linux is a registered trademark of Linus Torvalds. VMware and VMware Ready are trademarks and/or registered trademarks of VMware, Inc.
Table of contents 1 Main components ............................................................................................................4 2 Supported operating systems ...........................................................................................4 2.1 Agent ..........................................................................................................................................4 2.2 Management server and management console .........................................
This document describes how to install and start using Acronis Backup Advanced. 1 Main components Acronis Backup Advanced contains the following main components: Acronis Backup Agent for Windows: Backs up and recovers data, and validates archives. Acronis Backup Management Console: Enables you to connect to and manage the agents and the management server—such as by setting up backup plans.
Windows Small Business Server 2011 – all editions Windows Server 2012/2012 R2 – Essentials and Foundation editions 2.
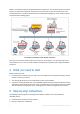
Below is an example of how you would distribute the components. The comments remind you which licenses are required to install each component. You do not have to enter the license key on each individual machine. Just import all the keys when installing the management server and then specify its address when installing agents. An example of distributing Acronis Backup components Once you are clear about which components to install on each machine, run the setup program on every machine in turn.
Recover a volume of a machine. Create a centralized vault in a network shared folder. Back up several machines to the vault. Back up user profiles to each machine's local folder and replicate the backups to the vault. Recover a user's documents. 5.1 Preparation Firewall configuration Acronis Backup uses TCP port 9876 for installation and for communication between components. The setup program automatically opens this port through Windows Firewall.
On the machine where you are planning to install the management server, add the information about all of the machines where you are planning to install agents. The format is one line for one machine. For example: 10.200.200.10 Smith 10.200.202.200 Jones 10.200.200.44 Srv2 On each of the machines where you are planning to install the agent, add the information about the machine where you are planning to install the management server. Details.
Installing the agents Perform these steps on each machine you want to back up. Every machine should have at least 380 MB of physical memory (above the OS and running applications) and at least 1.16 GB of free disk space. 1. 2. 3. 4. 5. 6. 7. 8. Log on as an administrator and start the Acronis Backup setup program. Click Install Acronis Backup. Accept the terms of the license agreement, and then click Next. Select the Back up this machine's data check box, and then click Next.
5.4 Using direct connection to a machine Let's connect the console to a machine with an agent and perform operations directly on that machine. This is the simplest way to get familiar with the basic functionality of the product. 5.4.1 Backing up a machine In this step, you will save an entire machine to a file located on a USB drive. This is a simple operation to start with. Using a similar procedure, you can back up individual disks, volumes or files. 1. Connect the console to the machine. 2.
5.5.1 Creating a centralized vault In this step, you will create an unmanaged centralized vault to back up the machines to. An unmanaged vault is just a shortcut to a shared folder on the network. In general, it is recommended that you install a storage node and create a managed vault on the node to be able to use the benefit of deduplication. 1. 2. 3. 4. Connect the console to the management server. In the Navigation tree, click Vaults, and then click Create. Specify the name of the new vault.
a. b. c. d. e. f. 5. 6. 7. 8. Under What to back up, click Items to back up. In Data to back up, select Files. Select Use policy rules for selection. In Use the following rules, select [All Profiles Folder], and then click Add rule. Click %ALLUSERSPROFILE% and click Delete. Expand the Management Server node, expand the Machines with agents node, and then expand the All Machines node. g. Select the check boxes next to the machines you want to back up. Click OK to confirm your selection.
6. 7. 8. 9. 10. 11. Details. The software displays the data backed up to the selected vault. The Show list is a filter that allows you to view either folders/files or machines/disks/volumes. In the Show list, click Folders/files. Expand the machine whose data you backed up and select the required folder. Click OK to confirm your selection. By default, the folder will be recovered to the machine from which it was backed up. You can click Browse and select another machine to recover the folder to.