
Backing Up Virtual Machines
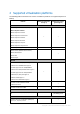
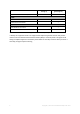
Table Of Contents
- 1 About this document
- 2 Supported virtualization platforms
- 3 Backup at a hypervisor level
- 3.1 Features and capabilities
- 3.2 Limitations
- 3.3 What does a virtual machine backup store?
- 3.4 Working in VMware vSphere
- 3.4.1 Getting started with Agent for VMware
- 3.4.2 Installation of Agent for VMware
- 3.4.3 Operations with agents
- 3.4.4 Flexible configuration of the agents
- 3.4.5 Using a locally attached storage
- 3.4.6 Configuring ESX(i)-related options
- 3.4.7 Support for VM migration
- 3.4.8 Support for datastore clusters and Storage DRS
- 3.4.9 Backing up fault tolerant machines
- 3.4.10 Backing up independent disks and RDMs
- 3.4.11 Backing up virtual machine templates
- 3.4.12 Privileges for VM backup and recovery
- 3.5 Working in Microsoft Hyper-V
- 3.6 Backing up Linux logical volumes and MD devices
- 3.7 File-level recovery
- 3.8 Virtual machines on a management server
- 3.9 VM-specific backup and recovery options
- 3.10 Limitations for backup and recovery options
- 4 Backup from inside a guest OS
- 4.1 Working with Red Hat Enterprise Virtualization
- 4.1.1 Overview of the RHEV platform
- 4.1.2 How Acronis Backup works with RHEV
- 4.1.3 Backup and recovery of RHEV virtual machines
- 4.1.4 Migrating a physical machine to a virtual machine
- 4.1 Working with Red Hat Enterprise Virtualization

10 Copyright © Acronis International GmbH, 2002-2016
2. Click Install Acronis Backup.
3. Accept the terms of the license agreement.
4. Select the Centrally monitor and configure the backing up of physical and virtual machines
check box.
5. Type all your license keys or import them from a text file.
6. Click Install.
3.4.1.3 Integration with the vCenter Server
In this step, you will integrate the management server with your vCenter Server. Integration enables
the management server to automatically deploy agents to ESX(i) hosts.
1. Start the management console, by clicking Acronis Backup on the desktop.
2. Click Connect to a management server. In Machine, type the name of the current machine.
3. In the Navigation pane, right-click Virtual machines, and then click Configure VMware vCenter
integration.
4. Specify the name or IP address of the vCenter Server, and the user name and password of a
vCenter Server administrator.
Note: If you want to specify a non-administrative user account, make sure that the account has the
appropriate privileges (p. 21).
5. Select the Automatically deploy Agent for VMware (Virtual Appliance) check box.
6. Click OK.
Result:
The All virtual machines view shows all virtual machines of the vCenter Server.
The virtual machines are shown as grayed out because Agent for VMware has not been deployed
yet. The agent will be deployed automatically after you select the virtual machines for backing
up.
3.4.1.4 Creating a centralized vault
In this step, you will create a centralized vault available across the network. This will enable easy
access to the backups.
1. In your network, choose a machine where you want to store the backed-up data. It can be the
machine where you installed the management server.
2. On the machine where you installed the management server, click Acronis Backup on the
desktop.
3. Click Connect to a management server. In Machine, type the name of the current machine.
4. On the Actions menu, click Create centralized vault.
5. In Name, type the name of the vault.
6. In Type, select Unmanaged.
7. Click Path and then specify the path to the network share where the backups will be stored. Click
OK. When prompted, provide access credentials for the shared folder.
8. Click OK. You can see the vault name in the Navigation tree under Vaults > Centralized. Click the
vault name to check its free space and contents.