Acronis Backup Advanced Version 11.
Copyright Statement Copyright © Acronis International GmbH, 2002-2016. All rights reserved. “Acronis” and “Acronis Secure Zone” are registered trademarks of Acronis International GmbH. "Acronis Compute with Confidence", “Acronis Startup Recovery Manager”, “Acronis Active Restore”, “Acronis Instant Restore” and the Acronis logo are trademarks of Acronis International GmbH. Linux is a registered trademark of Linus Torvalds. VMware and VMware Ready are trademarks and/or registered trademarks of VMware, Inc.
Table of contents 1 About this document .......................................................................................................4 2 Supported virtualization platforms ...................................................................................5 3 Backup at a hypervisor level .............................................................................................7 3.1 Features and capabilities ..................................................................................
1 About this document This document contains information that is specific for backup and recovery of virtual machines with Acronis Backup. For the most comprehensive information about the functionality provided by Acronis Backup, please refer to Acronis Backup Help Web Help: http://www.acronis.com/en-us/support/documentation/AcronisBackup_11.7/ Built-in context-sensitive Help available in Acronis Backup Management Console by clicking the question-mark button .
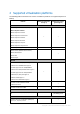
2 Supported virtualization platforms The following table summarizes how various virtualization platforms are supported by Acronis Backup. Platform Backup at a hypervisor level (p. 7) Backup from inside a guest OS (p. 34) + + VMware VMware vSphere versions: 5.0, 5.1, 5.5, and 6.
Platform Backup at a hypervisor level (p. 7) Backup from inside a guest OS (p. 34) Kernel-based Virtual Machines (KVM) + Parallels Parallels Workstation + Parallels Server 4 Bare Metal + Oracle Oracle VM Server 3.0 and 3.3 + Oracle VM VirtualBox 4.x + * The Standard edition does not support Hot-add so backups may run slower. ** Backup at a hypervisor level is not supported for vSphere Hypervisor because this product restricts access to Remote Command Line Interface (RCLI) to read-only mode.
3 Backup at a hypervisor level Backup at a hypervisor level (also known as agent-less backup) means the ability to back up and recover virtual machines without installing agents into the guest systems. This functionality becomes available by using Acronis Backup Agent for VMware or Acronis Backup Agent for Hyper-V. Agent for VMware can be imported or deployed to a VMware ESX(i) host as a virtual appliance.
Protect your virtual environment with as many agents as you want, from one agent for each host to one agent for each machine. The management server evenly distributes virtual machines among the agents running within each host. Or, you can bind the agents (p. 17) with the machines manually. Automatic agent deployment (p. 16) Applies to VMware vSphere only Just include virtual machines in a backup plan.
Backing up fault tolerant machines (p. 20) Backing up Linux logical volumes and MD devices (p. 29) 3.3 What does a virtual machine backup store? Backing up an entire virtual machine, its disks or volumes, results in a standard disk backup. A backup created at a hypervisor level also stores the virtual machine configuration. This configuration will be suggested by default when recovering the backup content to a new virtual machine.
2. Click Install Acronis Backup. 3. Accept the terms of the license agreement. 4. Select the Centrally monitor and configure the backing up of physical and virtual machines check box. 5. Type all your license keys or import them from a text file. 6. Click Install. 3.4.1.3 Integration with the vCenter Server In this step, you will integrate the management server with your vCenter Server. Integration enables the management server to automatically deploy agents to ESX(i) hosts. 1.
3.4.1.5 Backup and recovery Backup In this step, you will back up one or more virtual machines to the centralized vault you created. 1. 2. 3. 4. 5. In the welcome screen, click Back up now. Click Items to back up. In Data to back up, select Virtual machines. Select the virtual machines that you want to back up. Click Location, expand Vaults, and then specify the vault you have created. Click OK to start backing up the virtual machines.
Installation There are three methods of installing Agent for VMware: Importing to a ESX(i) host as an OVF template. Use this method for troubleshooting purposes or if you cannot install Acronis Backup Management Server for some reason. Deployment (p. 13) from Acronis Backup Management Server to a specified host or cluster. Connect the console to the management server. In the Navigation tree, right click Virtual machines, then click Deploy Agent for VMware.
3.4.3.2 Deploying Agent for VMware (Virtual Appliance) If your host contains a big number of virtual machines, you may want to deploy one or more agents in addition to the automatically deployed one. The instructions below will also help you deploy the agent to a stand-alone ESX(i) host that is not managed by vCenter Server. To deploy an additional virtual appliance 1. Connect the management console to the management server. 2.
To remove Agent for VMware 1. In the Virtual machines view, on the toolbar, click Remove Agent for VMware. 2. Select the agents to remove. 3. Click Remove Agent for VMware. 3.4.4 Flexible configuration of the agents This section gives you an overview of how the management server organizes the operation of multiple agents running within a VMware vCenter host. All agents must be registered on the management server. All agents must be connected to vCenter Server.
Tips on setup Below are brief instructions on how to set up some of the available configurations. For detailed information about integration with vCenter see the "VMware vCenter integration" (p. 16) section. 1 agent per host - default (achieved by automatic deployment). Enable vCenter integration (do not disable automatic deployment of virtual appliances). Alternatively, you can deploy or install the agents manually and connect them to vCenter Server.
When connected to the management server – Select Store each machine's archive in the specified folder on the machine with agent. Then type the letter corresponding to the locally attached storage, for example, D:\. When connected directly to the agent – Type the letter corresponding to the locally attached storage, for example, D:\. To recover a machine from a locally attached storage Connect the console directly to the agent where the storage is attached. Click Recover.
3. Select the Automatically deploy Agent for VMware (Virtual Appliance) check box. 4. Specify the credentials that the automatically deployed agents will use to connect to the vCenter Server. Centralized backup and recovery tasks will run under this account by default. This means the account should have the necessary privileges (p. 21) on the vCenter Server. Otherwise, you will need to specify credentials for the account with the necessary privileges in every centralized backup plan or recovery task. 5.
3. Select one or more machines, and click OK. Result. The list of the virtual machines currently managed by the agent is updated. Machines bound to the agent are displayed in black color. They are no longer available for automatic distribution. To unbind a machine from an agent: 1. Select the agent. The software shows the virtual machines currently managed by the agent. Machines available for automatic distribution are grayed out. Machines bound to the agent are displayed in black color. 2.
CBT is most effective for large amounts of data that changes little between backups. In particular, databases often consist of large files with relatively small daily changes. Available settings The preset is: Use CBT Use CBT Acronis Backup uses CBT for each virtual machine that is included in the backup plan. Do not use CBT Acronis Backup does not use CBT. 3.4.
Datastore clusters with disabled Storage DRS are not shown. Instead, their individual datastores are shown in the form DatastoreClusterName/DatastoreName. 3.4.9 Backing up fault tolerant machines Agent for VMware does not back up virtual machines with the VMware Fault Tolerance feature enabled, and you cannot select them for backup under Virtual machines. If you include a group containing a fault tolerant machine in a backup plan, this machine will be automatically excluded.
3.4.11 Backing up virtual machine templates A virtual machine template (or simply a template) is a set of files and parameters that represents a complete virtual machine. Templates are typically used to create multiple similar virtual machines. Virtual machine templates appear in the All virtual machines group on the management server along with other virtual machines. In terms of backup and recovery, a virtual machine template acts as a normal virtual machine.
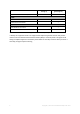
Operation Object Privilege System management Host > Inventory Modify cluster Host > Local operations Create VM Back up a VM + Back up a VM's disk Recover to a Recover to new VM an existing VM + + + Delete VM Reconfigure VM VA deployment + + + + Network Assign network + + + Resource Assign VM to resource pool + + + vApp Import Virtual machine > Configuration Add existing disk Add new disk + + + + + + + Add or remove device Advanced + + Change CPU count + + + + + +
Operation Object Privilege Back up a VM Back up a VM's disk Recover to a Recover to new VM an existing VM Power on Virtual machine > Inventory + Create from existing VA deployment + + + Create new + + + Move + Remove Virtual machine > Provisioning Allow disk access Allow virtual machine download Virtual machine > State 3.5.1 + + + + + + + + Create snapshot Remove snapshot 3.
3. The server connects the ISO image of the setup disk to the machine. Follow the onscreen instructions. 3.5.1.2 Installation Installing the management server In this step, you will install the management server. This will enable backing up the virtual machines of the Hyper-V host or cluster. 1. On the machine that will act as the management server, log on as an administrator and start the setup program. 2. Click Install Acronis Backup. Accept the terms of the license agreement. 3.
4. 5. 6. 7. On the Actions menu, click Create centralized vault. In Name, type the name of the vault. In Type, select Unmanaged. Click Path and then specify the path to the network share where the backups will be stored. Click OK. When prompted, provide access credentials for the shared folder. 8. Click OK. You can see the vault name in the Navigation tree under Vaults > Centralized. Click the vault name to check its free space and contents. 3.5.1.
1. A machine must be available for backup no matter what node it migrates to. To ensure that a backup plan can access a machine on any node, run the plan under a domain user account that has administrative privileges on each of the cluster nodes. We recommend that you specify such an account for the agent service during the Agent for Hyper-V installation. Otherwise, you will need to specify credentials for such account in every centralized backup plan or recovery task. 2.
3.5.4 Backing up and recovering a Hyper-V host For disaster recovery purposes, you can perform a disk-level backup of the entire Hyper-V host. This will back up the operating system and all virtual machines that are stored on the host's local disks. To back up the host, you need to install Agent for Windows on it. In Microsoft Hyper-V Server 2008/2008 R2, we recommend installing Agent for Windows remotely.
You want to back up cluster nodes before installing software updates on them. In this scenario, install both Agent for Hyper-V and Agent for Windows on each node of the cluster. Register the nodes on the management server. Set up disk-level backups for both nodes, by creating a centralized backup plan. You can exclude virtual machines from the backup, by excluding the CSV where the machines are stored from the CSV owner backup.
When backing up a Hyper-V 3.0 virtual machine, Agent for Hyper-V backs up the machine's PVLAN settings. The agent recovers these settings when recovering the machine to a new or existing machine on the same host. When recovering the machine to a different host, the agent clears the PVLAN settings for the recovered machine.
Installing the agent into the guest system For advanced operations, install Agent for Linux in the guest system and back up the logical volumes/MD devices as the ones of a physical machine. By doing this, you will overcome almost all of the above limitations. Using Linux-based bootable media, you will be able to recover logical volumes/MD devices "as is". However, the Acronis Universal Restore tool is still required for virtual-to-physical and virtual-to-virtual machine conversion.
Recovering files to a virtual machine To recover files directly into a virtual machine, use either of the following methods: Recover the files to a system network share of the virtual machine. For example, the \\MyVM\c$ network share corresponds to the C volume of the MyVM virtual machine. This method applies only to virtual machines running Windows. You must specify the credentials of an administrator on the virtual machine.
The membership criteria for dynamic groups of virtual machines are as follows: Virtualization server type Using this criterion, you can create a dynamic group of virtual machines hosted on all registered Hyper-V or ESX(i) servers. Any machine added to the servers will appear in this group. Any machine deleted from the servers will disappear from this group. All VMs backed up by agent Using this criterion, you can create a dynamic group of virtual machines managed by the specified agent.
By default, Agent for VMware (Virtual Appliance) uses 2 virtual processors. If you observe that CPU usage during backup approaches 100%, increase the number of virtual processors in the virtual appliance settings. This may significantly increase simultaneous backup performance. Power off the virtual appliance, click Edit settings…, choose Hardware > CPUs and select the desired number of processors. 3.9.
4 Backup from inside a guest OS Backup from inside a guest OS assumes backing up and recovering virtual machines similarly to physical machines. This functionality becomes available by using Acronis Backup Agent for Windows or Acronis Backup Agent for Linux. For online backup and recovery, install Agent for Windows or Agent for Linux in the corresponding guest system. You can use bootable media to do off-line ("cold") backups and "bare metal" recovery to an empty virtual machine.
active in one data center at a time. An export domain can use NFS or SAN (iSCSI/FCP-connected storages). 4.1.2 How Acronis Backup works with RHEV Acronis Backup can back up and recover virtual machines running in the Red Hat Enterprise Virtualization environment. Backup and recovery become available by installing Agent for Linux or Agent for Windows into the guest systems.
Windows XP Service Pack 3 and newer (32-bit only) Windows 7 (32-bit and 64-bit) Windows 8/8.1 (32-bit and 64-bit) Windows Server 2003 Service Pack 2 and newer (32-bit and 64-bit) Windows Server 2008 (32-bit and 64-bit) Windows Server 2008 R2 (64-bit only) Windows Server 2012/2012 R2 4.1.3 Backup and recovery of RHEV virtual machines This section contains step-by-step instructions enabling you to quickly set up centralized backups of virtual machines and to see what recovery is like.
Alternatively, you can install the agents on each machine manually as described in the "Hot imaging..." (p. 46) section. After the agents are installed, add the machines to the management server. To use the following procedure, you need: Red Hat Enterprise Virtualization Manager version 3.x. If your Manager version is 2.2, install the agents manually or use other installation methods described in the installation documentation. Guest tools installed on every machine you want to add.
a. Enter the server name or IP address. b. If prompted for credentials, specify the user name and password. Adding machines from RHEV environment 1. On the Actions menu, click Add multiple machines. 2. Click From Red Hat Enterprise Virtualization environment. Specify the name or IP address of the RHEV Manager server and credentials of the account with the rights to access this machine. When entering the name of an Active Directory user account, be sure to also specify the domain name (DOMAIN\Username or Us
4.1.3.4 Creating a bootable media In this step, you will install Acronis Media Builder and create a bootable media ISO. The ISO file is required when you recover (p. 48) an entire virtual machine. Also, you can back up a virtual machine using the ISO, if you do not want to install the backup software in the guest system. Installing Acronis Media Builder First, you need to install Acronis Media Builder on one of the machines running Linux. The machine must have Linux desktop GUI installed.
7. Click OK to create the vault. Backing up the machines 1. In the management console, click Create backup plan. 2. Under What to back up, click Items to back up. 3. Expand the Management Server node, expand the Machines with agents node, and then expand the All Machines node. 4. Select the check boxes next to the machines you want to back up. Click OK to confirm your selection. 5. Under Where to back up, click Location.
e. Select the check boxes for the data disks you want to recover. f. Select the date of the backup version you want to recover. By default, the latest version is selected. g. Click OK. 5. Make sure that under Where to recover, in Recover to, the Physical machine option is selected. As a result: If the console is connected to the management server, the data will be recovered to the original machine by default. To select a different target machine, click Browse.
Imaging method: hot or cold? The image can be taken under the operating system (hot imaging) or under bootable media (cold imaging). Take into account the following considerations. Is the server reboot/downtime acceptable? During cold imaging, the imaged machine will be off-line and will not provide the necessary services. Do you need Acronis software on the resulting machine? Hot imaging requires installation of an Acronis agent on the physical machine.
Are you ready to provide necessary drivers for Universal Restore? When Acronis creates a virtual machine on its own and deploys an image to it, the necessary drivers are installed automatically because the software knows what drivers or modules are required for the machine. When you create a machine and boot it using bootable media, Acronis treats it as a physical machine. This is why you need to explicitly apply Universal Restore and specify the path to the necessary drivers.
2. For RHEV Manager to be able to import the resulting virtual machine to the data center, the virtual machine files must have the same owner (vdsm:kvm) as the NFS export directory. This can be achieved by adding the following NFS export settings: Map all users to the anonymous account. Set the user ID of the anonymous account to 36 (vdsm). Set the group ID of the anonymous account to 36 (kvm). With these settings, files written to the directory by any user will be owned by vdsm:kvm.
a. Specify the location where to save the image. For more details about the location, see "Considerations before migration" (p. 41). b. [Optional, but recommended] In the Name box, type the image name. It could be the name of the machine being imaged. The name cannot end with a number. c. Click OK. 4. [Optional] Under Parameters, in Backup options, you can set other parameters of the imaging such as compression or network bandwidth usage. 5. Click OK to start the imaging. Details.
9. Click OK to start the recovery. Details. You will see the operation details. 10. Click the Progress tab to see the operation progress. 11. After the operation is completed, click Close in the progress window. 12. Import (p. 50) the machine to the required data center using RHEV Manager. 4.1.4.
Installation of Agent for Windows The following procedure describes how to install Acronis Backup Agent for Windows and Management Console on a machine running Windows. To do so: 1. 2. 3. 4. 5. 6. 7. 8. 9. Log on as an administrator and run the Acronis Backup Advanced setup program. Click Install Acronis Backup. Accept the terms of the license agreement, and then click Next. Select the Back up this machine's data check box, and then click Next.
If the machine is running RHEL, expand the NFS folders node, and then select the path to the RHEV export domain. Or, you can enter the NFS path manually; for example, nfs://10.200.200.10/opt/export:/{EXPORT DOMAIN UUID}. 13. 14. 15. 16. 17. If the machine is running Windows, select any convenient storage such as a local or network folder. Click OK to confirm your selection.
1. On the Actions menu, click Start shell. Alternatively, you can press CTRL+ALT+F2. 2. Create the volume structure by using the lvm utility. 3. Press ALT+F1 to return to the graphical interface. Selecting the image 1. Click Recover. 2. Under What to recover, click Select data. In the opened window: a. In the Data path box, enter the path to the image location and press Enter. If prompted, specify the user name and password to access the location. b.
4.1.4.6 Importing a virtual machine to a data center To import a machine from the export domain to the data center where the export domain is attached: 1. 2. 3. 4. 5. 6. 7. 50 Go to the Red Hat Enterprise Virtualization Manager Web console. In the upper row of tabs, click Storage. Select the export domain to which the machine was added. In the lower row of tabs, click VM Import. Select the required virtual machine, and click Import.