
Instruction manual

PROFICIENCY IN SURVIVAL CRAFT AND RESCUE BOATS OTHER THAN
FAST RESCUE BOATS
15 18
Remember that in cases of severe haemorrhage, it is less important to worry
too much about finding appropriate materials or about the dangers of
infection. The most important problem is to stop rapid exsanguination.
If no material is available, simply thrust your hand into the wound. In most
situations, direct pressure is the first and best method to use in the control of
haemorrhage.
Pressure Points
Bleeding can often be temporarily controlled by applying hand
pressure to the appropriate pressure point. A pressure point is the spot
where the main artery to an injured part lies near the skin surface and over a
bone.
Apply pressure at this point with the fingers (digital pressure) or with the
heel of the hand. No first aid materials are required. The object of the
pressure is to compress the artery against the bone, thus shutting off the flow
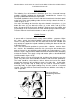
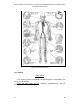
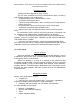
of blood from the heart to the wound. There are 11 principal points on each
side of the body where hand or finger pressure can be used to stop
haemorrhage.
These points are shown in figure 15-23.
If bleeding occurs on the face below the level of the eyes, apply pressure
to the point on the mandible.
This is shown in figure 15-23 A.
To find this pressure point, start at the angle of the jaw and run your finger
forward along the lower edge of the mandible until you feel a small notch.
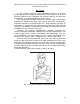
The pressure point is in this notch. If bleeding is in the shoulder or in the
upper part of the arm, apply pressure with the fingers behind the clavicle. You
can press down against the first rib or forward against the clavicle; either kind
of pressure will stop the bleeding.
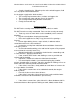
This pressure point is shown in figure 15-23B. Bleeding between the
middle of the upper arm and the elbow should be controlled by applying
digital pressure to the inner (body) side of the arm, about halfway
between the shoulder and the elbow.
This compresses the artery against the bone of the arm. The application
of pressure at this point is shown in figure 15-23C.
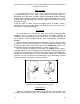
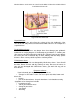
Bleeding from the hand can be controlled by pressure at the wrist, as shown
in figure 15-24D. If it is possible to hold the arm up in the air, the bleeding will
be relatively easy to stop. Figure 15-24E shows how to apply digital pressure
in the middle of the groin to control bleeding from the thigh. The artery at this
point lies over a bone and quite close to the surface, so pressure with your
fingers may be sufficient to stop the bleeding. Figure 15-24F shows the proper
position for controlling bleeding from the foot.
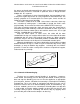
As in the case of bleeding from the hand, elevation is helpful in controlling
the bleeding. If bleeding is in the region of the temple or the scalp, use your
finger to compress the main artery to the temple against the skull bone at the
pressure point just in front of the ear. Figure 15-23G shows the proper
position. If the neck is bleeding, apply pressure below the wound, just in front
of the prominent neck muscle. Press inward and slightly backward,
compressing the main artery of that side of the neck against the bones of the
spinal column.