
User Guide


Y1-03-0116 Rev. C
10
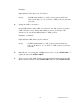
Example 1:
Light shall turn "ON" when code 1 is selected.
Set-up: Set DIP switch number 1 to "ON" position (away from the case
wall), set all others (2, 3, 4, 5, and 6) to "OFF" position (toward the
case wall).
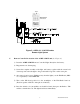
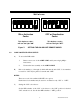
D) Setting the "OFF" code selector -
Set the DIP switches of the "OFF" code selector to the "ON" position for desired
"OFF" activation code(s). Ensure that number(s) was not used for the "ON"
activation code. Set all other DIP switches to "OFF" position.
Example 1: (continued)
Light shall turn "OFF" when code 6 is selected.
Set-up: Set DIP switch number 6 to "ON" position (away from the case
wall), set all others (1, 2, 3, 4, and 5) to "OFF" position (toward the
case wall).
E) Reinstall rear cover using the 4 Phillips-head screws on the ACR/L-32RC or
replace the lens on the ACR/L-32RCL.
F) Test for proper "ON"-"OFF" activation by following the instruction in Section 4B
Remote Control Activation of the ACR/L-32RC and 4C for the ACR/L-32 RCL.