
User's Manual

8
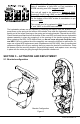
SECTION 4 – INSTALLATION
4.1 Mounting location
The location selected must be sufciently rigid to support the weight of the total installation
and at the same time consider vibration, exposure to the elements, exposure to surrounding
hazards, such as equipment movement, doors being opened, accidental covering, person-
nel trafc, etc., and yet be readily accessible at all times in the event of an emergency.
Also to be considered in selecting a location for installation is the harmful effect that certain
corrosive vapors might have on the beacon. Under no circumstances should a beacon be
jeopardized by any foreign articles being temporarily or permanently positioned during “at
sea” or “in port” activities.
The beacon should face inboard on rail mount applications and should not be subjected to
breaking waves.
CAUTION: Care must be taken to prevent any lanyard, line, or other emergency
equipment that may be attached to the beacon from becoming entangled or fouled
which could prevent the beacon from being removed in an emergency. Do not at-
tach the beacon lanyard to the vessel or mounting bracket.
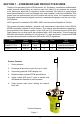
Do not mount the beacon 3.3 ft/1 m of strong magnetic or electrical elds, such as loud
speakers, radar, high power radio transmitter or magnetic navigation compass.
Mount the beacon in a vertical (antenna upward) position. In certain circumstances, such as
medical emergencies or disabled vessels, manual activation of the beacon for location and
homing purposes is sometimes requested. Mounting in this orientation provides the best
homing signal.
The Category I oat-free mounting bracket should be mounted securely to a vertical or hori-
zontal surface (the mount has predrilled holes for attachment to a at surface) where there
are no overhead obstructions. Location aboard a vessel must be chosen to allow the beacon
to oat free of sinking craft and as high as possible, especially on small vessels. This will
help ensure operation of the hydrostatic release unit in the event the vessel capsizes without
sinking. See section 4.3 on removing the HRU.
The Category I oat-free mounting bracket should be securely attached to the vessel. The
use of #10 stainless steel hardware (not included) is recommended.
4.2 Visual inspection
Visually inspect the area surrounding the mounting bracket installation site for hidden haz-
ards, obstacles, etc., that may have been overlooked during location selection. If there is any
doubt as to the ready accessibility to the beacon at all times or if any condition may appear to
be questionable, make a complete and thorough investigation before making nal approval
of the installation.
4.3 Hydrostatic release unit (HRU) catagoy 1 beacon
The ACR HydroFix™ HRU has an expiration date of 2 years from the date of installation or
3 years from the date manufactured, whichever comes rst. Upon installing your beacon or
new HRU, permanently scratch the new expiration date on the HRU date calendar (as seen
below).