
User Guide


6
Y1-03-0057 Rev. K
4.2 Repair
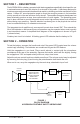
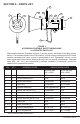
The megaphone consists of three major sub-assemblies; the microphone and mouthpiece
assembly, the megaphone sub-assembly, and the horn and speaker assembly. Repairs are
restricted to the replacement of these defective sub-assemblies or the batteries and lanyard
assemblies.
SECTION 5 – DISASSEMBLY & ASSEMBLY
5.1 Disassembly
Megaphone should be disassembled for repair or replacement of components only.
1. Remove microphone and mouthpiece assembly (1) by removing the three set
screws (2).
2. Remove battery cells (3) from the three tubes by tilting megaphone to allow cells to drop
out into the hand.
3. Remove the three oval head screws (9) at periphery of the speaker end of the housing
(13).
4. Extract speaker & megaphone subassembly by rstly turning horn (14) clockwise
approximately 45°. Secondly pull the entire assembly gently until it stops. Rotate the
assembly counterclockwise 45° then pull the entire assembly out.
5. Separate the speaker assembly (5) and megaphone subassembly (8) by rstly
unplugging the speaker wires from the “out” header. Then, remove the hex screw that
holds the assemblies together.
6. FURTHER DISASSEMBLY IS NOT RECOMMENDED.
Inspect unit for any evidence of damaged parts, loose mountings or broken leads
and dirty electrical contacts.
5.2 Assembly
1. Align horn (14) and speaker assembly (5) with location pins on megaphone subassembly
(8).
2. Attach horn (14) and speaker assembly (5) to megaphone subassembly (8). Route
speaker wires through provided slot.
3. Plug speaker connector into the “out” header.
4. Push entire assembly gently into the housing (13), until it stops. Turn clockwise 45° and
push all the way in. Turn counterclockwise 45° and align holes.
5. Secure with screws (9).
6. Replace the six batteries (3) in three tubes at microphone end of megaphone case.
CAUTION: Observe polarity of batteries during installation procedure (see
instructions on battery tubes).
7. Replace microphone and mouthpiece assembly (1). Align keyway, and secure with the
three setscrews (2).
8. Assembly is complete. Test unit in accordance with Section 4.1.