
Installation Guide

6
August 12, 2019
Step Four - Installation of Flooring
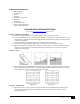
4.1. Once enough of the planks have been racked out, begin installing the planks by fitting the short side of
the click system into the long side of the click system. Make sure that the click system is engaged evenly,
any gapping can compromise the integrity of the installation. To ensure a tight fit, use a tapping block
and rubber mallet on the long seams and tap down on the top of the plank at the short seams. Continue
installing planks across the room ending at the far wall.
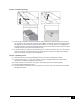
4.2. It may be necessary to rip the last row to allow for the ¼” expansion. If the last row is 2” or less click the
pieces to the last full uninstalled row and install them together. If needed, use a light rubber mallet to
make the remaining rows tight to the installed planks.
Step Five - Completing the Job
5.1. Clean the floor with a prefinished hardwood cleaner such as; Bona®, Woodwise® or Glitsa®.
5.2. Install transition pieces -i.e. – stair nose, reducer, end cap, t-molding and base shoe. Please follow
manufacturer’s installation guidelines for transitions.
5.3. Inspect final floor for nicks and or minor gaps – fill with appropriate color wood putty/filler.
5.4. Complete Warranty Registration Form.
5.5. Any unused material should be stored in a dry place in case future repairs are needed. We recommend
saving at least 2 boxes.