
Installation Guide


9
October 9, 2020
Step Four - Installation of Flooring
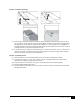
4.1 Once the rows are laid out, begin to trowel out adhesive according to manufacturer’s instructions. Begin
placing flooring onto adhesive, one row at a time, making sure that all joints are tight and parallel.
4.2 When installing near a solid object or wall, leave a minimum of ¼” as required expansion space.
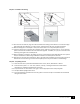
4.3 It may be necessary to rip the last row to allow for the ¼” expansion. If the last row is 1” or less, glue the
pieces to the last full uninstalled row and install them together. If needed, use a pry bar or lever to fit the
remaining rows tight to the installed planks.
4.4 When installation is complete, use wedges or spacers to hold wood in place while adhesive dries. Spacers
may be removed after initial setting of adhesive to allow for normal expansion of wood.
4.5 Roll and cross-roll floor with a 100-150 lb. roller at the end of the installation to ensure proper transfer of
adhesive. Be sure the flooring is cleaned and completely free of any and all debris to avoid damage.
Step Five - Completing the Job
5.1. Clean the floor with a prefinished hardwood cleaner such as; Bona®, Woodwise® or Glitsa®.
5.2. Install transition pieces -i.e. – stair nose, reducer, end cap, t-molding and base shoe. Please follow
manufacturer’s installation guidelines for transitions.
5.3. Inspect final floor for nicks and or minor gaps – fill with appropriate color wood putty/filler
5.4. Complete Warranty Registration Form.
5.5. Any unused material should be stored in a dry place in case future repairs are needed. We recommend
saving at least 2 boxes.