
Installation Guide

P.
5
/
8
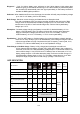
Press BATTERY TYPE button and hold for 3 seconds to go into your battery type selection mode,
the battery type you select will be shown on the LCD meter, the default setting is AGM Battery; the
controller will automatically memorize your battery type setting.
Li-ion battery shown in LCD indicates 3-SERIES Li-ion battery shown as below:
-- Lithium Cobalt Oxide LiCoO2 (LCO) battery
-- Lithium Manganese Oxide LiMn2O4 (LMQ) battery
-- Lithium Nickel Manganese Cobalt Oxide LiNiMnCoO2 (NMC) battery
-- Lithium Nickel Cobalt Aluminum Oxide LiNiCoAlo2 (NCA) battery
Remarks: This solar controller is recommended to just work with 3 x series above Li-ion
batteries.
LiFePO4 battery shown in LCD indicates Lithium Iron Phosphate battery, LFP battery.
LTO battery shown in LCD indicates Lithium titianate oxidized, Li4Ti5O12 battery.
Caution: Incorrect battery type setting may damage your battery.
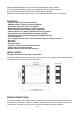
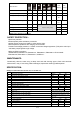
When the controller powers on, the unit will run self-qualify mode and automatically show below
items on LCD before going into charging process
Self-test starts, digital meter segments test
Software version test
Rated voltage and current test
External battery temperature sensor test (if connected)
Indicates the solar panel connected.
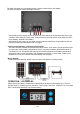
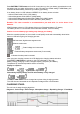
After going into charging process, the LCD displays the charging statues as below:
Press VOLT / AMP button in sequence, the LCD will display in turn with
Battery Voltage, Charging Current, Charged capacity (Amp-hour) and Battery
Temperature (if external temperature sensor connected)
Display in sequence-
Alternatively Display voltage and FUL when battery is fully charged
The VOLT / AMP button can be changed at any time during charging process.
The LCD also can be treated as an independent voltage meter or thermometer.
CHARGING STAGE-
The unit has a 6-stage charging algorithm.
Diagnose* - Soft Charge – Bulk Charge - Absorption charge – Equalizing Charge* - Float Mode