
User Guide


– 32 –
Backup Set. The default location is the Documents folder inside the Home folder on
your computer’s startup disk. Click Save.
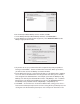
16. In the Backup Set Selection window, click OK. In the Retrospect Button Backup:
Destinations window, click OK.
17. In the Backup: Retrospect Button Backup window, the default for Selecting is All
Files. If you wish to modify this, click on the Selecting button. The Retrospect Button
Backup: Selecting window will appear. Select the types of files you wish to backup
from the pull-down menu.
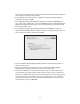
18. In the Backup: Retrospect Button Backup window, select Options to open the
Retrospect Button Backup: Options window and view or change the Verification and
Data compression options (Figure 43). Click OK.
19. Close the Backup: Retrospect Button Backup window, and when prompted click
Save to save the script.
20. In the Scripts window you will now see the script Retrospect Button Backup
(Backup). Close the Scripts window. The script is now ready to use.
21. Press the PushButton™ on the AcomData Drive. If this is the first time perform-
ing this Backup operation, Retrospect Express will ask you to select a disk for the
Backup Set. A window will appear with a list of available drives. If the listing simply
says “Removable Disk” expand the selection by clicking on the arrow to the left
of the listing, and you will see the name of the volume. Make sure you select the
AcomData Drive, then click Proceed.
FIGURE 43