KD 6176 1U Rackmount Console Server (for KVM switch or server) User Manual KD 6176: 1U Rackmount Console Server (for KVM switch or server) 1 661 Brea Canyon Rd., Suite 3 Walnut, CA 91789 tel: 909.598.7388, fax: 909.598.0218, www.acnodes.com © Copyright 2009 Acnodes, Inc. All rights reserved. Product description and product specifications are subject to change without notice. For latest product information, please visit Acnodes’ web site at www.acnodes.com.
KD 6176 1U Rackmount Console Server (for switch or server) PC KVM 5150 15-inch touch panel PC Package Content - KD 6176 1U Rack Mount Console - 1 KVM PS/2 Cable Kit (VGA + PS/2 keyboard & mouse) - 1 KVM USB Cable Kit (VGA + USB keyboard & mouse), Optional - 1 AC Power Cord -1 Owner’s Manual Table of Contents Overview...........................................................................................3 Features..........................................................................................
KD 6176 1U Rackmount Console Server (for KVM switch or server) Overview KD 6176 1U Rack mount Consoles feature an integrated LCD panel, full keayboard and touchpad in a 1U rack mount housing. These consoles are designed for use with a server or a KVM switch with PS/2 or USB console connectors. Features Include - Rack mount console (17” LCD display on KD 6176, keyboard, touchpad) in an integrated 1U Rack mount housing.
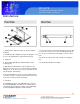
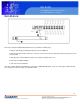
KD 6176 1U Rackmount Console Server (for switch or server) PC KVM 5150 Introduction 15-inch touch panel PC 1. Console Port Section: The KVM cable kits for PS/2 or USB to connect the console to your server or KVM switch plugs in here. A console cable has been provided to connect to these 2. LCD Monitor: After sliding the module out, flip up the cover ports. to access the LCD monitor, keyboard and touch pad. 2. Power Socket: The power cord to the AC source plugs in 3. Keyboard here. 1.
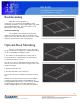
KD 6176 1U Rackmount Console Server (for KVM switch or server) Installation Refer to the example installation diagram below as you perform the following steps: 1. Plug the cable kit (provided with this unit) into the port on KD6176 2. Plug the keyboard, monitor, and mouse connectors on the other end of the cable kit into their respective ports on the server or KVM. 3. Plug the power cord into KD 6176’s power socket and into an AC power source. 4. Power up your KVM installation. 5.
KD 6176 1U Rackmount Console Server (for switch or server) PC KVM 5150 15-inch touch panel PC LCD OSD Configuration The LCD OSD allows you to set up and configure the LCD display: - To bring up the LCD OSD main menu, press the button marked Menu. - Use the up and down buttons to navigate and make adjustments; after navigating to a setting choice, use the Menu button ro bring up the adjustment screen. - When make adjustments, up button increases the vaule; down button decreases the value.
KD 6176 1U Rackmount Console Server (for KVM switch or server) Rackmounting KD 6176 can be mounted in a 1U system rack. For convenience and flexibility, a rackm mounting kit, that allows several mounting options is provided with your KD 6176 package. The various options are explained in the sections that follow. Stadard Rack Mounting The standard rack mounting brackets that come attatched to KD 6176 allow the unit to be installed in standard 1U racks.
KD 6176 1U Rackmount Console Server (for switch or server) PC KVM 5150 15-inch touch panel PC 8 661 Brea Canyon Rd., Suite 3 Walnut, CA 91789 tel: 909.598.7388, fax: 909.598.0218, www.acnodes.com © Copyright 2009 Acnodes, Inc. All rights reserved. Product description and product specifications are subject to change without notice. For latest product information, please visit Acnodes’ web site at www.acnodes.com.
KD 6176 1U Rackmount Console Server (for KVM switch or server) Warranty 1-year Limited Warranty: Acnodes warrants its products to be free from defects in matrials and workmanship for a period of one (1) year from any date of inital purchase. Acnodes obligation under this warranty is limited to repairing or replacing (at its sole option) any such defective prodicts. To obtain service under this warrant, you must obtain a Returned Material Authorization (RMA) number from Acnodes.