
User manual


LED-CTL6
5A
3. Main Function
1. Mains input:IEC socket and integrated fuse holder, connect to main power cable.
2. DMX OUT: Transmit DMX signal by 3-Pin XLR female socket.
3. DMX IN: Receive DMX signal by 3-Pin XLR male socket.
4. Remote controller input: Connecting with 1/4” microphone jack to control the
scene for Stand by, Function, and Mode function
selections.
5. Microphone:Receive audio signal for sound activated.
6. Sensitivity:Adjust the sound-input sensitivity.
7. Dip switches:Dip 10 for Master/Slave setting such as Dip 10 ON is MASTER mode
and Dip 10 OFF is SLAVE mode. Dips 1-9 are used to set DMX
address of the unit.
LED-CTL6
6A
4. How To Control The Unit
Three ways to operations:
A. Master/Slave operation
B. Easy controller
C. Universal DMX controller
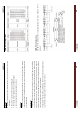
A. By Master/slave Built-in Preprogrammed Function
By linking the units in master/slave connection, the first unit will control the others to
give a coordinate automatic light show and it’s good for instant shows. In this mode, the
first unit(Master)must be turn Dip switch 10 on. The first unit is easy to recognize by
nothing in its DMX input jack. The others of chains (Slaves) will have DMX cables
plugged into the DMX input jacks (daisy chain). Please refer to the diagram on setting
the Dip switches.
Slave 1 : dip / on : #1 ( 1 )
Slave 2 : dip / on : #1, #3 ( 1 + 4 =5 )
Slave 3 : dip / on : #1, #4 ( 1 + 8 = 9 )
Slave 4 : dip / on : #1, #3, #4 (1 + 4 + 8 =13)
B. By Easy Controller(CA-8)
The easy remote control is used only in master/slave mode. By connecting to the 1/4”
microphone jack of the first unit, you will find that the remote control on the first unit will
control all the other units for Stand by, Function and Mode programs.