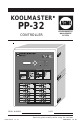
KOOLMASTER PP-32 ENVIRONMENTAL MANAGEMENT SYSTEM CONTROLLER SERIAL NUMBER: DATE: Read this guide carefully before using the controller. M 890-00252 rev. 04 K 895-00147 rev.
NOTICE Every effort has been made to ensure that this manual is complete, accurate and up-to-date. The information contained in it is however subject to change without notice due to further developments.
TABLE OF CONTENTS Page 1. PRECAUTIONS ............................................................ 6 2. FEATURES ................................................................. 7 3. LOCATION OF THE CONTROLS .................................... 9 4. MOUNTING INSTRUCTIONS ....................................... 11 4.1 CONNECTION .................................................................. 11 4.2 SETTING THE DIP SWITCHES ............................................. 14 5. CONTROLLER SETUP ...........
PP-32 5.9 AUXILIARY OUTPUTS ....................................................... 42 5.10 ANIMAL AGE ................................................................ 44 5.11 CLOCK OUTPUTS ........................................................... 45 5.11.1 Adjusting Clock Output Start and Stop Times ................... 46 5.11.2 Adjusting Starting Day of Clock Programs ........................ 47 5.12 HISTORY ...................................................................... 48 5.12.1 5.12.2 5.12.
PP-32 5.15 ADVANCED SETTINGS .................................................... 78 5.15.1 Setting the Temperature Curve ........................................ 78 5.15.2 Setting the Minimum Ventilation Curve ............................ 80 5.15.3 Humidity Control ......................................................... 82 5.15.3.1 5.15.3.2 5.15.3.3 5.15.3.4 Adjusting Relative Humidity Set Point ................................ RH Compensation on Minimum Ventilation .........................
1. PRECAUTIONS We strongly recommend installing supplementary natural ventilation as well as a backup thermostat on at least one cooling stage (refer to the wiring diagram enclosed with this user's manual to connect the thermostat). Although fuses at the input and outputs of the controller protect its circuits in case of an overload or overvoltage, we recommend installing an additional protection device on the controller's supply circuit.
2. FEATURES The PP-32 is an electronic device used for environmental control in livestock buildings. It allows the user to maintain a specified target temperature by controlling the operation of ventilation and heating equipment. Eight heater stages, 16 fan stages, a tunnel curtain, 2 auxiliary outputs, vent doors and 4 clock outputs can be controlled. Fan stages can be configured to activate cooling systems in timer mode. In all, the PP-32 provides up to 32 relay outputs.
PP-32 EIGHT INDEPENDENT TEMPERATURE SENSOR INPUTS Up to eight temperature sensors can be connected to the controller in order to obtain a more accurate reading of the average room temperature and a faster reaction time. Sensors may be assigned to each heater output or to auxiliary outputs. Auxiliary outputs can be used to operate various devices such as heating units or stir fans for instance.
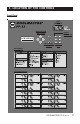
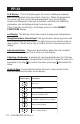
3. LOCATION OF THE CONTROLS Front Panel LED DISPLAY NAVIGATION BUTTONS ALARM STATUS LED LCD DISPLAY ADJUSTMENT SHORTCUT BUTTONS KEYS MAIN MENUS 32 ON/OFF RELAYS KOOLMASTER PP-32 REV.
PP-32 LCD Display: The LCD display gives the current readings and parameters to be adjusted when you select a function. When the parameters for a given function cannot all be presented at once on the display, arrows are displayed on the right handside to indicate that additional parameters can be displayed using the arrow keys. After 5 minutes of inactivity, the display returns to the CURRENT CONDITIONS display. Led Display: This display shows the current average room temperature.
4. MOUNTING INSTRUCTIONS Fasten the four metal brackets on the mounting holes located behind the controller using the four screws included with the controller. Mount the enclosure on the wall using four other screws. Make sure the electrical knockouts are at the bottom of the enclosure in order to prevent water from entering the controller. The enclosure must be mounted in a location that will allow the cover to be completely opened right up against the LOCKING DEVICE wall.
PP-32 Sensors operate at low voltage and are isolated from the supply. Be sure that sensor cables remain isolated from all high voltage sources. In particular, do not route the sensor cables through the same electrical knockout as other cables. Do not connect the shield from the sensor cable to a terminal or a ground. Extending a sensor: Each sensor can be extended up to 500 feet (150 meters). To extend a sensor: Use a shielded cable of outside diameter between 0.245 and 0.260 in (6.22 and 6.
PP-32 terminal as shown on the wiring diagram. For an alarm of the second type, use the NO terminal. 3. DWR-F-1A COMMUNICATION HOOKUP If DWR-F-1A air inlet controllers are connected to the PP-32, use id numbers within the range 4-15. Id numbers 1,2 and 3 are reserved for another purpose. Refer to section 5.5.1.1 to set the proper ID numbers. KOOLMASTER PP-32 REV.
PP-32 4.2 SETTING THE DIP SWITCHES The PP-32 has 12 DIP switches (only the first 7 are used) which determine how the controller works. These switches are located on the board inside the top cover. ON ON OFF 1 2 3 4 5 6 7 8 9 10 11 12 To change the position of a DIP switch, use a small screwdriver or similar object to move the switch to the desired position. Pay attention when setting DIP switches. Since they are very close to each other, it is easy to switch 2 switches at the same time.
5. CONTROLLER SETUP 5.1 CURRENT CONDITIONS The current conditions menu gives a quick view of the actual conditions in the barn. Press to step directly to this menu. Room Set Point: this is the target temperature in the barn. Average Temperature: shows the average temperature in the barn. Static Pressure: current static pressure in the barn. Fan Stage: shows which fan stage is currently active. Room Set Point 80.0 Average Temp 79.2 Static Pressure 0.01 Fan Stage: Min.
PP-32 5.2 CONTROLLER PROGRAMS The controller allows to use up to 4 separate programs to control the room temperature. It then becomes possible to activate a specific program, that uses particular fan settings, in accordance with the animal age for instance. Relays that are activated on fan stages 1-4 vary depending on the chosen program: the first 4 fan stages use separate relay assignment settings for each program.
PP-32 Use the adjustment buttons to select the proper season (winter/ summer). The start and stop temperatures of heating and ventilation stages that are associated with this seasons will be used. Fan / Sensor Program Selection: (a) Temp Settings: Summr Press the left-arrow key to exit this menu. KOOLMASTER PP-32 REV.
PP-32 5.3 ADJUSTING THE ROOM SET POINT The room set point is the target room temperature. It can be adjusted between 32°F and 120°F (0°C and 48.9°C). Note that the temperature curve must be turned off to adjust this value. The set point can quickly be accessed by pressing the shortcut key (note that the set point will not be accessible this way if the temperature curve is turned on, see below to deactivate the temperature curve). Select the "6.
PP-32 5.4 MINIMUM VENTILATION PRINCIPLE OF OPERATION When the room temperature is below the set point, fans can operate according to a timer. The minimum ventilation cycles runs stage 1 fans according to a timer as shown below. Running fans even though ventilation is not required for reducing the room temperature is useful to reduce the humidity level and supply oxygen to the room. It also prevents the fans from freezing in winter.
PP-32 Use the arrow keys to select the "1. On Time/Curve" function. Press the right-arrow key. The fans' On- Time, in minimum ventilation, is displayed, as well as the status of the minimum ventilation curve. If the curve is OFF, the On-Time value flashes on the display. Use the adjustment buttons to adjust minimum ventilation's On- Time to the desired value then press the left-arrow key to exit this menu.
PP-32 5.5 INLET / VENT DOOR SETTINGS The PP-32 controller can operate the air inlets / vent doors in two different ways: 1. Inlets' positions can be determined by using a potentiometer feedback controller (DWR-F-1A). Refer to the installation setup section to enable DWR-F-1A modules. Note that the static pressure sensor must be deactivated in order to activate the air inlets (see sec. 5.15.3). 2. Inlets' positions can be determined by the static pressure level in the barn.
PP-32 Note that the reference numbers that are used by the PP-32 DO NOT correspond to the ID numbers that used by the DWR-F-1A modules because #1, 2 and 3 are reserved for other purpose. PP-32 Reference # DWR-F-1A id # 1 4 2 5 ... ... 12 15 5.5.1.2 Adjusting the Air Inlet Compensation The compensation is expressed as a percentage per degree difference between the average controller's temperature and the average temperature of sensors that are assigned to the inlet.
PP-32 5.5.2 Vent Door Settings If a static pressure sensor is used, the PP-32 can control the static pressure in the room by opening and closing vent doors. When the pressure drops below the low pressure set point, the vent doors close according to a timer. Likewise, when the static pressure increases above the high pressure set point, the vent doors open according to a timer. It is also possible to define a stage level above which the vent doors will always remain closed. Refer to sec. 5.15.
PP-32 GROUPS OF STATIC PRESSURE SET POINTS : Two groups of static pressure set points can be defined. HI and LO static pressure set points #2 start being used either when a certain ventilation stage is reached or when the outside temperature decreases below a user-define value. The following graphs sum both cases: 1.
PP-32 2. Static pressure set points' transition according to the outside T°: Example: When the outside temperature drops below the "outside temperature influence" value, a transition between the two set point groups starts. When the outside temperature decreases 5°F further than the user-defined value, the second group of set points is used.
PP-32 5.5.2.1 Adjusting Static Pressure Set Points When the high pressure set point is reached (Open at), the controller opens the vent doors according to a timer cycle. When the low pressure set point is reached (Close at), the controller closes the vent doors according to the another timer. The pressure set points can be adjusted from 0 to 0.2 inches of water (0 to 50Pa). Select "8.Vents/Static P" from the main menu using the navigation buttons then press the right-arrow key.
PP-32 Off Time: once the vent doors have opened or closed (depending on the situation), they then stop operating during the Off time delay. The Off Time delay ranges from 0 to 900 seconds. VENT DOORS TIMER ON OPEN / CLOSE TIMES OFF OFF TIME If the pressure has not reached the desired value after the Off Time, the cycle starts again, up until the pressure goes back into the normal range. Select "8.Vents/Static P" from the main menu using the navigation buttons then press the right-arrow key.
PP-32 5.5.2.3 Adjusting Stage Level for the Closing of Vent Doors When the stage defined by this parameter is reached, the vent doors start to close continuously until they are completely closed, no matter what the static pressure is. This feature is usefull for closing vent doors when a tunnel ventilation stage starts. Select "None" to deactivate this function. Select "8.Vents/Static P" from the main menu using the navigation buttons then press the right-arrow key.
PP-32 Use the adjustment buttons to select the fan stage above which the second group of static pressure set points starts being used. Press the down-arrow key once, the LO static pressure set point #2 is selected (Close At). Use the adjustment buttons to adjust the 2nd low static pressure set point (Close At) to the desired value then press the down-arrow key. The HI static pressure set point #2 (Open At) is selected.
PP-32 Use the adjustment buttons to set the outside temperature below which the second group of static pressure set points start to be used. Press the down-arrow key once, the LO static pressure set point #2 (Close At) is selected . Use the adjustment buttons to adjust the 2nd low static pressure set point (Close At) to the desired value then press the down-arrow key. The HI static pressure set point #2 (Open At) is selected.
PP-32 5.6 TUNNEL CURTAIN The PP-32 allows you to control an endwall curtain for tunnel ventilation. The tunnel curtain is controlled either by the static pressure level in the barn or in timer mode, according to the room temperature. Select the proper mode (Timer or Static pressure) that is used to control the tunnel curtain in the installation setup (see sec 5.14.3). In both modes, a minimum animal age is defined to avoid starting the tunnel ventilation mode when animals are too young.
PP-32 Tunnel Curtain Controlled by the Static Pressure: When the pressure drops below the low pressure set point, the tunnel curtain closes according to a timer. Likewise, when the static pressure increases above the high pressure set point, the curtain opens according to another timer. The curtain only starts operating this way once the start temperature of the first tunnel stage has been reached. When the curtain starts opening, it first opens during the pre-opening delay.
PP-32 TRANSITION BETWEEN SIDEWALL AND TUNNEL VENTILATION MODES: The following section describes the vent doors and curtain's behavior when the transition between sidewall ventilation (vent doors) and tunnel ventilation is being done. These steps are automatically performed by the controller. VENT DOORS TO TUNNEL : 1. Vent doors stop operating; 2. The tunnel curtain opens during the Pre-Opening time; 3. Fans of the first tunnel stage turn on; 4.
PP-32 5.6.1 Adjusting Minimum Age for Tunnel Ventilation The minimum age is used to prevent tunnel ventilation from being used when the animals are too young. It ranges from 1 to 450 days. The tunnel curtain will never open until the animal age reaches this value. Select "9.Tunnel Curtain" from the main menu using the navigation buttons then press the right-arrow key. Note that this menu is only available if the tunnel curtain has been enabled during the installation setup (see sec 5.14.3).
PP-32 5.6.3 Adjusting Curtain's Operating Times This function is only used if the curtain operates in timer mode. The curtain's operating time is the time during which the curtain opens when a new tunnel fan stage is activated or closes when a tunnel fan stage is deactivated. This value needs to be adjusted for each tunnel fan stage. In addition, the user must set the maximum curtain's running time. The sum of all running times cannot exceed this value.
PP-32 5.6.4 Adjusting Static Pressure Hi and Lo Set Points This function is only used if the curtain operates in static pressure mode. When controlled by the static pressure, the curtain opens or closes according a timer cycle whenever the static pressure level exceeds the Hi or Lo static pressure set points. The Lo (Close At) and the Hi (Open at) set points can be adjusted from 0 to 0.2 inches of water (0 to 50Pa). Select "9.
PP-32 Open Time: when the static pressure exceeds the Hi pressure set point, the curtain opens during this delay. It ranges from 0 to 900 seconds. Close Time: when the static pressure drops below the Lo pressure set point, the curtain closes during this delay. It ranges from 0 to 900 sec. Off Time: once the curtain has opened or closed (depending on the situation) it then stops operating during this delay. The Off Time delay ranges from 0 to 900 seconds.
PP-32 5.7 FAN STAGES SETTINGS The PP-32 controls up to 16 on-off fan stages. These stages operate in a sequence to increase the level of ventilation as the room temperature rises. Each stage can also activate relays in timer mode. The user defines a start and stop temperature for each stage. When the room reaches the start temperature, the stage is activated. When the room reaches the stop temperature, the stage is deactivated. The following diagram shows how fan stages operate.
PP-32 5.7.1 Adjusting Fan Stages' Start/Stop Temperatures The minimum temperature difference between two consecutive start temperatures is 0.5°F (0.3°C). The stop temperature of a fan stage must always be lower than its start temperature. Make sure the right season is selected before making any changes in start/stop temperatures of fan stages. The selected season appears beside the start and stop temperatures: (S) for summer or (W) for winter. Refer to sec. 5.2.2 to select the proper season. Select "10.
PP-32 Set the function to "17. Fan Settings" from the main menu. Note that this menu is available only in the installer mode (see sec. 5.14.2). Press the right-arrow key once again to select the "1. Relays" menu. Select the stage that needs to be adjusted by using the navigation buttons then press the right-arrow key (the letter standing beside fan stages 1-4 represents the selected program, when applicable). Ventilation Stage Relay Assignement 3. Stage 1a 4.
PP-32 5.8 HEATER SETTINGS The PP-32 operates up to eight independent heater stages. A start and stop temperature is defined for each heating stage. The stop temperature must be at least 0.5°F (0.3°C) greater than the start temperature for a given heater and the start temperature cannot be greater than the set point. The number of heater stages needed and the sensor assignment for each stage is determined during the installation (see sec. 5.14.3 and 5.14.4).
PP-32 5.9 AUXILIARY OUTPUTS The PP-32 can control up to two auxiliary outputs. They are used as supplementary outputs for heating or cooling and may be used to control several devices such as chimney dampers, stir fans, lamps, heat mats, etc. The user must specify if the auxiliary output operates in heating or in cooling mode. In heating mode, the output is activated whenever the temperature decreases below its start temperature.
PP-32 Refer to the installation setup to activate the auxiliary outputs and to select either if they operate in heating or cooling mode (sec. 5.14.3). Adjusting Start/Stop Temperatures of Auxiliary Outputs - In heating mode, the stop temperature (Off Temp) must be at least 0.5°F (0.3°C) greater than the start temperature (On Temp). - In cooling mode, the start temperature (OnTemp) must be at least 0.5°F (0.3°C) greater than the stop temperature (OffTemp). Set the function to "10. Temp.
PP-32 5.10 ANIMAL AGE The animal age is used as the reference day to determine the position in curves that are used by the controller (temperature curve, minimum ventilation curve). The controller also refers to the animal age to activate the proper clock output programs. The age can be adjusted from 0 to 450 days. Note that all histories are cleared once the animal age goes from "OFF" to "1 day", except for the Alarm Log history.
PP-32 5.11 CLOCK OUTPUTS The PP-32 has 4 clock outputs to control various devices, using the realtime clock. Refer to the installation setup section to activate the clock outputs (see sec. 5.14.3). START TIME / STOP TIME DEFINITION ON OFF START TIME = 8:00 STOP TIME = 9:30 OPERATION OF CLOCK OUTPUTS 1 AND 2 : The first 2 clock outputs can use up to 8 programs and each program has up to 10 start and stop times.
PP-32 5.11.1 Adjusting Clock Output Start and Stop Times Set the function to "11.Clock Times" from the main menu using the navigation buttons then press the right-arrow key. This menu is only available if the clock outputs have been enabled in the installation setup (see sec. 5.14.3). Press the right-arrow key once again to select the "1.Start/Stop" menu. Use the navigation buttons to select the desired clock output. Press the right-arrow key.
PP-32 5.11.2 Adjusting Starting Day of Clock Programs Clock outputs 1 and 2 use up to 8 programs. The user determines at what day each program starts being used, this day is directly related to the animal age. This is true for all programs except for program 1. The first program is automatically enabled at day 1 (or at day 0 (Off)) and is deactivated when the start age of the following program is reached. When a new program starts, the previous program is deactivated. Set the function to "11.
PP-32 5.12 HISTORY 5.12.1 Resetting Histories The controller automatically resets all sensor histories when the animal age goes from "Off" to "1day". Note that this reset doen't clear the Alarm Log history. The following procedure shows how to clear all histories without having to change the animal age. Set the function to "12.Animal Age" from the main menu using the navigation buttons. Press the down-arrow key once to select the "Clear All?" menu.
PP-32 5.12.3 Individual Temperature Sensors History The controller has an history in which the minimum and maximum temperature readings of each sensor, for the past 10 days, are logged in. Set the function to "3.Temp. Sensors" from the main menu using the navigation buttons then press the right-arrow key. Sensors' temperature readings are displayed. 2 days ago T°1L 69.2 T°1H 75.4 T°2L 70.3 T°2H 74.0 T°3L 69.3 T°3H 74.2 Press the down-arrow key to scroll the display.
PP-32 Use the down-arrow key to scroll the display. Relative humidity's Hi and Lo readings are displayed for the past 10 days. 5.12.6 Water Consumption History The controller has an history in which the water consumption, for the past 60 days, is logged in. The controller also displays the total water consumption since the last reset. Set the function to "13. Water Consumption" from the main menu using the navigation buttons then press the right-arrow key.
PP-32 Press the down-arrow key once, the total heater run time, since the last reset, is displayed. Heater 1 Run Time Total run time 120min Keep pressing the down-arrow key to scroll the display. The Heater Run Time values recorded for the past 60 days are displayed. Keep pressing the down-arrow key to scroll the display and look at all histories. KOOLMASTER PP-32 REV.
PP-32 5.13 ALARM SETTINGS 5.13.1 Alarm Log When an alarm occurs, the light next to the alarm button turns on and the alarm is logged along with the time and date. To view alarms in then use the up and downthe alarm log, press the alarm button arrow keys to step through the recorded alarms. Refer to section 5.12.1 to clear the alarm log. A total of 10 alarms can be logged.
PP-32 5.13.2 Setting Alarm Limits The following diagram explains how temperature alarms are detected: REGULAR TEMPERATURE ALARM DETECTION ROOM TEMPERATURE An alarm is set off Hi Offset Set Point + HI Offset Lo Offset Set Point Set Point - Lo Offset TIME NORMAL RANGE: NO TEMPERATURE ALARMS OUTSIDE THE RANGE: THE TEMPERATURE ALARM IS SET OFF When the average room temperature exceeds the high temperature alarm setting (Set Point + Hi Offset), a high temperature alarm is generated.
PP-32 ALARM DETECTION WITH OUTSIDE T° INFLUENCE ROOM TEMPERATURE Critical Alarm SP + HI Offset Outside Influence ALARM LIMIT OUTSIDE TEMP. Set Point - Lo Offset TIME NORMAL RANGE: NO TEMPERATURE ALARMS OUTSIDE THE RANGE: THE TEMPERATURE ALARM IS SET OFF 5.13.2.1 Adjusting Hi/ Lo Temperature Alarms The low alarm temperature can be adjusted from 20°F to 0.5°F (11.1 to 0.3°C) below the set point (Lo Offset). The high alarm temperature can be adjusted from 0.5°F to 20°F (0.3 to 11.
PP-32 values. 5.13.2.2 Adjusting Critical Temperature The critical temperature is the absolute maximum temperature allowed in the room. Set the function to "21.Alarm Limits" from the main menu using the navigation buttons then press the right-arrow key. Press the right-arrow key once again, in to select the "1.Temperature" menu. Press the down-arrow key in order to select the critical temperature menu. Temperature Alarm Lo Offset T° 10.0 Hi Offset T° 15.0 Critical 95.
PP-32 5.13.2.4 Adjusting Static Pressure Alarms The controller can generate an alarm if the static pressure drops below the low pressure limit or if it exceeds the high pressure limit. The controller uses a delay before activating the alarm. If the static pressure exceeds the high or low limits for that delay, an alarm is generated. LO STATIC PRESSURE ALARM: The user can assign a relay that will be activated when a Low Static Pressure Alarm occurs. This relay may activate a fan output for instance.
PP-32 the Low alarm limit to the desired value. Press the down-arrow key to select the Hi alarm limit. Use the adjustment buttons to set the Hi alarm limit to the desired value. Note : If you do not want a relay to be turned off in the case of a low static pressure alarm, set the Low Alarm limit to "Off" by pressing the down-arrow key. Adjusting High/Low Delays Set the function to "21.Alarm Limits" from the main menu using the navigation buttons then press the right-arrow key.
PP-32 Use the adjustment buttons to set the Hi Pressure Alarm Delay to the desired value. Adjusting the Open-Time for the Hi Static Pressure Alarm The Open-Time of the tunnel curtain or vent doors, in case a Hi static pressure alarm occurs, can be adjusted from 0 to 900 sec. Set the function to "21.Alarm Limits" from the main menu using the navigation buttons. Use the navigation buttons to select "2.Static Pressure" then press the right-arrow key.
PP-32 5.14 INSTALLATION 5.14.1 Step-by-Step Installation Guide These are the basic steps to start-up your PP-32 controller. 1. Connect the control according to the wiring diagram enclosed with this manual. 2. Turn on the power. 3. Adjust the Date and Time (sec. 5.14.5). 4. Select the proper season and program, if applicable (sec. 5.2.1, 5.2.2). 5. Step through the "19. Installation" menu and answer all questions in order to customize the controller for your particular application (see sec. 5.14.3). 6.
PP-32 9. Adjust the temperature set point. This is the target temperature in the room. Refer to section 5.3. 10. Adjust the start/stop temperature of fan stages (see sec. 5.7) and heater stages (see sec. 5.8). 11. Adjust the minimum ventilation cycle settings (see sec. 1.1.1). 12. If inlets operate using DWR-F-1A modules, set the air inlet compensation. This feature helps to reduce temperature differences in the building (see sec. 5.5.1). 13. Adjust all vent door parameters, if applicable (see sec 5.5.2).
PP-32 5.14.2 Password Settings This function allows to identify 2 different user types. It is used to restrict the access to certain parameters. The password is made up of three blocks of two digits, for example: 13 44 21. When a correct password is entered, the current user is identified. Installer Password: By default, the INSTALLER PASSWORD is set to "01-01-01". The installer mode gives full access to all functions of the PP-32.
PP-32 Modifying the Installer's Password The installer's password must first be entered before being allowed to modify it. Proceed as explained above to enter the installer password (1-1-1 by default). Note : The password "1-2-3" is reserved for the user mode. Do not use the same number sequence for the installer password. Set the function to "19.Installation" from the main menu using the navigation buttons. Press the rightarrow key.
PP-32 5.14.3 Installation Setup The following section describes how to customize the controller for your particular application. Normally, this setup needs to be done only once. Parameters are presented below in the order they appear on the display. Use the adjustment buttons to adjust a parameter value. When you are finished adjusting a parameter, press the down-arrow key to move to the next parameter. The user should step through all the parameters at least once. These parameters are located in the "19.
PP-32 8. Use Static Pressure ? Set to "Yes" to activate the static pressure sensor. 9. Static Pressure Set 2. Select whether the activation of the second group of static pressure set points is related to a specific stage (Stage) or to the outside temperature (Out T°). Refer to section 5.5.2 for further information on this feature. Use Stat. pres? Yes Static Set. 2 Stage # Inlets 12 # Auxiliary Out. 2 Aux. 1 Mode: Heat Aux. 2 Mode: Cool # Fan Stages 16 # Stg Programs abc # Heater Stages 8 10.
PP-32 16.# of Clock Outputs: Set the number of clock outputs to the desired value. Up to 8 clock outputs can be activated. 17.# of Clock Programs for Clock Outputs 1 & 2 : Set the number of programs for clock outputs 1 & 2. Up to 8 programs can be activated for the first 2 clock outputs. # Clocks 4 # Clock 1 Prog 8 # Clock 2 Prog 8 # Sensors 8 Use Out. Temp? Yes Contrast 70% Installer Password code #1 1 code #2 1 code #3 1 18.# of Sensors : Select the number of temperature sensors in the room.
PP-32 5.14.4 Sensor Assignment 5.14.4.1 Assigning Sensors to the Room T° and Fan Stages The controller uses the average reading of activated sensors to calculate the room temperature. Fan stages use this temperature to operate. The selection of sensors that are used to determine the average room temperature differs depending on the selected program. Therefore, the user must make a separate sensor assignment for each program in use.
PP-32 5.14.4.2 Assigning Sensors to Heater Stages Heater stages use the average temperature of their assigned sensors to operate. The assignment of heater stages is common to all programs and can only be set in the installer mode (see sec. 5.14.2). Select sensors that are used for the operation of each heater stage as follows: Set the function to "16.Heater Settings" from the main menu using the navigation buttons. Note that this menu is only available in the installer mode (see sec. 5.14.2).
PP-32 Select "2.Inlet Sensors" then press the right-arrow key. This option is only available in the installer mode (see sec. 5.14.2). Use the navigation buttons to select the desired inlet then press the rightarrow key . Sensors that have been activated during the installation are displayed (see sec. 5.14.3). Use the right and left-arrow keys to select the desired sensor. When the item is flashing, press to activate the sensor or to deactivate it. Inlet Settings 1. 2.
PP-32 Use the right and left-arrow keys to select the desired sensor. When the to item is flashing, press activate the sensor or to deactivate it. Auxiliary 1 Sensors 12345678 √√√ Proceed in similar fashion to assign sensors to the second auxiliary output, if applicable. KOOLMASTER PP-32 REV.
PP-32 5.14.5 Setting Time and Date Set the function to "20.Time / Date" from the main menu using the navigation buttons. Press the right-arrow key. The current time and date are displayed. Press the right-arrow key once. The Time / Date year is selected. Use the adjustment (Y/M/D) buttons to set the year. Press the Date: 2002/10/01 right-arrow key once again, the Time: 13:21:01 month is selected. Use the adjustment buttons to set the month. Press the right-arrow key. The day is selected.
PP-32 RELAY ASSIGNMENT EXAMPLE (an empty template is available at the end of this manual) OUTPUT/ RELAY # 1 2 3 4 5 Heater Stage 5 x x Heater Stage 4 x x x x x x x Heater Stage 3 x x x Heater Stage 2 x x 6 7 8 9 10 11 12 13 14 15 16 17 18 19 20 21 22 23 24 25 26 27 28 29 30 31 32 Heater Stage 8 Heater Stage 7 Heater Stage 6 Heater Stage 1 x Cooling Stage 1 (a) x Cooling Stage 1 (b) x x x x x x x x x T x x T x x T x x Cooling Stage 1 (c) Cooling Stage 1 (d) Co
PP-32 5.14.6.1 Assigning Fan Stages' Relays Ventilation stages 1 to 4 use a separate relay assignment for each progam in use. Refer to sec. 5.2 to select the proper program. ! WARNING MAKE SURE EVERY FAN STAGE HAS RELAYS ASSIGNED TO IT! An alarm is set off whenever a fan stage, that doesn't activate any relay, is activated. In this case, all relays of the previous fan stage are copied into this stage. Set the function to "17.
PP-32 To assign relays on timer mode, proceed as described above and use the adjustment buttons to select the "Timer" option. Stage Relay Relay Relay 1a Relays: 1 On(1) 2 Timer(1) 3 Off(1) 5.14.6.2 Assigning Heater Stages' Relays Set the function to "16.Heater Settings" from the main menu using the navigation buttons then press the right-arrow key. Note that this menu is only available in the installer mode (see sec. 5.14.2). Press the right-arrow key once again to select the "1.Relays" menu.
PP-32 Use the navigation buttons to select the "2. Relay Settings" menu then press the right-arrow key. Use the navigation buttons to select the "1.Open Relay" or "2. Close Relay" menu then press the right-arrow key. Use the right and left-arrow keys to select the desired relay. When the item is flashing, press to activate the relay or to deactivate it. Vent Door Open Relay 13 14 15 16 17 18 19 √ 5.14.6.
PP-32 5.14.6.5 Assigning Relays to Clock Outputs Set the function to "11.Clock Times" from the main menu using the navigation buttons then press the right-arrow key. Note that this menu is only available in the installer mode (see sec. 5.14.2) and if clock outputs have been enabled during the installation setup (see sec. 5.14.3). Use the navigation buttons to select the "2. Clock Relays" menu then press the right-arrow key.
PP-32 5.14.6.7 Assigning Relays for the Lo Static Pressure Alarm This relay is activated if a low static pressure alarm occurs. Refer to sec. 5.13.2 to activate/deactivate the low static pressure alarm. Set the function to "21.Alarm Limits" from the main menu using the navigation buttons then press the right-arrow key. Alarm Settings 1. 2. Temperature Lo Static Alarm Use the navigation buttons to select Lo Static Alarm "2.Static Pressure" then press the Relay Assignment right-arrow key.
PP-32 5.14.7 Calibrating the Water Counter The PP-32 provides a pulse input to monitor the water consumption. The user must enter the water flow per pulse, it can be adjusted from 1 to 100 gallons per pulse. Set the function to "13. Water Consumption" from the main menu then press the right-arrow key. The water consumption of the current day is displayed. Press the up-arrow key once. The water flow per pulse is displayed. Use the adjustment buttons to set the water flow per pulse to the desired value.
PP-32 5.15 ADVANCED SETTINGS 5.15.1 Setting the Temperature Curve The user can define a temperature curve to adjust the set point automatically over a given time period. A curve is defined using up to 10 points. Each point specifies a day number and a set point for that day. The animal age defines the current day number that is used by the curve. Once the points of the curve are defined, the curve must be activated.
PP-32 Note that the temperature curve must be turned off to adjust its points and days. Use the down-arrow key to scroll each point of the curve. The curve status then flashes on the display. Use the adjustment buttons to turn it Off. Set the function to "6.Room Set Point" from the main menu then press the right-arrow key. The current set point and the curve status are displayed. Room Set Point Temperature Set Point: 70.0°F Curve stat Off Press the down-arrow key once.
PP-32 5.15.2 Setting the Minimum Ventilation Curve Fans' On-Time, in minimum ventilation, can automatically be adjusted over a given period of time, by using the minimum ventilation curve. The On-Time changes using 10 steps. Each step specifies a day number and an On-Time value for that day. The animal age defines the current day number used by the curve. Once the 10 steps are defined, the curve must then be activated.
PP-32 Note that the minimum ventilation curve must be turned off to adjust its points and days. Use the down-arrow key to scroll each point of the curve. Then the curve status then flashes on the display. Use the adjustment buttons to turn it Off. Set the function to "7.Min Ventilation" from the main menu then press the right-arrow key. Use the adjustment buttons to select the "1.On Time/ Curve" menu. The current On-Time and the curve status are displayed. Press the down-arrow key once.
PP-32 5.15.3 Humidity Control If a humidity sensor is being used, the PP-32 has three mechanisms to compensate for a high humidity level : 1. The humidity level can be decreased by increasing the fans' on time during minimum ventilation cycles. Set Dipswitch #7 to ON to activate this function; 2. Kool-Cels are shut off whenever the relative humidity is too high (this applies to fan stage outputs that are using a timer relay). Set Dipswitch #5 to ON to activate this function ; 3.
PP-32 5.15.3.2 RH Compensation on Minimum Ventilation When the humidity level reaches the RH set point + 10%, the On-Time portion of the minimum ventilation cycle is increased by an amount ranging from 0 to 900 seconds. Set the dipswitch #7 to ON to activate this function. HUMIDITY COMPENSATION ON MIN. VENTILATION ON TIME (IN MIN. VENT.
PP-32 5.15.3.3 Adjusting Mist or Kool-Cel Shutoff When the humidity level is too high, Kool-Cel or mist units are shut off to avoid increasing the humidity level any further. This means that the fan stage outputs that operates in timer mode stop operating whenever the humidity level exceeds the mist shutoff limit. This limit ranges from 25% to 100% (Off) of humidity. Set the dipswitch #5 to ON to activate this function. Set the function to "18.
PP-32 On-Time when the humidity is at or above RH Set Point + 10% as shown below. Set the dipswitch #6 to ON to use this function. Set the function to "18.RH Compensation" from the main menu using the navigation buttons then press the right-arrow key. Note that this menu only appears if the relative humidity sensor has been enabled during the installation setup (see sec. 5.14.3). Use the navigation buttons in order to select the "Heater On time" display.
PP-32 5.15.4 Calibrating Sensors The reading of each sensor can be slightly adjusted by the user in order to obtain the most accurate and uniform readings of all sensors. The calibration of sensors can only be preformed in the installer mode (see sec. 5.14.2). 5.15.4.1 Calibrating Room and Outside T° Sensors The reading of each temperature sensor can adjusted by an amount of ±3°F (±1.7°C). Set the function to "3.Temp. Sensors" from the main menu using the navigation buttons.
PP-32 Use the adjustment buttons to set the humidity level that will be added or removed from all readings of the humidity sensor. 5.15.4.3 Calibrating the Static Pressure Level The reading of the static pressure level can adjusted by an amount of ±0.030"WC (±7Pa). Select "8.Vents/Static P" from the Vents/Static Press main menu using the navigation Cal. SP .000WC buttons then press the right-arrow Close At: .070WC key. The calibration menu flashes Open At: .090WC on the display "Cal. SP".
PP-32 5.15.5 Test Mode A test mode allows you to simulate temperature changes and verify the controller's performance. In test mode, the temperature sensor inputs are turned off, allowing the user to change the temperature used by the controller to operate the stages. The controller operates as before using the new temperature settings. Adjusting Room Temperature When the room temperature is adjusted, the controller bypasses the temperature sensor inputs and uses the new value as a reference.
6. TECHNICAL SPECIFICATIONS Type Controller's supply fuse F1 PP-32 1A, fast-blow Relays' supply fuse F1 Mains supply/frequency 3A, fast-blow 230 Vac , 50/60Hz 14Vdc output 14 Vdc ±10%, regulated, 200mA max. 14Vdc output fuse F2 1A max, fast-blow Relays' Maximum load ratings: Max voltage : 270Vac or 30 Vdc Max motor load: 1HP at 120 Vac, 2HP at 240Vac Max resistive load current: 15 A Alarm contact: 10mA to 2A, 24 Vac or dc max.
7. FACTORY SETTINGS PARAMETER Te m p e r a t u r e A n i m a l S e t P o i n t FAC TORY SETTING RANGE OF VALUES 8 0 . 0 ° F ( 2 6 . 7 ° C ) 3 2 t o 1 2 0 oF ( 0 t o 4 8 .
8. USING THE MEMORY STICK 8.1 Load a Configuration into the Controller 1- Position the memory stick on the J1 connector located at the upper left corner of the board, with the components facing DOWN. 2- Simultaneously press the up and down-arrow keys during a 5 second delay. The following message is displayed : Load into Control Press +/- to start “Load into Control, Press +/- to start” 3- Simultaneously press the +and - push buttons . The configuration starts to load into the controller.
PP-32 8.2 Save a Configuration into the Memory Stick 1- Place the memory stick on the J1 connector, at the upper left corner of the board, with the components facing DOWN. 2- Simultaneously press the up and down-arrow keys during a 5 second delay. The following message is displayed : Load into Control Press +/- to start “ Load into control. Press +/- to start” 3 - Press the up-arrow key once. The following message is then displayed: “ Save into mem stick.
9. INSTALLATION REPORT CONTACT INFORMATION CLIENT INFORMATION INSTALLER INFORMATION KOOLMASTER PP-32 REV.
PP-32 SENSOR ASSIGNMENT TEMPLATE (see sec. 5.14.
PP-32 INSTALLATION SETUP TEMPLATE (see sec. 5.14.3) INSTALLATION SETUP Parameter Setting : Reset Min/Max Relative humidity sensor YES NO Pre-Open vents delay (0 to 60 sec.) Pre-Open tunnel delay (0 to 30 sec.) Use Tunnel ? YES NO Tunnel Mode TIMER STATIC P. YES NO Use static pressure sensor? Static Set.
PP-32 RELAY ASSIGNMENT TEMPLATE (see sec. 5.14.6) PROCEDURE 1- Write down the description of each relay. 2- Put an "X" to assign ON/OFF relays or a "T" for relays that operate in timer mode. RELAY ASSIGNEMENT EXAMPLE OUTPUT/ RELAY # 6 7 Cooling Stage 1 5 X X 8 Cooling Stage 2 X X X Cooling Stage 3 T X X X In minimum vent. : Exhaust Fans 1 and 2 operates according to the minimum ventilation timer (minimum ventilation cycles run stage 1 fans in timer mode).
OUTPUT/ RELAY # Heater Stage 8 Heater Stage 7 Heater Stage 6 Heater Stage 5 Heater Stage 4 Heater Stage 3 Heater Stage 2 Heater Stage 1 Cooling Stage 1 (a) Cooling Stage 1 (b) Cooling Stage 1 (c) Cooling Stage 1 (d) Cooling Stage 2 (a) Cooling Stage 2 (b) Cooling Stage 2 (c) Cooling Stage 2 (d) Cooling Stage 3 (a) Cooling Stage 3 (b) Cooling Stage 3 (c) Cooling Stage 3 (d) Cooling Stage 4 (a) Cooling Stage 4 (b) Cooling Stage 4 (c) Cooling Stage 4 (d) Cooling Stage 5 Cooling Stage 6 Cooling Stage 7 Cooling
10.
PP-32 Assigning sensors to air inlets Inlet compenation 22 Inlets' operation 21 67 Pressure units 14 Probes see also Sensors Programs Installation Activating programs 64 Clock programs 45, 65 Program selection 16 Season selection 16 Viewing the program currently in use 15 Installation report templates 93–96 Installation setup 63–65 Installation setup template 95 Step by step installation 59–60 Installer password 61 Pump see Kool-Cel pump K R Keys see also buttons Shortcut keys Ramping see Curves
PP-32 Clock output settings 45–47 Factory settings 90 Fan stages settings 38 Heater settings 41 Humidity compensation 82–85 Inlet settings 21–22 Minimum ventilation settings 19–20 Password settings 61–62 Relay assignment 70–76 Sensor assignement settings 66–69 Time & date settings 70 Tunnel ventilation settings 31–37 Vent doors settings 23–30 Test mode 88 Time Reset time 63 Setting time and date 70 Setting time units 14 Timer Minimum ventilation timer 20 Timer relays on fan stages 39, 72 Tunnel curtain t