
Installation Instruction


5
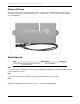
MTU Single Port Pulse Devices Installation Instructions
Do not mount the MTU if large metal objects, such as heating ducts, block both the front and rear of
the MTU. If absolutely necessary, a single large metal object may be located several feet away from
the MTU.
1. Select a mounting location for the MTU that will allow optimum signal transmission. In unfinished
basements, this is typically high on a ceiling joist.
In finished basements, this may be high on a ceiling joist in an unfinished section of the basement
or high on an interior wall near a window or outside wall.
The MTU should always be mounted at least a few inches from outside walls.
2. Mount the MTU vertically and level, with the ACLARA logo facing the installer. Allow a 1" space
between the top of the MTU and any overhang above it. This is critical for proper radio signal
transmission.
N
OTE
Do not over tighten screws. Excessive torque will damage the MTU enclosure. Do not tighten screws
beyond the point that the MTU touches the mounting surface.
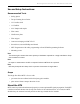
Wiring the MTU
General
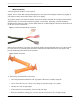
Many MTUs connect to the meter by means of a 3-conductor, 22-gauge solid conductor wire. The wire
is housed in a PVC jacket with UV inhibitors. A black-jacketed wire is supplied on single-port MTU.
Make sure inner conductors are not nicked during stripping..
N
OTE
For pulse units without a tamper detection circuit, connect the white wire to the black wire for
proper cut-wire detection functionality.
Wire Length
MTUs are provided with a standard wire length of 12 feet. Additional wire may be used if necessary. A
maximum run of up to 500 feet can be used to position the MTU in a favorable location. Use like
colors for cable jackets and individual wires when extending MTU wiring.
Some specific meters may impose other wire length limitations. Consult the meter manufacturer.
Wire Description
Black Ground
White Tamper
Red Pulse