
Installation Instructions


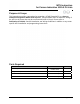
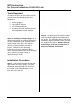


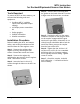
Table Of Contents
- Table of Contents
- 471-2000.pdf
- 471-2001.pdf
- 471-2002.pdf
- 471-2003.pdf
- 471-2004.pdf
- 471-2005.pdf
- 471-2006.pdf
- 471-2007.pdf
- 471-2008.pdf
- 471-2009.pdf
- 471-2010.pdf
- 471-2011.pdf
- 471-2012.pdf
- 471-2013.pdf
- 471-2014.pdf
- 471-2015.pdf
- 471-2016.pdf
- 471-2017.pdf
- 471-2018.pdf
- 471-2019.pdf
- 471-2020.pdf
- 471-2021.pdf
- 471-2022.pdf
- 471-2023.pdf
- 471-2026.pdf
- 471-2027.pdf
- 471-2028.pdf
- 471-2029.pdf
- 471-2030.pdf
- 471-2031.pdf
- 471-2032.pdf
- 471-2033.pdf
- 471-2034.pdf
- 471-2035.pdf
- 471-2036.pdf
- 471-2037.pdf
- 471-2038.pdf
- 471-2040.pdf
- 471-2041.pdf
- 471-2042.pdf
- 471-2043.pdf
- 471-2044.pdf
- 471-2045.pdf
- 471-2046.pdf
- 471-2047.pdf
- 471-2051.pdf
- 471-2052.pdf
- 471-2053.pdf
- 471-2054.pdf

MTU Instruction
for Rockwell/Equimeter/Sensus Gas Meters
Tools Required
To mount the MTU to these meters, you
will need the following tools and
equipment:
• Cordless drill ⅜”, variable
speed, with adjustable torque
settings
• #2 Phillips power screwdriver
bit
• Safety goggles
• Phillips screwdriver
• Slotted screwdriver
Installation Procedure
Before installing the MTU, anti-tamper,
safety, and security hardware must be
removed from the clear register cover.
Step 1 - Remove the existing clear
register cover by removing the four
screws. Discard the screws and cover.
Step 2 - Remove the register by
removing the two screws. Set the register
aside. Discard the screws.
Step 3 - Insert the four 10-24 x 1⅛”
screws through the holes on the MTU as
shown.
Step 4 – Turn the MTU over and place
the gasket on the back of the MTU so that
it aligns over the four screws, as shown.
Step 5 - Position the MTU on the meter.
Rotate the coupler so that the gear tooth
on the coupler engages with the gear
teeth on the gas meter. Orientation is not
critical, but you should be able to feel the
teeth “bite” when you turn the coupler
from the front of the MTU.
Step 6 - Tighten the four 10-24 x 1-⅛”
screws to 12 to 15 in-lb. On a standard
drill driver with 0 to 24 torque settings,
this is typically the #10 setting. Tighten
corner to corner.
Step 7 - Check the coupler. It should
have slight play — it should not bind or
turn too freely.
Page 180