The Lead in Sing-Along Entertainment DKR-510 640 WATTS 5.1 SURROUND-SOUND UPCONVERSION DVD KARAOKE RECEIVER WITH HDMI SWITCHING,BLUETOOTH USER’S MANUAL DKR-510 BLUETOOTH INPUT STOP 5.1 SURROUND-SOUND UPCONVERSION DVD KARAOKE RECEIVER - MASTER VOLUME with HDMI switching, Bluetooth, IPod Dock PLAY/PAUSE OPEN/CLOSE MIC VOL / ADJUST 5.1CH b # MULTIPLEX MUSIC.MENU CH-/PREV. CH+/NEXT KEY CONTROL TUN.-/REW TUN.+/F.
CONTENT 1. Safety Cations 2. Brief Instruction of Controls 1 3. Preparations 5 5 5 5 6 3.1 Accessories 3.2 Battery installation of remote controller 3.3 Connection cable 3.4 Video conversion 2 4. Speaker connection 6 5. Connection 8 8 8 5.1 5.2 5.3 5.4 5.5 5.6 HDMI connection External DVD/VCR/HDP/AUX connection Hooking up a DVD recorder Hooking up a TV monitor Hooking up a AV amplifier Connecting AM/FM antennas 9 9 10 10 6. Amplifier-function 11 7. Disc player function 12 7.
1. Safety Cautions CAUTION RISK OF ELECTRIC SHOCK DO NOT OPEN CAUTIONㄩTO REDUCE THE RISK OF ELECTRIC SHOCK, DO NOT REMOVE COVER (OR BACK). NO USER SERVICEABLE PARTS INSIDE .REFER SERVICING TO QUALIFIED SERVICE PERSONNEL. The lightning flash with arrowhead symbol,within an equilateral triangle, is intended to alert the user to the presence of uninsulated "dangerous voltage" within the product's enclosure that may be of sufficient magnitude to constitute a risk of electric shock to persons.
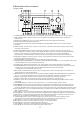
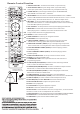
2.Bri e f instruction of control FRONT PANEL DKR-510 INPUT BLUETOOTH STOP 5.1 SURROUND-SOUND UPCONVERSION DVD KARAOKE RECEIVER - MASTER VOLUME with HDMI switching, Bluetooth, IPod Dock PLAY/PAUSE OPEN/CLOSE MIC VOL / ADJUST 5.1CH b # MULTIPLEX MUSIC.
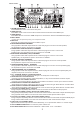
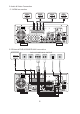
REAR PANEL 1 2 SUB WOOFER 6 3 4 5 SURROUND SOUND SPEAKERS 7 8 9 10 11 12 13 14 15 16 17 18 19 20 21 22 1. FM/AM ANTENNA IN Use FM/AM antenna to connect to these jacks. 2. HDMI OUTPUT Use HDMI cable to Connect to external video device like monitor with HDMI input. 3. HDMI INPUTS Use HDMI cable to Connect to HDMI output from external A/V devices like HDMI DVD player. 4. MIC3 INPUT Connect to a microphone by using 1/4" microphone cable . 5.
Remote Control Function 1.OPEN/CLOSE TRAY - To switch to DVD mode, or open/close tray. 1 2.YPbPr/DIGITAL INPUT- Cycles though YPbPr 1(w/coaxal audio), 33 2 3 4 5 32 31 YPbPr 2(w/ optical audio), Coaxal audio only, and Optical audio only. 3.OTHER INPUTS - Cycles though 5 different inputs: DVD/USB/CARD, iPod, AM/FM, Front AUX, AUX 1, and AUX 2. 4.MUSIC MENU- Press this button to switch between BASS volume, TREBLE volume, SUB WOOFER and Sound Channel selection amount 2.1 Ch, 5.
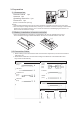
3. Preparation 3.1 Accessories Remote Control 1 pc Antenna 1 pc Operating Instruction 1 pc Power wire 1 pc (Check contents after opening) NOTE: 1. Put the lead attachment plug into the socket of INPUT VOLTAGE, and ensure it is insert tight. 2.The consumption voltage of local factory setting is 110 V/60Hz. If need to exchange to 220 V/50Hz, please pull out a switch till 220 V. Don*t touch this switch to avoid damaging the machine if it doesn’t need to switch the voltage. 3.
3.4 VIDEO Upconversion Chart This feature will automatically transfer all formats of video signal into the formats that output the video signal of DKR-510 to monitor.
Connection diagram of DKR-510 to 5.1 chanal speakers Please check and connect to the LEFT / RIGHT channel and positive (red) and negative (black) of DKR-510. Make sure the connection of channel and the two poles are correct. Don’t touch the speaker terminals to avoid electric shocks when the power is on.
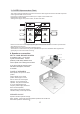
5.Audio & Video Connection 5.1 HDMI connection TV,MONITOR INPUT HDMI SUB WOOFER HD DVD OUTPUT HDMI Satellite Tuner PS3 OUTPUT HDMI OUTPUT HDMI SURROUND SOUND SPEAKERS 5.
5.3 Connect to a DVD Recorder DVD RECORDER INPUT OUTPUT VIDEO VIDEO INPUT OUTPUT S-VIDEO S-VIDEO INPUT OUTPUT AUDIO AUDIO L SUB WOOFER SURROUND SOUND SPEAKERS 5.
5.5 Hooking up a AV Amplifier AMPLIFIER AUDIO INPUT SUBWOOFER CENTRE SW CEN SUB WOOFER SURROUND SL SR SURROUND SOUND SPEAKERS 5.
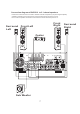
6. Amplifier Function 1.Be sure cut off power, connecting source outputs with corresponded input jacks. 2.Turn on the power, waiting 3-4 seconds till the speakers function connected. 3.Input select Select audio source by press the key INPUT on the front panel, then adjust the knob MIC VOL/ADJUST. Total 14 Inputs: HDMI1, HDMI2, HDMI3, COAXIAL, OPTICAL, Ipod, BLUETOOTH, RADIO, YPBPR1, YPBPR2, FRONT AUX, AUX1, AUX2, DVD INPUT MIC VOL / ADJUST MASTER VOLUME INPUT BLUETOOTH CH.
7. Disc Player Function 7.1 Disc Player Basic operation Press PREV key: Once all the connections and settings have been done, the unit is ready for normal use. Prior to playback, make sure the following operations have been carried out. , 1. Switch on TV and select AV mode. lf it s S-Video connect select S-Video mode. 2. Select DVD input, Step 1: DISC LOADING shown on screen: POWER Prev PREV Press NEXT key: Next NEXT Loading...
7.2. DVD Function 7.2.6 Time 7.2.1 Title When playing a DVD, press TIME key. The following will be displayed: Press TITLE key to get title menu. (This operation works only for the disc with multi title encoded). TITLE TIME 7.2.2 Menu Press MENU key to return to main menu for DVD disc playing. Press UP or DOWN key to select title and chapter. Select direct time by pressing number in subtitle chapter, then press play key. 7.2.
7.2.9 Angle 7.2..8 Repeat In DVD mode, press REPEAT key. The following will be displayed: REPEAT Repeat Chapter During a sport match, concert or theatrical program, press ANGLE key continually on remote controller to select various angles to view the same image (This operation works only for the disc with multi angle encoded). Angle 2 2/2 Chapter repeat on REPEAT Repeat Title 7.2.
7.3 Setting of the Disc Play Note: 1).lrrespective of what screen format you have selected, if your screen displays in 4:3 format, the picture will be shown in that format anyway. 2).For DVDs, the screen format is convertible. 3).lf your screen displays in 4:3 format, when a DVD with 16:9 display format is used, the picture will be flattened. Press the SETUP button on the remote c o n t r o l l e r, t h e S E T U P M E N U ( m a i n ) will be displayed. 1.
HD Resolution Bass Management Follow the operation instructions stated in ※Video in combination with desired option in the following figure. Follow the operation instructions stated in ※Audio in combination with desired option in the following figure.
Surround Speakers Surr. Delay Follow the operation instructions stated in ※Audio in combination with desired option in the following figure. Follow the operation instructions stated in※ Audio in combination with desired option in the following figure. Surround Speakers Surr. Delay Large Small None No Delay 1m, 2m 3m 4m 5.1m Surround speaker is set to large , small, or none. Subwoofer Speakers The user can select the surround delay mode: No delay, 1m, 2m, 3m, 4m, or 5.1m.
8.Operation of Mp3 function Mp3 is an audio compression mode using Level 3 of the international standard MPEG, whereby sound signal is compressed in a rate of 12:1 A Mp3 disc can record music for play of over 600 minutes or record over 170 songs, rivalrous CDs in sound quality. To play a Mp3 disc Select the track using numbered buttons 1.Follow the basic operating instructions to insert a Mp3 disc, this machine will start to search the information on the disc and show it in the display. 2.
12.RADIO application 1. Before using radio function, you must attach the supplied antenna. Adjust the antenna to obtain optimum reception. Select "RADIO i np ut f un ct io n. 2. Press AM/FM button on the front panel or on the remote control, to select AM band or FM band. 3. Press the keys CH+/CH- on the remote control, you can find out the radio bands you've memorized before. 4. Press the keys TUNING+/TUING- on the remote control, you can adjust the radio frequency by hand. 5.
14. BLUETOOTH function ACE DKR-510 ACE DKR-510. ACE DKR-510 Amplifier ACE DKR-510 c. Press BLUETOOTH key on the DKR-510 front panel or remote control to display ON. Amplifier.
ACE DKR-510 H. Press BLUETOOTH key on the DKR-510 front panel or remote control to display ON.
Note: A system can be connected with only one BLUETOOTH device each time. Before searching for a new device, please cancel the existing connection.
15. Trouble shooting guide Incorrect operations are often mistaken for trouble and malfunction. If you suspect that something is wrong with the unit, check the list below. Sometimes, the troubles lie within another component. Remember to try inspecting other component and electrical appliances in use. If the trouble can not be rectified even after exercising the steps list below, call Acesonic servic center +1(626)820-0670 to inquire about repairs.
16.Technical Specification Model DKR-510 Play mode NTSC/PAL/AUTO Disc mode DVD ` VCD ` CD ` SVCD `Mp3 ` DVD-R ` CD-R ` CD-RW ` MP4 Sub woofer output power -150W Power Front speakers output power -150WX2 Centre speaker output power -70W Surround speakers output power -60WX2 Frequency response CD: 4Hz-20KHz(EIAT) DVD: 4Hz-22KHz(48K) 4Hz-44KHz(96K) Audio S/N ratio ≡80dB Dynamic range ≡90dB Distortion <0.