
PCI to Ultra SCSI RAID Controllers Installation Guide

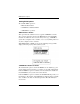
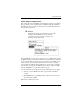
Table Of Contents
- Outside Front Cover
- Inside Front Cover
- Greetings/Please Notice/Our Policy
- About This Manual
- TABLE OF CONTENTS
- Chapter 1: Introduction
- Chapter 2: Preinstallation Planning
- Chapter 3: Installation
- Chapter 4: Controller Start-up
- Appendix A: Battery Backup Unit Option
- Appendix B: DAC960PG and DAC960PJ Specifications
- Appendix C: Error Messages
- Appendix D: Enclosure Management
- Appendix E: Regulatory Information
- Glossary

Manual No. 775012 4-1
Chapter 4
Controller Start-up
This chapter describes:
• BIOS Options
• BIOS Configuration Utility (RAID EzAssist)
• Operating System, Device Drivers, GAM
• What to Check in Case of Problems
This chapter describes the DAC960PG and DAC960PJ controller start-up
procedures and messages produced by the BIOS during start-up or re-boot.
This chapter also explains three BIOS options that are available for
configuring controller operation.
BIOS Options Sequence
After physically installing the controller and connecting the cabling, do the
following if you need to set or modify the BIOS options (see “Setting BIOS
Options” on page 4-2 for details).
1. Power on the any drive enclosures connected to the controller.
2. Power on the computer.
3. Watch the messages on the screen for the following prompt to be
displayed:
Press <ALT-M> for BIOS options
4. Press Alt–M to get into the BIOS Options menu.
5. The BIOS Options menu provides the following items to choose from:
6. To select any of the items in the menu, highlight the selection with the
Up Arrow or Down Arrow. Press Enter to toggle any of the 3 items.
☛ Note
BIOS must be enabled to toggle the CD-ROM boot
and the Drive geometry parameters.