Acer ezDock User’s Guide
Copyright © 2005 Acer Incorporated. All Rights Reserved. Acer ezDock User’s Guide First issue: January, 2005 Changes may be made periodically to the information in this publication without obligation to notify any person of such revisions or changes. Such changes will be incorporated in new editions of this manual or supplementary documents and publications.
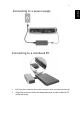
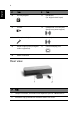
1 Connecting to a notebook PC 1 Pull out the connector from the connector slot and remove the cap 2 Align the connector with the designated port on the notebook PC and push firmly English Connecting to a power supply
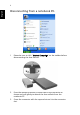
English 2 Disconnecting from a notebook PC. 1 Please be sure to click “Undock Computer” on the taskbar before disconnecting the Acer ezDock. 2 Press the releasing catches on both sides of the connector as shown and pull gently to detach the Acer ezDock from the notebook PC. 3 Cover the connector with the cap and return it to the connector slot.
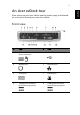
3 After setting up your Acer ezDock and the power suppy as illustrated , let us show you around your new Acer ezDock. Front view # Item # Item 1& 2 Universal PS/2 Keyboard / mouse connector 3 Two USB 2.
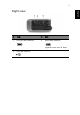
English 4 # Item # Item 10 Security keylock 11 DVI-D Port (for Digital visual input) 12 S-video 13 Headphone / Line out jack (based on system support) 14 Microphone in jack 15 Line in jack 16 S/PDIF output jacks (for digital audio equipment). 17 External display port 18 Power indicators Rear view # Item 1 124 pin connector, connects to the expansion port of a Notebook PC 2 Connector cap, protects the connector when not in use.
5 English Right view # Item # Item 1 Four pin IEEE 1394 port 2 Six pin IEEE 1394 port supports power upto 30 Watt. 3 Four USB 2.
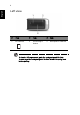
English 6 Left view # Item # Item # Item 1 PC Card slot 2 PC Card eject button 3 PCI Express™ Card slot To insert a PCI express card, push the card gently until it clicks. To eject, push the card gently until it clicks. Allow it to spring back before pulling.
7 Below is a brief summary of the Acer ezDock’s many features: Performance • Simple one plug design - easy to connect • System power can be supplied from Acer ezDock • Communicates with the system by a connector, 120 signal pins and 4 power pins • PCI-E signal via cable from system to Acer ezDock • 7.1 audio solution via SPDIF ( Based on system design ) • Supports up to six USB 2.0 ports, 1.
English 8 Special notice The usage guide below shows the ports available for use once Acer ezDock is connected to a Notebook PC.
Appendix A Regulations and Safety Notices
This appendix lists the general notices of your Acer ezDock.
11 This device has been tested and found to comply with the limits for a Class B digital device pursuant to Part 15 of the FCC Rules. These limits are designed to provide reasonable protection against harmful interference in a residential installation. This device generates, uses, and can radiate radio frequency energy and, if not installed and used in accordance with the instructions, may cause harmful interference to radio communications.
English 12 Appendix A Regulations and Safety Notices Operating conditions This device complies with Part 15 of the FCC Rules. Operation is subject to the following two conditions: (1) this device may not cause harmful interference, and (2) this device must accept any interference received, including interference that may cause undesired operation. Notice for users in Canada This Class B digital apparatus complies with Canadian ICES-003.
13 If this equipment should fail to operate properly, disconnect the equipment from the phone line to determine if it is causing the problem. If the problem is with the equipment, discontinue use and contact your dealer or vendor. Caution: To reduce the risk of fire, use only No. 26 AWG or larger UL Listed or CSA Certified Telecommunication Line Cord.
English 14 Appendix A Regulations and Safety Notices Notice for users in Australia For safety reasons, only connect headsets with a telecommunications compliance label. This includes customer equipment previously labelled Permitted or Certified.
15 Read these instructions carefully. Save them for future reference. 1 Follow all warnings and instructions marked on the product. 2 Unplug this product from the wall outlet before cleaning. Do not use liquid cleaners or aerosol cleaners. Use a damp cloth for cleaning. 3 Do not use this product near water. 4 Do not place this product on an unstable cart, stand, or table. The product may fall, causing serious damage to the product.
English 16 Appendix A Regulations and Safety Notices c If the product has been exposed to rain or water. d If the product does not operate normally when the operating instructions are followed. Adjust only those controls that are covered by the operating instructions since improper adjustment of other controls may result in damage and will often require extensive work by a qualified technician to restore the product to normal condition. e If the product has been dropped or the case has been damaged.
17 English Acer Incorporated 8F, 88, Sec. 1, Hsin Tai Wu Rd., Hsichih Taipei Hsien 221, Taiwan, R.O.C. Tel : 886-2-2696-1234 Fax : 886-2-2696-3535 www.acer.com Declaration of Conformity for CE marking We, Acer Inc. 8F, 88, Sec. 1, Hsin Tai Wu Rd., Hsichih, Taipei Hsien 221, Taiwan, R. O. C. Contact Person: Mr. Easy Lai Tel: 886-2-8691-3089 Fax: 886-2-8691-3000 E-mail: easy_lai@acer.com.
Appendix A Regulations and Safety Notices English 18 Federal Communications Commission Declaration of Conformity This device complies with Part 15 of the FCC Rules. Operation is subject to the following two conditions: (1) this device may not cause harmful interference, and (2) this device must accept any interference received, including interference that may cause undesired operation.