Digitally capture & store everything you write with ink on ordinary paper.
Federal Communications Commission (FCC) Radio Frequency Interference Statement This equipment has been tested and found to comply with the limits for a Class B digital device, pursuant to Part 15 of the FCC Rules. These limits are designed to provide reasonable protection against harmful interference in a residential installation.
GETTING STARTED.................................................................................................... 1 EQUIPMENT CHECKLIST .............................................................................................. 1 THE PARTS OF THE DIGITAL PAD ................................................................................. 2 INSTALLING THE BATTERIES INTO THE DIGITAL PAD ................................................... 2 INSTALLING THE BATTERY INTO THE DIGITAL INKING PEN .............
Moving Objects ....................................................................................................14 Deleting Objects ..................................................................................................14 Copying or Moving Objects .................................................................................14 Changing the Color and Width of Objects ...........................................................15 Adding a New Page...............................................
iv
Getting Started The DigiMemo A502/692 is a stand-alone device with storage capability that digitally captures and stores everything you write or draw with ink on ordinary paper, without the use of computer and special paper. Then you can easily view, edit, organize and share your handwritten notes in Windows.
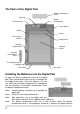
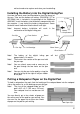
The Parts of the Digital Pad Battery Compartment Cover Card-Slot USB Connector Battery Compartment Power Button Display Buzzer Four Function Buttons Notepad Slot Cartridge Compartment Notepad Holder Cartridge Compartment Cover Two Replacement Ink Cartridges Pen Holder Pen Holder Installing the Batteries into the Digital Pad To open the battery compartment cover of the digital pad, slide it outward while pressing the raised dots on the middle of the cover. Insert four batteries (1.
not be turned on to capture and store your handwriting. Installing the Battery into the Digital Inking Pen Unscrew the barrel cover counterclockwise from the barrel of the pen. Take out the button cell battery (SR626SW, 377 or IEC-SR66) that is included in the package of the DigiMemo A502/692. Insert the battery into the battery compartment with the negative (-) cap facing the battery compartment. Screw the barrel cover clockwise onto the barrel until tight.
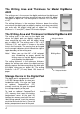
The Writing Area and Thickness for Model DigiMemo A502 The writing area is the area on the digital pad where the digital pad can digitally capture and store everything you write with the digital inking pen as digital ink. The writing area is 150 mm x 211 mm (5.9" x 8.3"). Writing Area The writing thickness is the maximum thickness above the writing area where the digital pad can digitally capture and store everything you write with the digital inking pen as digital ink. The writing thickness is 12 mm (0.
Note! The optional memory card must be Type I CompactFlash (CF) memory card. Note! Some brands of memory cards may not be compatible with this digital pad. Before purchasing a memory card, consult its manufacturer or dealer. Along with the digital pad, we recommend you to use CompactFlash (CF) memory cards (8 MB to 512 MB) of the brand SanDisk.
Writing and Recording Your Handwritten Notes Using the digital inking pen on the digital pad produces both familiar ink notes on ordinary paper and digital pages in the storage device of the pad. Turning on the Digital Pad Press and hold the Power button on the digital pad until the icon appears on the display. Release the Power button to turn on the pad. The display will be on and show the Digital Page Number, Storage Device icon and Page icon.
Press the Next Blank Page button to move to the next blank digital page. The Pen Icon When you are writing or drawing on paper by using the digital pen on the digital pad, the Pen icon appears on the display. The Pen icon indicates that the digital pad is capturing and storing your handwriting as digital ink. Note! If you do not see the Pen icon while writing, try to alter the pressure you apply on the pen tip.
Then press the Erase button on the pad. The display will show message. Press the Erase button again to erase all contents stored in the digital page. Here is a brief recommendation: you may want to tear off the paper page or simply cross out the page number you wrote on the paper page. Note! When message appears, the erase procedure will be cancelled if you write or press any button , or to execute other functions. All contents remain intact in the digital page.
Organizing Your Digital Pages in Windows With its DigiMemo Manager software, you can easily view, edit, organize and share your digital pages in Windows. You can save any digital pages you arbitrarily select as a book file (e-Book). Installing the DigiMemo Manager software 1. Turn on your computer and start Windows. 2. Insert the DigiMemo Manager software CD into the CD-ROM drive. The software installer will automatically launch.
Creating Your e-Book File On the Windows desktop, double-click the ACECAD DigiMemo Manager icon to open the software. Toolbars ACECAD DigiMemo Manager Icon The following toolbars are on the software window: z Standard Toolbar z Tools Toolbar z Color Toolbar z Width Toolbar To move a toolbar to the new location, drag the move handle on a docked toolbar or the title bar on a floating toolbar.
page in the sequence, and then hold down the SHIFT key and click the last digital page. To preview a digital page, select the digital page and click Preview. 5. Click OK. The digital pages you select will be imported to this book file. Note! You can click any page thumbnail to quickly switch the current page. Note! Note! You can import and insert any digital pages after the current page. The current page number indicates the current page of this book file (eBook).
z In the folder of the e-book file, double-click the e-Book file to open the file in a new software window. Note! z By this way, you can open various e-Book files in different software windows. on the Standard toolbar. In the software window, click the Open button In the dialog box, select the folder and then the e-Book file. Click Open. Note! If the previous e-Book file is not saved in its software window, you will be asked to save that e-Book file.
Note! You can click a color button to change the color of the text or click the Font button to change the font of text. Editing an Existing Text Box 1. Click the Select button 2. Click anywhere inside the existing text box. Then edit your text. Note! on the Tools toolbar. You can click a color button to change the color of the text or click to change the font of text. the Font button Drawing a Freeform Line and Writing 1. Click the Pen button on the Tools toolbar. 2.
z To select only one object, click the Select button and then one digital ink stroke or line. A Selection box will appear around the selected object. z To select one or several digital ink strokes, lines or text boxes, click the Select button . Then click and drag a box around the whole of them. A Selection box will appear around the selected objects. z Click the Select All button to select all objects in the current page. A Selection box will appear around the selected objects.
z If you want to copy or move the selected objects to the same page, click the Paste button on the Standard toolbar. The Selection box will be around the pasted objects. You can move the pasted objects to a new location. z If you want to copy or move the selected objects to another file for other programs such as Outlook e-mail message, Word file or Excel file, switch to the file. Click the Paste command in the program. Changing the Color and Width of Objects 1.
current page to. 3. Click OK. The current page will then be moved to the page you designated previously. Removing the Current Page Click the Remove Page button . A dialog box will appear. Click Yes. The current page and all its contents will be removed. Showing the Background of Pages 1. On the Edit menu, click Option. A dialog box will appear. 2. Choose or clear the following check boxes to show the background on: 3.
2. In the dialog box, select a file type and enter a file name. Click Save. Switching the Current Page by Keyboard Shortcuts First Page CTRL+HOME Last Page CTRL+END Previous Page PAGE UP Next Page PAGE DOWN Sending Your e-Book File in E-mail You can use one of the following methods to send your e-Book file in e-mail: z In the software window of DigiMemo Manager, you can copy or move several pages or just part of a page in your e-Book file to your Outlook e-mail message.
z Open your e-Book file in the DigiMemo Manager software. Click the E-mail button on the Standard toolbar. In the dialog box, select the Attach images option. Click OK. Every page of your e-Book file will be saved as a JPG image file and be attached to a new e-mail message. Converting Your Handwritten Notes in Your e-Book File 1. If you have installed the optional DigiMemo Handwriting Recognition software, click the Conversion button on the Standard toolbar in the software window of DigiMemo Manager. 2.
box to send your handwritten notes to the default Unfiled Notes section in OneNote. For OneNote 2003, the Send to Unfiled Notes Section check box is disabled. 4. z When the Send to Unfiled Notes Section check box is cleared or disabled, you can click the Browse button to select the existing Notebook, Section Group (Folder) and Section in OneNote which you want to send your handwritten notes in.
Note! 5. Such deletion can not be recovered. Click Next. The Send to OneNote Properties dialog box will appear. Select the options you want. Then click Finish to send your handwritten notes to OneNote. Changing the Default Program to OneNote for Digital Page File (DHW) The original default program to open digital page file (DHW) is DigiMemo Manager software. If you have installed OneNote software, you can change the default program to OneNote to open digital page file (DHW).
z You can copy or move the digital page files in the built-in 32 MB storage device or the optional memory card to your hard disk drive. You also can rename the digital page files in your hard disk drive. Note! Do not rename the digital page files in the folder DMEMO-M of the built-in 32 MB storage device or the folder DMEMO-C of the optional memory card. Otherwise the digital pad can not manage the renamed digital pages. Deleting the Digital Pages in the DigiMemo Manager 1.
Appendixes Replacing the Ink Cartridge of the Digital Pen Two replacement ink cartridges are stored in the cartridge compartment of the digital pad. To open the cartridge compartment cover of the pad, slide it outward while pressing the raised dots on the middle of the cover. Clip Hole To replace the ink cartridge of the pen, you may use a small clip to gently pull the old one out. Then insert a new one and press the cartridge tip firmly against a hard surface until it snaps into place.
z Severe missing digital ink strokes z Serious lengthened or shortened digital ink strokes z Significant twisted digital ink strokes z Decreasing of the writing thickness Removing the DigiMemo Manager Software in Windows Open Add or Remove Programs icon in the Control Panel window. Remove the ACECAD DigiMemo Manager software.
files it contains. To reset the built-in 32 MB storage device, execute the following steps: 1. While the digital pad is turned off, press and hold the Erase button 2. Meanwhile, press and hold the Power button on the pad until the appears on the display. Release the Power button. 3. Then release the Erase button Note! on the pad. icon . Do not format the built-in 32 MB storage device through the format function in Windows. Or it will cause the incompatibility problem with the pad.
Problem: Significant missing, twisted, lengthened or shortened digital ink strokes occur. Solution: Please check the following situations for the digital pen: z The battery is correctly installed in the pen. z The battery must be inserted into the battery compartment with the negative (-) cap facing the battery compartment. z The cushion (copper color) of the battery is still located inside the barrel cover. In fact, such cushion will remain at its original position unless it is improperly removed.
full. Solution: Although the digital pad has the ability to manage up to 999 digital pages (either for the built-in 32 MB storage device or for an optional memory card), such ability is unrelated to the maximum storage capacity. The full memory means that the used space for the digital page files and the other computer files reaches the maximum capacity of the built-in 32 MB storage device or an optional memory card.
Specifications Digital Pad Specifications Size 12.17" (length) x 8.23" (width) 309 mm (length) x 209 mm (width) Thickness The thinner part 0.39" (9.8 mm) The thicker part 0.62" (15.7 mm) Weight Approx. 1.13 lbs (512 g) without batteries Approx. 1.24 lbs (560 g) with batteries Writing Area 5.9" x 8.3" (150 mm x 211 mm) Writing Thickness 0.47" (12 mm); approx.
System Requirements Operating System Windows 2000 or XP CPU 500 MHz Pentium III or better RAM 128 MB or more recommended Equipment Available USB port CD-ROM drive Hard Disk Space 32 MB Environment Operating Temperature 32 °F to 104 °F (0 °C to 40 °C) Operating Humidity Less than 85% (no condensation) Storage Temperature -4 °F to 140 °F (-20 °C to 60 °C) Note! 28 These specifications are subject to change without notice.
www.acecad.com.tw Part Number: 91100-40850 English Version v2.40 Printed in China 2008.