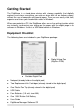
Digitally capture & store everything you write with ink on ordinary paper.
Federal Communications Commission (FCC) Radio Frequency Interference Statement This equipment has been tested and found to comply with the limits for a Class B digital device, pursuant to Part 15 of the FCC Rules. These limits are designed to provide reasonable protection against harmful interference in a residential installation.
GETTING STARTED....................................................................................................1 EQUIPMENT CHECKLIST ...............................................................................................1 THE PARTS OF THE DIGITAL PAD ..................................................................................2 INSTALLING THE BATTERIES INTO THE DIGITAL PAD ....................................................3 INSTALLING THE BATTERY INTO THE DIGITAL INKING PEN ..............
Selecting Objects.................................................................................................. 19 Resizing Objects................................................................................................... 19 Moving Objects .................................................................................................... 19 Deleting Objects .................................................................................................. 19 Copying or Moving Objects ..........
General Digital Pad Specifications......................................................................39 Digital Pen Specifications ....................................................................................40 File Formats.........................................................................................................40 System Requirements ............................................................................................40 Environment ............................................
Getting Started The DigiMemo is a stand-alone device with storage capability that digitally captures and stores everything you write or draw with ink on ordinary paper, without the use of computer and special paper. Then you can easily view, edit, organize and share your handwritten notes in Windows. When connected to a PC, the DigiMemo offers an on-line writing function which can instantly synchronize your writing on the paper with the digital page in its software in Windows.
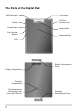
The Parts of the Digital Pad USB Connector Display Pen Holder SD Card Insertion Slot Power Button Notepad Clip Four Function Buttons Notepad Holder LED Battery Compartment Cover Battery Compartment Cartridge Compartment Two Replacement Ink Cartridges and One Plastic Pen Tip 2 Cartridge Compartment Cover
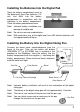
Installing the Batteries into the Digital Pad Open the battery compartment cover of the digital pad. Insert four batteries (1.5 volt, size AAA) into the battery compartment in accordance with the indication in the battery compartment. Close the battery compartment cover. Note! Incorrect battery installation may damage the digital pad. Note! Do not mix new and used batteries. Note! With continuous use of the digital pad, four AAA alkaline batteries will last approximately 80 hours.
Note! You can clip the pen to the pad by using the pen clip to clip to the right or left pen holder on the notepad clip. Two Holes Note! You can attach some cord or accessory such as the pen to the pad through the two holes on the upper-right corner of the pad. Putting a Notepad or Paper on the Digital Pad You can use the notepad clip to hold a notepad in the notepad holder on the pad. You also can directly put a few sheets of paper on the writing area of the pad for your writing.
Storage Device in the Digital Pad The digital pad is equipped with a built-in 32 MB storage device to store your handwritten notes. You also can load an optional Secure Digital (SD) memory card into the pad to expand the storage capacity of the pad. To load an optional Secure Digital (SD) memory card, insert the memory card all the way into insertion slot until it clicks by holding the memory card with the terminal side facing upward.
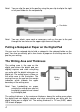
Writing and Recording Your Handwritten Notes Using the digital inking pen on the digital pad produces both familiar ink notes on ordinary paper and digital pages in the storage device of the pad. Note! The DigiMemo is a stand-alone device. You do not need to connect the digital pad to your computer for this function. Turning on the Digital Pad Press and hold the Power button on the digital pad until the icon appears on the display. Release the Power button to turn on the pad.
z Battery Icon The Battery icon indicates the battery strength in the digital pad. Changing the Current Digital Page You can use the following function buttons on the pad to change the current digital page in the current storage device. z Page Backward Button to move to the previous digital page. Press the Page Backward button By pressing and holding the Page Backward button , the Digital Page Number moves fast and backward. Once release the button , it stops moving.
immediately captured and stored in the current digital page file of the current storage device. The file name of this digital page is PGLT_XXX.DHW for the model DigiMemo L2, or PGA4_XXX.DHW for the model DigiMemo A402 (the XXX is the Digital Page Number such as 001). is displayed, the digital page file is stored While the Storage Device icon in the DMEMO-M folder in the built-in 32 MB storage device.
Note! When message appears, the erase procedure will be or to execute other cancelled if you write or press any button , functions. All contents remain intact in the digital page. Note! Once a digital page is erased, its original contents can not be recovered. Turning off the Digital Pad Press the Power button to turn off the digital pad. The display will be blank.
Low Battery Indication on the Digital Pad When the batteries remain too low power and are in need of replacement, the Low Battery icon will appear on the display. Please replace the batteries in the pad. When the batteries are exhausted, the pad sounds 3 beeps. Then the pad is turned off immediately. Notes on Replacement of Batteries in the Pad When you replace the batteries in the pad, if the batteries are not in the battery compartment over about one minute, the adjusted date and time will be erased.
Organizing Your Notes in Windows With its DigiMemo Manager software, you can easily view, edit, organize and share your digital pages in Windows. You can save any digital pages you arbitrarily select as a book file (e-Book). Installing the DigiMemo Manager software 1. Turn on your computer and start Windows. 2. Insert the DigiMemo Manager software CD into the CD-ROM drive. The software installer will automatically launch.
4. Click Next in the dialog box. 5. In the dialog box, click Next to start the installation. 6. The DigiMemo Manager software has been successfully installed. Click Close in the dialog box. Please restart your Windows.
Connecting the Digital Pad to Your Computer Turn on your computer. Take out the USB cable included in the package. Plug the wide connector of the cable into an available USB port on your computer. Connect the other end of the cable to the USB connector of the digital pad. USB Connector will appear on the The Connection icon display of the pad. The LED on the pad will light. indicates the The Connection icon connection between the digital pad and your computer.
z Tools Toolbar z Color Toolbar z Width Toolbar To move a toolbar to the new location, drag the move handle on a docked toolbar or the title bar on a floating toolbar. Move Handle Move Handle Docked Toolbar Title Bar Docked Toolbar Floating Toolbar Importing Your Digital Pages 1. Click the Digital Page button on the Standard toolbar. The Digital Page dialog box will appear. 2. Select the Import digital pages option button.
that contains digital pages. 3. Click OK. The Import Digital Pages dialog box will appear. 4. To select nonadjacent digital pages, click one digital page, and then hold down the CTRL key and click each additional digital page. To select adjacent digital pages, click the first digital page in the sequence, and then hold down the SHIFT key and click the last digital page. To preview a digital page, select the digital page and click Preview. 5. Click OK.
page. Note! You can import and insert any digital pages after the current page. Note! The current page number indicates the current page of this book file (e-Book). Note! As importing, the original digital page remains intact. Saving an e-Book File Click the Save button on the Standard toolbar. Note! If you are saving the e-Book file for the first time, you will be asked to give it a name. Note! The icon of a book file (e-Book) is . The extension of a book file (e-Book) is DND.
z In the folder of a digital page file, double-click the digital page file. The digital page will be imported to a new e-Book file in a new software window. Note! z By this way, you can open various e-Book files in different software windows. on the Standard In the software window, click the New button toolbar. A new and blank e-Book file with a new page will be created in the software window.
Drawing a Freeform Line and Writing 1. Click the Pen button on the Tools toolbar. 2. You can switch the color by clicking a color button on the Color toolbar. You can change the width by clicking a width button on the Width toolbar. 3. Drag to draw a freeform line or write. Drawing a Straight Line 1. Click the Line button on the Tools toolbar. 2. You can switch the color by clicking a color button on the Color toolbar. You can change the width by clicking a width button on the Width toolbar. 3.
Selecting Objects You can use the following methods to select objects: z To select only one object, click the Select button and then one digital ink stroke or line. A Selection box will appear around the selected object. z To select one or several digital ink strokes, lines or text boxes, click . Then click and drag a box around the whole of the Select button them. A Selection box will appear around the selected objects. z Click the Select All button to select all objects in the current page.
Copying or Moving Objects 1. Select one or several digital ink strokes, lines or text boxes. 2. Do one of the following: z To move the selected objects, click the Cut button Standard toolbar. on the z To copy the selected objects, click the Copy button Standard toolbar. on the 3. Do one of the following: z If you want to copy or move the selected objects to another page in this or another e-Book file, switch to the page. Click the Paste button on the Standard toolbar.
text box. By editing a text box, you can click a color button to change the color of the selected text or click the Font to change the font of the selected text. button Adding a New Page Click the Add Page button on the Standard toolbar. A new page will appear at the end of this book file. Setting the Default New Page Size The Default New Page Size is for the new page which you add in the e-Book file. It does not matter with the page size of the digital page which you import to the e-Book file.
Showing the Background of Pages 1. On the Edit menu, click Option. A dialog box will appear. 2. Choose or clear the following check boxes to show the background on: z Current page z Page thumbnails 3. If necessary, select the following one option button: z Default background (Lines) z Import image as background Click the Browse button to find the image file such as BMP, JPG, GIF or PNG file which you want to be the background. 4. Choose or clear the Print background when printing check box. 5.
1. Click the Save as Image button on the Standard toolbar. 2. In the dialog box, select a file type and enter a file name. Click Save. Sample of an Edited e-Book File On-line Writing Your Notes When the digital pad is connected to your computer through a USB port, you can use the On-line Writing function in the DigiMemo Manager software. By using the digital pen on the pad, the On-line Writing function can instantly synchronize your writing on the paper with the current page in the software window.
To use the On-line Writing function, execute the following steps: 1. Make sure that the digital pad is connected to your computer through a appears on the display of the pad. USB port. The Connection icon 2. On the Tools toolbar in the software window, click the On-line to activate the function. Writing button Note! When you activate the On-line Writing function, the tablet device function in Windows of the pad will be closed.
Note! When the On-line Writing function is closed, the tablet device function in Windows of the pad will be activated. You can use the digital pen on the horizontal pad to move the mouse pointer on the screen. Please refer to the chapter — Tablet Device in Windows.
Note! z You can not use this copy or move technique in an Outlook Express e-mail message. In an e-mail message, insert your e-Book file as an attachment. Note! To view and edit your e-Book file, the recipient must have the DigiMemo Manager software. If he or she does not have this software, please download it on the ACECAD website. http://www.acecad.com.tw/digimemo/download.html z Open your e-Book file in the DigiMemo Manager software. Click the on the Standard toolbar.
Converting Your Handwritten Notes in Your e-Book File 1. If you have installed the optional DigiMemo Handwriting Recognition software, click the Conversion button on the Standard toolbar in the software window of DigiMemo Manager. 2. In the dialog box, select the following one option button: z Current Page In this option, you can choose the Selected area only check box. z All Pages z Select Pages You can select several pages by using CTRL or SHIFT key with mouse click. 3. Click OK.
of the pad, is accessed to your computer. The following procedures can be easily executed in your Windows. z Delete the digital page files in the built-in 32 MB storage device or the optional memory card of the digital pad. Here is a brief recommendation: you may want to tear off the paper page or simply cross out the page number you wrote on the paper page.
4. To select nonadjacent digital pages, click one digital page, and then hold down the CTRL key and click each additional digital page. To select adjacent digital pages, click the first digital page in the sequence, and then hold down the SHIFT key and click the last digital page. To preview a digital page, select the digital page and click Preview. 5. Click OK. The digital pages you select will be deleted.
Tablet Device in Windows When the digital pad is connected to your computer through a USB port, the will appear on the display of the pad and the LED on the Connection icon pad will light. The digital pad is a tablet device in Windows and for all Windows applications. You can use the digital pen on the horizontal writing area of the pad to move the mouse pointer on the screen. The pen tip of the digital pen is the primary button of the mouse.
Appendixes Replacing the Cartridge of the Digital Pen Open the cartridge compartment cover on the back of the digital pad. Two replacement ink cartridges and one plastic pen tip are stored in the cartridge compartment of the digital pad. Clip Hole To replace the cartridge of the pen, you may use a small clip to gently pull the old one out. Then insert a new one and press the cartridge tip firmly against a hard surface until it snaps into place.
the digital pen: Brand Model ACECAD Ink Cartridge Series Cross 8518-1 Zebra BR-8A-4C Lamy M21 Sterling (Target) 01800T SPALDING RFR80A STAEDTLER 930-ASBK3V Replacing the Battery in the Digital Pen Even though the battery of the digital pen can last approximately 14 months, the battery in the pen may be exhausted if any of the following situations occurs. If so, please replace the battery.
battery liquid leaking from the batteries and corroding the digital pen. z Avoid placing diskettes or other magnetic media on the pad surface. z Avoid placing hot or heavy items on the pad. z Clean the pen and pad with a soft cloth lightly dampened with water or a neutral detergent. z Never drop the pen or pad. The pen or pad may malfunction if subjected to strong shocks or vibration. z Avoid cutting or scratching the pad surface. z Never immerse the pen and pad in liquid.
4. Then release the Erase button . 5. When the reset is finished, the digital pad will be turned on. Note! Note! The display will show the current digital page 001 with no digital ink in the built-in 32 MB storage device if no SD memory card is loaded in the pad. Do not format the built-in 32 MB storage device through the format function in Windows. Or it will cause the incompatibility problem with the pad.
the root directory. The Damage of the Digital Pad — the Error Code E03 or E05 If the error code E03 or E05 appears on the display of the digital pad, it indicates that the digital pad may be damaged. It needs to be repaired. Please contact the ACECAD distributor. Troubleshooting General Problems Problem: A superimposed digital page is created. Solution: Make sure to select a blank digital page each time you change a page on paper.
thickness of the digital pad. Solution: Do not try to trace or write through any conductive material (for example: steel ruler). Problem: When you are writing or drawing on paper by using the digital pen on the digital pad, the Pen icon does not appear on the display. Solution: Try to alter the pressure you apply on the pen tip. Problem: After replacing the ink cartridge with the new one, the performance level of the digital pen is lowered.
Problem: Even though the stored digital pages have not reached 999, the memory (either in the built-in 32 MB storage device or in an optional memory card) is full. Solution: Although the digital pad has the ability to manage up to 999 digital pages (either for the built-in 32 MB storage device or for an optional memory card), such ability is unrelated to the maximum storage capacity.
Problems When Connecting the Digital Pad to your Computer Problem: When connecting the digital pad to your computer through a USB port, your Windows can not recognize the built-in 32 MB storage device and an optional memory card in the pad as removable storage devices. Solution: Please verify the followings: z The USB port is available. z Make sure that a power adapter provides enough power to the USB hub while connecting the digital pad via an USB hub.
Specifications Digital Pad Specifications of DigiMemo L2 Model Size 9.88" (width) x 13.22" (length) 251 mm (width) x 336 mm (length) Thickness 0.47" (12 mm) Weight Approx. 1.4 lbs (635 g) without batteries Approx. 1.5 lbs (680 g) with batteries Writing Area 8.5" x 11" (216 mm x 279 mm) Writing Thickness 0.55" (14 mm); approx. 140 sheets of paper Notepad Holder Holder for Letter size notepad; 8.5" x 11.9" (216 mm x 302 mm) Digital Page Size Letter size (8.
Power Source Supplied from USB port when connecting the digital pad to PC. Interface to PC USB port Digital Pen Specifications Size 134 mm (length) x 11.3 mm (diameter) 5.28" (length) x 0.45" (diameter) Weight 13.8 g (0.03 lbs) with battery Power Source One (1) 1.55V button cell battery (SR626SW, 377 or IEC-SR66) Battery Life Approx. 14 months Ink Cartridge 2.3 mm (diameter) x 67 mm (length) 0.09" (diameter) x 2.
www.acecad.com.tw Part Number: 91100-40590 English Version v1.0 Printed in China 2006.