
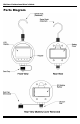
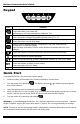
Product Overview

BluVac+ Professional User’s Guide
4
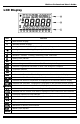
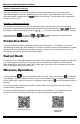
Keypad
Item Function
Press to Turn Power On.
Press and Hold to Turn Power Off.
While power is off, Press and Hold for Calibration Test.
Press and Release to Change Display Units.
Press and Hold to Change Temperature Display Units (°F or °C).
Press and Release to Start RUN Mode (Evacuation or Rise Time Analysis).
Press and Hold to Cancel RUN Mode .
Press to Switch Between Ambient Temperature, Leak Rate, and Saturation
Temperature on Alternate Display.
Upon Initiating RUN Mode, Press to switch between Evacuation and Rise Time
Analysis.
Press and Release to Activate/Deactivate Bluetooth Wireless Functionality
Press and Release to Activate Backlight.
Press or Press and Hold to Change Programmed Pressure or Time in SET Mode.
Press and Hold to Enter SET Mode.
Press and Release to Switch to Next Setting.
Press and Hold to Exit SET Mode.
Press and Hold to Mute/Un-mute Sound.
Quick Start
To operate the BluVac+ Pro as a basic vacuum gauge:
1. Install the battery as described in the “Battery Installation” section below.
2. Turn the power on by pressing . The display will show to indicate pressure greater
than 25,000 Microns.
3. Select the desired units by repeatedly pressing .
4. Attach the BluVac+ Pro to the system to be evacuated with a high quality vacuum hose or brass
coupler. Start the vacuum pump. Read the vacuum level from the Main Display.
5. Turn the power off by pressing and holding .
WARNING: To avoid damaging the BluVac+ Pro, only hand-tighten the sensor connection. If greater
torque is required, support the sensor body with a ¾” wrench. Do not use gauge body for leverage.
NOTE: To assist in the use of this gauge and the interpretation of vacuum information, please refer to
the Frequently Asked Questions Section at the end of this guide.