
Instruction manual


19
5. Reinstall the readhead if it has been removed from the scale. Care
should be taken to not damage the readhead’s sensitive internal
ground fingers. Also note the orientation label on the readhead
housing. Carefully slide the readhead onto the scale, checking for
the proper orientation.
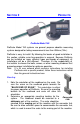
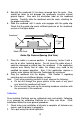
6. Slide the readhead until it meets and engages with the guide clip.
Check that the guide clip exerts sufficient pressure on the readhead,
as seen in the figure below.
7. Place the cable in a secure position. If necessary, fasten it with a
wire tie or other fastening device. Do not leave the cable where it
could be damaged or pulled from the readhead. If the application
requires over twenty feet of cable, the display may need to be
modified for proper operation. Also, if the application requires a
shorter scale, please call Accurate Technology for assistance.
8. Plug the readhead into the display. See Section 3 regarding
mounting and use of different display versions.
Note: If any other mounting method is used, observe the following:
a. Do not drill through the green portion of the scale at any point
over which the readhead will travel.
b. Do not mount the scale so the mounting hardware interferes with
the movement of the readhead.
Calibration:
Once installed, ProScale can be calibrated easily and quickly. Following
is an example for calibrating ProScale on a table saw fence. Other
installations follow the same general procedure.
1. Check to be sure installation of all parts is complete, all fasteners are
secure, and the display is plugged in.
2. Cut a part using the normal operation.
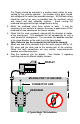
Readhead
Model 250 Scale
33.0mm (1.3")
21.2mm
(.83")
Guide Clip
Guide Clip Pressure/Spacing (End View)