
Instruction manual


16
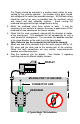
Calibration:
Once installed, ProScale can be calibrated easily and quickly. Following
is an example for calibrating ProScale on an industrial sander. Other
installations follow the same general procedure.
1. Check to be sure installation of all parts is complete, all fasteners are
secure, and the display is plugged in.
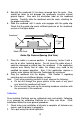
2. Set the machine to sand as normal. Using the regular operation, run
a part through the sander.
3. Measure the thickness of the sanded part with the most precise
measuring tool available (digital calipers if possible).
4. Press the zero key on the ProScale digital display.
Note: If the direction of movement and the direction shown on
the digital display are opposite, the position of internal jumper JP3
should be changed. See Section 3 for more information.
5. Press and hold the PLUS key to scroll until the thickness
measurement is displayed (the longer the PLUS key is held down,
the faster the display will scroll).
6. When the proper reading is reached, lock the display if desired. This
prevents accidentally re-zeroing of the display. See Section 3 for
more information about how to lock the display.
7. Re-calibrate, if necessary, after changing sanding belts (or
applicable tooling).
8. Calibration is not necessary after batteries are changed.
Maintenance:
The aluminum scale should be cleaned of debris often. This will prevent
premature damage to the scale or readhead. Should the scale become
difficult to move, check that it is thoroughly cleaned. Find and remove
any burrs which may have developed on the aluminum scale. Do not
use any liquid lubricants on the scale assembly, as this may:
1. Impede the readhead's ability to operate properly.
2. Attract other contaminants to the scale.
The Digital Display should be cleaned periodically with compressed air to
remove any dust on the lens and keys. All mounting fasteners should be
checked occasionally for tightness.