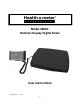
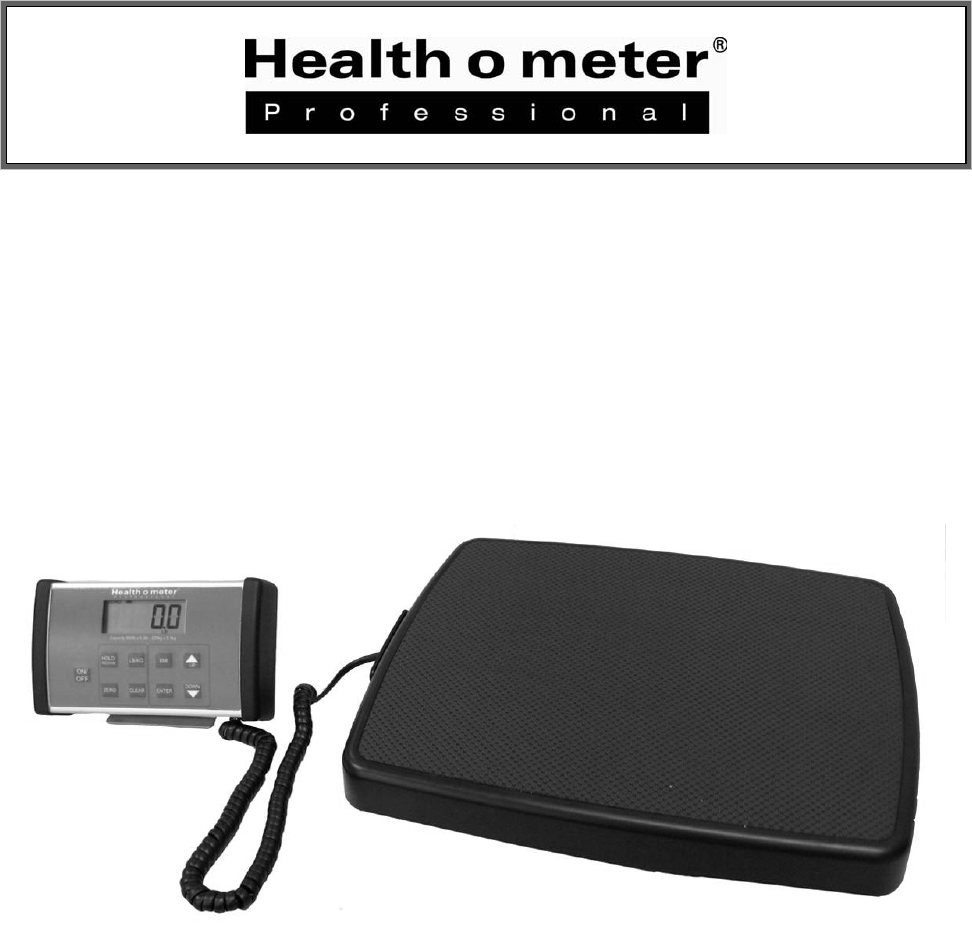
Model 498KL Remote Display Digital Scale User Instructions P/N UM498KL Rev 1-032612 1
Model 498KL Thank you for your purchase of this Health o meter® Professional product. Please read this manual carefully, and keep it for easy reference or training. TABLE OF CONTENTS Caution and Warning.................................................................................................3 Specifications for This Scale .....................................................................................4 Certifications / Connectivity / Disposal ....................................................
CAUTION AND WARNING To prevent injury and damage to your scale, please follow these instructions very carefully. Assemble and operate the scale per the enclosed user instructions. For accurate weighing, this scale must be placed on a flat, stable surface. For accurate weighing, verify before each use the proper operation according to the procedure described in this manual.
SPECIFICATIONS FOR THIS SCALE General The Model 498KL remote display digital scale uses highly sophisticated microprocessor technology. Each precision scale is designed to provide accurate, reliable and repeatable weight measurements. In addition, each scale is designed to provide the user with features that make the weighing process simple, fast, and convenient. This scale is set up to use motion-sensing weighing technology in order to determine the actual weight of a moving patient.
CERTIFICATIONS / CONNECTIVITY / DISPOSAL Certification Descriptions Pelstar, LLC has been officially certified as the manufacturer of Health o meter® Professional medical devices. The Pelstar, LLC quality assurance system covers the development, production, sales and service of medical scales and measuring systems. This product is tested to and meets the requirements of: 1. UL60601-1 First Edition: Safety for Medical Electrical Equipment 2. CSA C22.2 No.
498KL ASSEMBLY INSTRUCTIONS Before Assembly Each 498KL remote display digital scale is shipped disassembled in one carton. Carefully inspect the carton for shipping damage before unpacking. If damage is found, contact your shipper or a Health o meter® Professional representative immediately at 1-800-815-6615. Claims must be filed with the shipper as soon as possible after receipt of the package. The following information details what you will find inside the main carton as you unpack the parts for assembly.
498KL ASSEMBLY INSTRUCTIONS (CONTINUED) Assembling the 498KL Scale (Refer to Figures 1 – 4) Note: For wall mounting, mount display assembly directly to the wall do not use display bracket for wall mount. Display bracket is for surface use only. 1. Carefully remove the scale platform with the display assembly from the carton, and place the scale platform and display assembly on a flat, level, and dry surface (see Figure 3). 2.
498KL ASSEMBLY INSTRUCTIONS (CONTINUED) Display Bracket Mounting studs Screws Center tab Plate A Screw holes Tab Plate B Figure 1 Scale platform RJ jack Adaptor Jack Figure 2 8
498KL ASSEMBLY INSTRUCTIONS (CONTINUED) Scale platform Display assembly RJ jack Cable Figure 3 9
DISPLAY ASSEMBLY WALL MOUNT INSTRUCTIONS Display Assembly Wall Mounting Instructions (Refer to Figure 4) Caution: When wall mounting the display assembly, ensure that the mounting location is free of electrical lines, gas pipes, and other safety hazards. Ensure that wall is of construction that can support the display assembly. Note: Remote head can be mounted to a wall up to 6 feet (1.83 m) from the base or it can be mounted on the display bracket (included) for placement on a table up to 6 feet (1.
DISPLAY ASSEMBLY WALL MOUNT INSTRUCTIONS (CONT) Display assembly Mounting hole 2-¾” (70 mm) 3.1” (80 mm) Mounting hole 3.
SETUP / BATTERIES / TRANSPORT Preparing the 498KL Scale for Use Replacing / Inserting Batteries 1. Remove the protective plastic film covering the display (the film says “FACTORY CALIBRATED”). 2. Unplug the optional AC adapter, if connected to a power source. 3. Use a Phillips head screwdriver to remove the battery cover on the side of the display assembly by unscrewing the (2) battery cover screws (see Figure 5). 4. Replace or install the batteries with new units.
SETUP / BATTERIES / TRANSPORT (CONTINUED) Preparing the 498KL Scale for Use Optional AC Adapter 1. Remove the protective plastic film covering the display (the film says “FACTORY CALIBRATED”). 2. Connect the optional AC adapter into the adaptor jack on the scale platform (see Figure 2). Warning: To avoid a safety hazard, use AC adapter model ADPT30 (International, plug kit) or ADPT31 (Domestic, USA). 3. Plug the scale’s AC adapter into the power source. 4.
SETUP / BATTERIES / TRANSPORT (CONTINUED) Preparing a 498KL Scale for Transport This scale can be easily placed into carrying case (# 64771) for storage, or transport from one room to another. This scale does not include the carrying case item # 64771, and must be acquired separately (see Figure 6). To prepare the scale for transport, follow these steps: 1. Remove the display assembly and display bracket from its current position. 2.
SETUP / BATTERIES / TRANSPORT (CONTINUED) Scale platform Display assembly Display bracket Figure 7 Strap Figure 8 15
QUICK START / OPERATING INSTRUCTIONS Keypad Figure 9 Function ON/OFF ZERO HOLD/RELEASE BMI Description Turns scale on and off. Tares the scale prior to a weighing. Holds the weight value of the patient on the display until the button is pressed again to clear the value. Prompts entry of height data to calculate patient’s Body Mass Index (BMI). LB/KG Toggles between pounds (LB) and kilograms (KG). CLEAR Clears the incorrect height input when in BMI mode. UP▲ Increases height input (0.5 in / 0.
QUICK START / OPERATING INSTRUCTIONS (CONT) Auto-Off Function As an energy saving feature, the scale will automatically turn off after 2 minutes of inactivity. By default this function is enabled. Note: Ensure cable is attached to the display assembly RJ jack, and make sure there is no object on the scale platform. Disable Auto-Off 1. While the scale is turned off, press and hold the HOLD/RELEASE button. 2. While holding the HOLD/RELEASE button, press the ON/OFF button to turn the scale on. 3.
QUICK START / OPERATING INSTRUCTIONS (CONT) Weighing a Patient Note: When this scale is turned on, it will always default to the settings and units last used (LB or KG). 1. Make sure there is no object on the scale platform. 2. Press the ON/OFF button to turn the display assembly on. 3. Wait until the “0.0” LB or “0.0” KG appears on the display. 4. Ask the patient to step on the scale.
QUICK START / OPERATING INSTRUCTIONS (CONT) Zero Function When using this scale, the weight of an object, can be zeroed out allowing additional weight to be added and displayed. The zero function automatically performs this subtraction. Note: Ensure there are no object on the scale platform. Zero (Push Button) 1. With all weight off the scale, press the ON/OFF button to turn on the scale. 2. Wait until the “0.0” LB appears on the display. 3. Set the unit (LB or KG). 3. Place the object on the scale.
MAINTENANCE Maintenance The following pages provide instructions for maintenance, cleaning, calibration, and troubleshooting for the 498KL scale. Maintenance operations other than those described in this manual should be performed by qualified service personnel. Caution: Before first use, or after long periods of non-use, check the scale for proper operation and function. If the scale does not operate correctly, refer to qualified service personnel. 1.
CALIBRATION Calibration This scale has been factory calibrated, and does not require calibration prior to use. If required, the scale can be calibrated. Calibration of your 498KL scale is performed using kilograms (KG) or pounds (LB), according to the units of measure used upon entering into the calibration path. The following calibration assumes the scale is set to pounds, and 100 (40 kg) / 200 (80 kg) / 300 (120 kg) / 500 (200 kg) lb is employed as the calibration standards.
TROUBLESHOOTING Troubleshooting Before contacting service personnel, refer to the following instructions to check and to correct any failures. Symptom Scale does not turn on Possible Cause Corrective Action 1. Dead battery 1. Replace batteries 2. Faulty electrical outlet 2. Use a different outlet 3. Bad power supply 3. Replace AC adapter 1. External object interfering with the scale 1. Remove interfering object from the scale 2. The display did not show “0.0” before weighing 2.
WARRANTY Limited Warranty What does the Warranty Cover? Health o meter® Professional scales are warranted from date of purchase against defects of materials or in workmanship for a period of two (2) years. If product fails to function properly, return the product, freight prepaid and properly packed to Pelstar, LLC (see “To Get Warranty Service”, below, for instructions).