BLOOD GLUCOSE METER Instructions for use
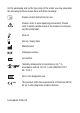
On the packaging and on the type plate of the meter you may encounter the following symbols shown here with their meanings: Please consult instructions for use Caution (refer to accompanying documents). Please refer to safety-related notes in the manual accompanying this instrument. Store at Use by / Expiry date Manufacturer Catalogue number Lot number Tested by Underwriter’s Laboratories, Inc.© in accordance with UL 61010-1 and CAN/CSA C22.2 No.
Intended use Blood glucose meter for quantitative blood glucose testing using Accu-Chek Go test strips. Suitable for self-testing. The Accu-Chek Go meter may be used by patients who test their own blood glucose as well as by healthcare professionals for monitoring patients’ blood glucose values. Healthcare professionals must read the instructions in Chapter 11 “Testing blood glucose in more than one patient – Directions for healthcare professionals”.
About this Instructions for use Please read this Instructions for use carefully and completely before testing blood glucose for the first time. If you have any questions, please contact your local customer support and service centre (see Chapter 19). This Instructions for use will help you get to know your new meter step by step. It will provide you with all the information you need to operate, troubleshoot and care for your meter.
Please read with special attention all text in this booklet that is preceded by the following symbols. This symbol signifies a possible risk of injury or of damage to your health. This symbol indicates that your meter is at risk of being damaged. i This symbol highlights important information. Other symbols are used, too: P This symbol is a cue for you to do something, such as turn the meter on. O This symbol signifies a list. J This symbol signifies a list within a list.
Contents 1 Introduction................................................................................. 10 1.1 The Accu-Chek Go blood glucose meter at a glance............. 10 1.2 Main features....................................................................... 12 1.3 Display features................................................................... 15 2 Initial steps before testing.......................................................... 16 2.1 Checking the contents................................
5 Testing blood glucose................................................................. 72 5.1 Preparing to test blood glucose............................................ 72 5.2 Turning the meter on............................................................ 72 5.2.1 Turning the meter on with a test strip....................... 72 5.2.2 Turning the meter on with the Þ button................. 76 5.2.3 Notes....................................................................... 78 5.
7 Acoustic Mode.......................................................................... 116 7.1 Beep tones at power-on..................................................... 118 7.2 Beep tones during blood glucose testing............................ 118 7.3 Announcement of the result following a test....................... 119 7.4 Announcement of results saved in memory........................ 122 7.5 Announcement of symbols and error messages................. 123 8 Checking your meter...................
13 Symbols, error messages and troubleshooting....................... 159 13.1 Symbols shown in the display............................................ 160 13.2 Error messages and troubleshooting.................................. 169 14 Technical data........................................................................... 180 15 Disposing of your meter........................................................... 184 16 System components.................................................................
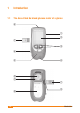
1 Introduction 1.
1 Top and sides a Þ button Turn on or off, start a set-up to change settings, save entry b Display c < and > buttons Change settings (increase and decrease value, respectively), retrieve results, request averages d Test strip guide – this is where you insert the test strip e Measurement optics cover f Test strip ejector g Code chip (supplied with the test strips) h Infrared port for downloading results to a PC, for instance Bottom g Code chip (supplied with the test strips) i Code chip slot j Type plate k
1.2 Main features Fast testing The meter needs only approximately 5 seconds for each test. Simple blood dosing Blood is drawn up into the strip through capillary action. This makes it easy to dose and test blood from alternative sites such as the base of the thumb or forearm. Blood volume checking Testing starts automatically when the meter detects that you have applied sufficient blood (approximately 1.5 µL (1 µL (microlitre) = one thousandth of a millilitre)).
1 Two ways to change settings You can change settings such as the time in two different ways: using Standard set-up or Quick set-up. Standard set-up takes you step by step through all the available settings. Quick set-up allows you to go directly to the setting you wish to change. Alarm clock function You can set up to four separate times at which you would like the meter to remind you to test your blood glucose. Target range for results You can define a target range for your results.
Acoustic Mode Acoustic Mode is intended for persons who are visually impaired. When Acoustic Mode is turned on, the meter guides you through the testing process using beep tones; it also announces the test result as a series of beeps. For more information see Chapter 7. Visually impaired persons need a sighted person to instruct them in the use of the meter and to assist them with all aspects of its operation.
1 1.3 Display features Throughout these Instructions for use you will see examples of what the display looks like. Any elements that are shown surrounded by a halo in this booklet actually flash on the meter’s display. Example: You have turned on the meter to perform a blood glucose test. In the display you see the test strip symbol and blood drop symbol. The drop symbol is flashing. Flashing blood drop symbol The time, date and blood glucose results shown in the display are intended only as examples.
2 Initial steps before testing 2.1 Checking the contents Check that your monitoring kit is complete. The package contents are listed on the box. If anything is missing, please contact your local customer support and service centre. Contact details are given at the end of Instructions for use. 2.2 Checking the unit of measurement for blood glucose Blood glucose results can be displayed in two different units (mg/dL or mmol/L). Consequently, two different versions of the same meter are available.
2 2.3 Removing the protective film from the battery The meter is sold complete with one lithium battery (type CR 2032) already inserted. A plastic film protects the battery from becoming drained prematurely. Before using the meter, remove the protective film. P Turn the meter upside down. You will see the film projecting from the battery compartment cover. P Simply pull the film vertically out of the meter. You do not need to open the battery compartment to do this.
2.4 Performing a full display check To verify that all of the display elements are properly displayed, carry out a full display check. P Briefly press the < and > buttons at the same time. The meter turns on and all of the display elements are displayed.
2 mg/dL meter or mmol/L meter P Compare the display screen of your meter with the one shown above. If any of the display elements are missing or the unit shown for the blood glucose result is not the correct one, please ask your dealer/ pharmacy to exchange the meter. P Press any button to terminate the display check and turn off your meter.
Notes i Please refer to Chapter 13.1 “Symbols shown in the display” for a complete list. i The meter turns off automatically after 60 seconds, even if you have not turned it off manually by then. i You can perform a full display check whenever you wish as long as the meter is on and no test strip is inserted.
3 Entering settings 3 You can enter settings to select the time-and-date format, to set the time and date, to turn the beep tone and Acoustic Mode on or off, to define a target range and to set alarms. Beep tone: When the beep tone is turned on, it provides user support during testing by marking the start of each step acoustically. Acoustic Mode: When Acoustic Mode is turned on, the meter guides you through the testing process using beep tones; it also announces the result as a series of beeps.
You can still perform blood glucose tests even if no settings have been entered. The date and time are not set, however, and the meter shows 0:00 (0:00 am) as the time and 0- 0 as the date. In memory the results are saved not with the time and date but with their memory location number (see Chapter 6.2 “Retrieving results from memory”). Also, if the time and date have not been set, the meter is unable to calculate averages (see Chapter 6.3 “Requesting 7, 14 and 30 day averages”.
3 When you turn the meter on for the first time to enter settings, it displays the following factory defaults.
3.1 Two ways of changing settings There are two methods in which you can change your meter settings: through Standard set-up and Quick set-up. Both ways are described below, followed by more instructions on how to enter individual settings.
3 Standard set-up takes you step by step through all the available settings. Standard set-up is therefore best for entering initial settings into your meter. The order in which you enter settings is shown in the overview on page 26. You can only enter settings in the order shown (from top to bottom). Quick set-up allows you to select just the setting you wish to change. Quick set-up is therefore best for quickly changing individual settings.
3.1.1 Standard set-up overview Turning on the meter Press briefly Starting Standard set-up Press and hold down (for more than 3 seconds) Time-anddate format Time Date Beep tone Target range Alarm clock function Press briefly (turn off) A detailed overview of this set-up is provided in Chapter 21 at the end of these Instructions for use.
3 3.1.2 Quick set-up overview Turning on the meter and starting Quick set-up Press and hold down (for more than 3 seconds) Time-anddate format Beep tone Target range Alarm clock function Time Date Press briefly (turn off) A detailed overview of this set-up is provided in Chapter 22 at the end of these Instructions for use.
3.2 Set-up operations In the sections set out below you will be able to read O a description of the general rules for changing settings, O instructions for starting Standard set-up and Quick set-up, O descriptions of individual settings and how to change them. The descriptions of settings are in the order in which they appear in Standard set-up (see overview on page 26). Note i 28 You can only perform set-up operations when there is no test strip in the meter.
3 3.2.1 Changing settings – General rules When set-up is displayed, it indicates that the meter is in one of the two set-ups and you can change settings. The following rules apply when you change settings: O The setting currently flashing can be changed using the < and > buttons. J Pressing the < button decreases a number such as the year by 1, pressing the > button increases it by 1. Pressing and holding down either button increases or decreases the number quickly one digit at a time.
O Press the Þ button J to scroll from one setting to the next without changing anything (this also saves the unchanged setting), J to save settings you have changed, J to turn the meter off when End is displayed, J to leave the set-up at any time and turn the meter off. To do this, press and hold down the button for at least 3 seconds - all changes you have made up to then will be saved.
3 3.2.2 Starting Standard set-up To start Standard set-up, proceed as follows: P With the meter turned off, press the Þ button briefly (for less than 3 seconds). The meter turns on.
If no code chip is inserted in the meter, three horizontal bars are displayed and the word code flashes. As soon as a code chip is inserted in the meter (see Chapter 4 “Coding”), the flashing test strip symbol is displayed: Note i 32 You can turn the meter off again. To do this, press the Þ button briefly.
3 P Press the Þ button again, this time holding it down (for longer than 3 seconds) until the following screen appears. or 24-hour format 12-hour format You are in Standard set-up. The first setting is displayed, i.e. the timeand-date format. The format that is currently set – 24-hour or 12-hour – flashes in the display. If you wish to continue with Standard set-up, proceed to Chapter 3.2.4 “Setting the time-and-date format, time and date”. Note i You can turn the meter off again at any time.
3.2.3 Starting Quick set-up To start Quick set-up, proceed as follows: P With the meter turned off, press and hold down the Þ button (for longer than 3 seconds) until the following screen appears. You are in Quick set-up and F1 is flashing in the display.
3 Beep tone and Acoustic Mode (page 45) Beep tone symbol Target range (page 50) Symbol for target range Alarm clock function (page 60) Symbol for alarm clock function Exit Quick set-up without entering anything Entering settings 35
P Press the < or > button now to access the desired group of settings. P If F1, F2, F3 or F4 is displayed: Press the Þ button briefly if you wish to change the settings in the group currently being displayed. If End is displayed: You can turn the meter off. To do this, press the Þ button briefly. The settings are described in the chapters that follow. Note i 36 You can turn the meter off again at any time. To do this, press and hold down the Þ button for longer than three seconds.
3 3.2.4 Setting the time-and-date format, time and date You can choose between two formats. In 24-hour format the time is displayed from 0:00 to 23:59. If you select this format, the date is displayed in the format DD-MM (day-month, no year displayed). In 12-hour format the time is displayed from 12:00 to 11:59 accompanied by a.m. or p.m. If you choose this format, the date format changes to MM-DD (month-day, no year displayed). The time-and-date format is shown together with the current time.
In Quick set-up these settings are in group F 1. The first three settings in Standard set-up are the time-and-date format, time and date.
3 The settings appear in the following order: O Time-and-date format O Time J Hours J Minutes O Date J Year J Month J Day P Press the < or > button O to change between 24-hour format and 12-hour format, O to set hours, minutes, year, month and day. P Press the Þ button to save the setting and take you to the next setting.
Time-and-date format The time-and-date format is factory-set to 24-hour format. Time The time is factory-set to 0:00 hours (12:00 a.m.).
3 Minutes Time Date The date is factory-set to December 31 in the year of manufacture.
Month Day 42 Entering settings
3 In Standard-set-up you have reached the beep tone setting Beep tone symbol Entering settings In Quick set-up you have reached the end of group F 1. End is displayed. P Press the Þ button briefly. The meter turns off.
Notes i The year is only displayed when you are in a set-up. It is not displayed during testing, nor with the result, nor when you review results saved in memory. Having the correct year entered is still important, however, so that the meter can recognize February 29 in leap years. The correct year is also needed to provide a unique date stamp for your test results if you download them to a computer for further analysis.
3 3.2.5 Setting the beep tone or Acoustic Mode This setting enables you to turn the beep tone on or off and to activate Acoustic Mode.
In Standard set-up beep tone and Acoustic Mode is the fourth setting. In Quick-set-up this setting is under F 2.
3 The current beep tone setting is seen flashing in the display. The beep tone is factory-set to on (0n1). Beep tone turned on Beep tone turned off Acoustic-Mode turned on P Press the < or > button to select the next option. P Press the Þ button to save the setting.
In Standard set-up you have reached the target range setting. Symbol for target range 48 In Quick set-up you have reached the end of group F 2. End is displayed. P Press the Þ button briefly. The meter turns off.
3 Notes i When you select Acoustic Mode 0n2 (from 0n1 by pressing the > button or from 0FF by pressing the < button), you hear a beep. i The beep tone setting has no influence on the alarm clock function (see Chapter 3.2.7). If you have turned the alarm clock function on, the meter will always beep to remind you to test your blood glucose even if the beep tone itself is turned off.
3.2.6 Setting the target range The target range feature allows you to set your personal upper and lower limit. Ask your doctor to advise you what the best target range is for your blood glucose results. You have three different options for setting the limits. You can set O just a lower limit, O just an upper limit, O both limits. As soon as a test result is below or above one of the limits of your target range, you see the flashing symbol displayed along with the result.
3 The target range is factory-set to off. In Standard set-up target range is the fifth setting. In Quick set-up the setting is under F 3.
Turning the lower limit on or off LL stands for Limit Low Turned off Turned on Set limit Upper limit P Press the < or > button to turn the lower limit (signified by LL) on (0n) or off (0FF). P Press the Þ button to save the setting.
3 If you selected 0n , you see the current value displayed. If the beep tone is turned on (0n1), you also hear 3 long beeps. These also sound following a test if the result is below the lower limit. The beep tones are used here for illustration only. If you selected 0FF, you move to the upper limit setting. Proceed to page 55. Setting the limit (numerical value) The lower limit is factory-set to 80 mg/dL (4.4 mmol/L).
P Press the < or > button repeatedly until the chosen numerical value is displayed. Pressing and holding down either button increases or decreases the number initially by one digit at a time and subsequently by 10 at a time. P Press the Þ button to save the setting. Next is the upper limit setting.
3 Turning the upper limit on or off LH stands for Limit High Turned off Turned on Set limit Alarm 1 Standard set-up Quick set-up P Press the < or > button to turn the upper limit (signified by LX) on (0n) or off (0FF). P Press the Þ button to save the setting.
If you selected 0n, you see the current value displayed. If the beep tone is turned on (0n1), you also hear 3 short beeps. These also sound following a test if the result is above the upper limit. The beep tones are used here for illustration only. If you selected 0FF, you move to the alarm clock function setting. Proceed to page 60. Setting the limit (numerical value) The upper limit is factory-set to 180 mg/dL (10.0 mmol/L).
3 P Press the < or > button repeatedly until the chosen numerical value is displayed. Pressing and holding down either button increases or decreases the number initially by one digit at a time and subsequently by 10 at a time. P Press the Þ button to save the setting. In Standard set-up you have reached the alarm clock function setting. Symbol for alarm Entering settings In Quick set-up you have reached the end of Group F 3. End appears in the display. P Press the Þ button briefly. The meter turns off.
Notes If you wish to use the lower limit as a warning of a possible hypo, remember this: the warning is only permissible if the limit has been correctly set. We therefore recommend that you do not set the limit until you have discussed the matter with your treating physician. This function is not a substitute for hypoglycaemia instruction by your doctor or diabetes team.
3 i If, when setting the limits, you have reached the smallest possible or the greatest possible value, the meter beeps and you cannot move down or up any further by pressing the < button and > button, respectively. i If you selected Acoustic Mode (0n2), the beep tones will be suppressed. This is to prevent confusion with other beep tones. In Acoustic Mode, therefore, there is only a flashing symbol if a test result is outside the set limits. i Each person will have his/her own target range.
3.2.7 Setting the alarm clock function You can use the meter’s alarm clock function to remind you to test your blood glucose at pre-defined times. You can set four alarms. The meter beeps for 20 seconds at the appointed time every day. The meter then turns off again. You can stop it beeping by pressing any button.
3 All alarms are factory-set to off. Each alarm has a factory-set default time: Alarm 1 (AL1): 8:00 (8:00 a.m.) Alarm 2 (AL2): 12:00 (12:00 p.m.) Alarm 3 (AL3): 18:00 (6:00 p.m.) Alarm 4 (AL4): 22:00 (10:00 p.m.) AL is short for English “alarm”, as in “alarm clock”.
In Standard set-up, alarm clock function is the sixth and final setting. Turning on the meter In Quick set-up this setting is under F 4.
3 Two steps are involved in entering the setting. First you define whether a given alarm is to be turned on (0n) or off (0FF). When it is on, you can enter or change the time. Alarm time Setting 0FF (turned off) The procedure is the same for each alarm. Alarm 1 is used below for illustrative purposes.
Turning the alarm clock function on or off Turned 0n or turned 0ff Enter alarm time P Press the Þ button briefly. The meter turns off. Note i 64 If alarm 1 was already turned on at some time in the past, the setting for alarm 2 is displayed instead of End.
3 P Press the < or > button to turn the alarm on (0n) or off (0FF). P Press the Þ button to save the setting. If you selected 0FF, either End is displayed or you move to the setting for alarm 2. If you selected 0n, you can now enter the time. The hour flashes at top left of the display.
Entering alarm times Hours Minutes Alarm 2 66 Entering settings
3 P Press the < or > button repeatedly until the correct hour is displayed. P Press the Þ button to save the setting. You move to the minute setting. The minutes flash at top left of the display. P Press the < or > button repeatedly until the correct minutes are displayed. P Press the Þ button to save the setting. You move to the setting for alarm 2. When you have set all of the alarms, you have reached the end both of Standard set-up and of group F 4 of Quick set-up. End is displayed.
Notes i You can only turn the alarm clock function on (0n) and set alarm times when you have also set the date and time. i If you lose the date and time settings while changing the battery (see Chapter 10 “Changing the battery”), all alarms are automatically turned off (0FF). All of the times you set, however, are retained in the meter’s memory. You then need to turn the alarms on again (0n).
3 i To save you going through all the alarms if you only use alarm 1, not all of the alarms are displayed. When your meter is new, therefore, only alarm 1 is visible. If you leave this turned off, End is shown next in the set-ups. Only when you have turned alarm 1 on is alarm 2 visible in the set-ups. Alarms 3 and 4 remain invisible. They only appear when you have turned on alarms 2 and 3, respectively.
4 Coding The meter receives information about the properties of the test strip from the code chip attached to the test strip container. Each time you open a new container of test strips, you will need to insert the code chip that came with that container into your meter. Code chips from other containers may contain the wrong information for your new test strips, rendering test results incorrect.
4 P Compare the code number printed on the chip with the code number printed on the label of the container the test strips came in. The three-digit code (e.g. 963) on the code chip must match the threedigit number on the label. When coding, leave the meter turned off. P Gently slide the code chip into the slot on the side of the meter until you feel it engage.
5 Testing blood glucose 5.1 Preparing to test blood glucose You will need the following items to carry out the test: O your meter with the code chip inserted O the container of Accu-Chek Go test strips you took the code chip from O a lancing device to collect blood O lancets for the lancing device 5.2 Turning the meter on There are two ways to turn the meter on: with a test strip or by pressing the Þ button. 5.2.
P Take a test strip from the container and close the container again immediately. P Hold the test strip so the arrows printed on it are uppermost and pointing towards the test strip guide. P Without bending it, gently push the test strip into the test strip guide until you feel it engage. The meter turns on. The meter first performs a standard display check lasting approx. 2 seconds. mg/dL meter mmol/L meter P Check that all the segments making up the numerals 888 (mg/dL meter) or 88.
Following the display check, the code number appears in the display (963 is just an example). P Check that the same number is printed on the label of the test strip container.
If the numbers are not the same: did you really insert the code chip that came with the container of test strips you are using? If the answer to this is yes, please contact your local customer support and service centre (see Chapter 19). After the code number has been displayed, you see the test strip symbol with a flashing blood drop. When the beep tone is turned on, the meter beeps at this point. The meter is ready to perform a blood glucose test.
5.2.2 Turning the meter on with the Þ button Instead of using the test strip to turn the meter on, you can also press the Þ button and then insert the test strip. P With the meter turned off, press the Þ button briefly (for less than 3 seconds). The meter turns on. After the meter has turned on, you see the following displays: Standard display check Code number display (963 is just an example) Notes See Chapter 5.2.1 for details of the standard display check and the code number display.
The flashing test strip symbol is your cue to insert the test strip in the meter. P Take a test strip from the container and close the container again immediately. P Hold the test strip so the arrows printed on it are uppermost and pointing towards the test strip guide. P Without bending it, gently push the test strip into the test strip guide until you feel it engage. After that a flashing blood drop symbol is displayed and the test strip symbol stops flashing.
5.2.3 Notes Only operate your Accu-Chek Go meter with Roche Diagnostics GmbH-approved Accu-Chek Go test strips. If you use the wrong test strips, your results will be incorrect. Incorrect results can cause the wrong therapeutic decision to be taken and so lead to serious adverse health effects. The test strips are sensitive to humidity. Make sure your hands are completely dry when you take the test strip from the container.
Ensure that the measurement optics cover (see pages 10 and 11) is firmly and properly attached to the meter when you turn it on. A cover that is not properly attached can lead to incorrect results. Incorrect results can cause the wrong therapeutic decision to be taken and so lead to serious adverse health effects. If the code number displayed does not match the code number on the test strip container, do not test blood glucose. Improper coding leads to incorrect results.
If the standard display check shows anything other than 888 or 88.8, the meter will not be able to display results correctly. For example, the display may look like this (just one of various possibilities): mg/dL meter i mmol/L meter If you see only three horizontal bars instead of a code number and code is flashing, no code chip is inserted in the meter. P Gently slide the code chip into the meter (see page 71). You then see the code number displayed.
i 5.3 If you press the Þ button to turn the meter on and there is already an unused test strip in the test strip guide, the code number is followed not by the flashing test strip symbol but straight away by the flashing blood drop symbol. Performing a blood glucose test P Prepare your lancing device to collect blood. P Wash your hands with warm water and soap, and dry them well. This helps ensure proper hygiene and stimulates blood flow. P Turn the meter on.
When the beep tone is turned on, the meter also beeps at this point. The meter is ready to perform a blood glucose test. Now allow the test strip to draw up blood. You have approximately 90 seconds to perform this action. P Prick the side of a fingertip. P Gently massage the finger towards the fingertip to encourage a drop of blood to form. P Hold the meter with the test strip pointing downwards (see illustration).
P Move the finger away from the test strip as soon as the hourglass symbol is displayed and the meter beeps (only when the beep tone is turned on). The test strip has then drawn up enough blood, and the test starts. The hourglass symbol indicates that the meter is busy measuring. The test is complete after approx. 5 seconds. The result is displayed and the meter beeps (only when the beep tone is turned on). The meter automatically saves the result in its memory.
Notes Do not bend the test strip before it draws up blood or while it is drawing up blood, and do not bend or move the test strip while the test is in progress. Bending or moving the test strip can produce an incorrect result or cause an E-6 (see page 176) error message to be displayed. Allowing the test strip to draw up blood too early, i.e. before the flashing blood drop symbol has appeared, can produce an incorrect result or cause error message E-1 (see page 172) or E-6 (see page 176) to be displayed.
i Once the flashing blood drop symbol has appeared, you have approx. 90 seconds to apply blood to the test strip. After this time, the meter automatically turns off. Remove the test strip by pushing the ejector down (see page 86) and discard the test strip. Start the blood glucose test again with a new test strip. i If the test does not start, the test strip drew up too little blood.
5.4 Ejecting the test strip P Hold the meter directly above a waste bin with the test strip pointing downwards. P Push the test strip ejector down as far as it will go towards the test strip guide. The test strip drops out.
After the test strip has dropped out, End is displayed twice letter by letter from left to right. The meter then turns off automatically. Notes Always use the test strip ejector to remove the test strip. Do not pull the test strip out. If you do pull it out, blood can enter the meter and contaminate it. i The meter beeps after approx. 60 seconds if you do not eject the test strip. It beeps five more times within approximately the next 30 seconds.
During the time in which End is displayed the meter performs a self-test, except when the meter has turned off automatically because you failed to eject the test strip. Always eject the test strip following a test in order to allow the meter to perform the self-test. i After you have ejected the test strip, wait for the meter to turn off before inserting a fresh test strip for a new test. If you insert a test strip when End is displayed, the meter turns off regardless.
5.5 Symbols seen during testing and what they mean You may see the following symbols displayed during or after a test. For further information please refer to Chapter 13.1. The beep tone (0n1) or Acoustic Mode (0n2) is turned on. You have turned on at least one alarm. Flashing while the result is displayed: You have turned the target range on. The result is outside one of the limits.
5.6 Flagging special results You can flag special results, e.g. results obtained from alternative site testing or after exercise, with an asterisk . You can do this only as long the result is being displayed and you have not ejected the test strip.
P Press the < or > button repeatedly until the asterisk is displayed. 5 The display cycles through the asterisk at bottom right, a bottle at bottom left, or no symbol displayed. You can therefore use the < and > buttons to remove the asterisk. If you subsequently eject the test strip and so turn the meter off, the result is saved together with the asterisk. Note i The bottle symbol is used to flag performance checks (see Chapter 8.2 “Performing a performance check”).
5.7 Evaluating results If the displayed test result reflects the way you feel, continue as instructed by your doctor. If the displayed test result does not reflect the way you feel, please perform a performance check with an Accu-Chek Go control solution and a new test strip (see Chapter 8 “Checking your meter”). Then perform another blood glucose test. If the latest test result still does not reflect the way you feel, please contact your doctor. Do not change your treatment based on just one result.
5.7.1 Measuring range 5 Your meter measures blood glucose within a defined range (10-600 mg/dL or 0.6-33.3 mmol/L). Results that are below this range are displayed as: The result is lower than 10 mg/dL (0.6 mmol/L). Results that are above this range are displayed as: The result is higher than 600 mg/dL (33.3 mmol/L). These results are ignored during averaging (see Chapter 6.3 “Requesting 7, 14 and 30 day averages”).
5.7.2 Implausible results – possible sources of error If you receive frequent error messages or often obtain implausible results, please check the following: Did you take the test strip from the container that the code chip in the meter came with yes Did you perform the test as directed (see Chapter 5.
Is the measurement optics cover properly and firmly in place on the meter (see Chapter 9 “Cleaning your meter”)? yes Are the test strips past their expiry date (look next to the symbol on the test strip container label and also look in the display to see if exp is shown)? no Are the test strip guide and measurement optics clean (see Chapter 9 “Cleaning your meter”)? yes Have you observed the proper storage conditions for the meter and test strips (see Chapter 12 “Measurement and storage conditions” an
6 Using the meter as a notebook 6.1 Memory Your meter has a 300-location memory for saving results together with their time and date (only when the time and date have been set in the meter). You do not need to save the results specially. The meter automatically saves all results and numbers them consecutively. The most recent result is always saved in memory location 1, the result preceding it in memory location 2, and so on, up to memory location 300.
6.2 Retrieving results from memory 6 P With the meter turned off, press the < or > button briefly. The meter turns on. The most recent result is displayed together with the time, date and memory.
Retrieving earlier results from memory: P Press the < button once to move back one result. By pressing and holding down the < button, you can scroll quickly through the results, initially one result at a time and subsequently 10 at a time. Once you have reached the oldest memory location (i.e. the highestnumbered location, see Chapter 6.1), the meter beeps each time you press the < button. To return to the more recent results, press the > button. To fast-scroll, press and hold down the > button.
Notes i Pressing the > button when the most recent result is displayed takes you to the average for the last 7 days (see Chapter 6.3). If the beep tone 0n1 is turned on, the meter also beeps at this point. i The meter turns off automatically when you have not pressed a button for 90 seconds. i If the time and date were not set at the time of testing, then the memory location number is displayed instead of the time and date.
i 6.3 You can move directly from reviewing results in memory to blood glucose testing by inserting a test strip in the test strip guide. The meter behaves as if it had been turned on with a test strip (see Chapter 5.2.1 “Turning the meter on with a test strip”). Requesting 7, 14 and 30 day averages The meter can display the average of results from the last 7, 14 or 30 days. The calculation is based on all results falling within the chosen period. The current day is always included in the calculation.
The meter turns on. The most recent result is displayed together with the time, date and memory. 6 P Press the > button. The 7 day average is displayed along with memory. If the beep tone 0n1 is turned on, the meter also beeps at this point. a The number of results n used in the calculation is displayed at top left (in this example: 24). b The number of days over which the average was calculated is displayed at top right (in this example: 7).
P Press the > button to move to the other averages. P To return to the previously displayed averages, press the < button. You can exit the average screen at any time: P To do so, press the Þ button. The meter turns off.
Notes i Pressing the < button when the 7 day average is being displayed takes you to the most recently saved result (see Chapter 6.2). If the beep tone 0n1 is turned on, the meter also beeps at this point. i The meter turns off automatically when you have not pressed a button for 90 seconds. i You can move directly from viewing averages to blood glucose testing by inserting a test strip in the test strip guide. The meter behaves as if it had been turned on with a test strip (see Chapter 5.2.
i If no results were saved in memory for the period in question, three horizontal bars --- are displayed instead of a numerical value. If, for example, the results are more than 7 days old, the meter cannot calculate a 7 day average. i The meter can only perform the calculations as long as the results were stored together with the time and date. If no time and date has been set, three horizontal bars --- are displayed instead of a numerical value.
i If the memory contains both results that were saved together with the time and date and results that were saved without this information, the averages will only be calculated from results saved with the time and date that come chronologically before the first result without the time and date. Example: The meter saved 150 results over a period of 50 days. The result in memory location 51 was saved without the time and date.
6.4 Erasing the most recent result You can erase the most recent result (and only this) from memory. This feature is useful, for instance, if you have obtained an implausible result. Only the result is erased; the time and date information is retained as a reminder, and the memory location remains occupied. P With the meter turned off, press and hold down the < and > buttons at the same time (for longer than 3 seconds) until the following screen appears.
P Press and hold down the < and > buttons again at the same time (for longer than 3 seconds) until a new screen appears. 6 The most recently saved result is displayed together with the time and date; the result flashes. P Press and hold down the < and > buttons again at the same time (for longer than 5 seconds) until a new screen appears. The result is erased from memory and three horizontal bars --- appear in the display instead. The time and date of this result are retained. P Press the Þ button.
Notes i When the beep tone or Acoustic Mode is turned on (0n1 or 0n2), the meter beeps five times at approx. 1 second intervals while the result is being erased (the last beep is longer than the preceding four). i When you later retrieve results from memory, the erased result appears as three horizontal bars ---. i As long as the fifth beep has not sounded, you can stop the result from being erased by releasing the < and > buttons again. The flashing result continues to be displayed.
6.5 Downloading test results to a PC, handheld computer or printer Your meter has an inbuilt infrared port permitting wireless data downloading to a suitably equipped PC or handheld computer (PDA), or to special analysis system. All results in memory are downloaded each time. Roche Diagnostics offers a variety of special hardware and software products that you can use to analyze your data and so extend the integrated notebook functions of your meter.
The infrared port is located at the front of the meter. P Be sure to read the operating instructions supplied with the software and hardware you are using. These will include instructions on how to download your data. P Make the receiving end (software product or hardware) ready to download the results.
6 P With the meter turned off, briefly press the Þ and < buttons at the same time. The meter turns on and you see the following screen: P Position your meter approx. 10-20 cm away from the infrared port of the receiving end. Point the two infrared ports towards one another.
P If necessary, start downloading at the receiving end (software product or hardware). The meter automatically downloads all of the results from its memory and P( stops flashing in the display. End is displayed when the download is complete. P Press the Þ button. The meter turns off.
Notes i The receiving end may turn off the meter automatically when the download is complete. In this case End may be displayed only briefly. i Your results can only be analyzed if you previously set the time and date (see Chapter 3 “Entering settings”). i The results remain in the meter’s memory following downloading. i You cannot test blood glucose while results are being downloaded.
i If data transfer did not occur (P( continues to flash in the display) or was incomplete, the meter turns off automatically after approx. 90 seconds. This may be due to: O A download error occurred. Start the download again. O The infrared windows are too far apart or not properly facing one another. Reduce the distance between the two infrared ports to 10-20 cm and position them so they are pointing towards one another. Start the download again.
O An object, for instance, is blocking communication between the two infrared ports. Remove the object and start the download again. 6 O A error occurred at the receiving end. Read the relevant Instructions for use. i Data transfer does not follow the IrDA standard (IrDA stands for Infrared Data Association).
7 Acoustic Mode Acoustic Mode is intended for persons who are visually impaired. When Acoustic Mode is turned on, the meter guides you through the testing process using beep tones; it also announces the test result as a series of beeps. The meter beeps additionally whenever the battery symbol , the thermometer symbol , the exp symbol or an error message is displayed. Chapter 3.2.5 “Setting the beep tone or Acoustic Mode” describes how to turn Acoustic Mode on.
The chapters that now follow deal with beep tones in greater depth. In addition, training software to help you interpret results announced in the form of beeps is available on CD from your local customer support and service centre (see Chapter 19). Practise listening to beeps from actual tests or from the training software together with a sighted person until you can clearly recognize and interpret the results and other beeps you will hear.
7.1 Beep tones at power-on When Acoustic Mode is set to on, your meter announces this when you O turn it on with a test strip, O turn it on with the Þ button, O press the < or > button to review results in memory, O exit memory or the average screens and go directly to blood glucose testing by inserting a test strip. The meter emits a pattern of 6 beeps: one beep – pause – two beeps – pause – three beeps ( – – – – – – ). 7.
7.3 Announcement of the result following a test In Acoustic Mode, whenever your meter displays a result following a blood glucose test, it also announces the result as a series of beeps. The result is not treated as an entity, but is broken down into individual digits. Examples: O The result 138 mg/dL is announced as 1 – 3 – 8. O The result 7.6 mmol/L is announced as 0 – 7 – decimal point – 6. Each digit is represented by the corresponding number of beeps; e.g. 4 beeps for the number 4 ( – – – – ).
mg/dL meters First the hundreds are announced, then the tens, and finally the units. There is a short pause between each group of beeps. The hundreds are always announced, even when the result is below 100. The hundreds in this case are represented by a long beep, signifying zero.
Examples: O The result 13.8 mmol/L is announced as follows: 1 beep – pause – 3 beeps – pause – 1 very short beep – pause– 8 beeps ( – – – – · – – – – – – – – ) O The result 4.0 mmol/L is announced as follows: 1 long beep (for 0 tens) – pause – 4 beeps – pause – 1 very short beep – pause – 1 long beep ( — – – – – · — ) The result announcement is repeated twice. Again, two short beeps precede each repetition. Results that are lower than 10 mg/dL or 0.
7.4 Announcement of results saved in memory Only the last result that was saved can be announced acoustically. It is represented in the same way as any result that is announced directly following a test. Notes i If the memory does not contain any results or the last result that was saved has been erased or lost, three horizontal bars --- are displayed. This is signalled acoustically as two short beeps sounded three times in succession ( - - - - - - ).
i 7.5 Averages (see Chapter 6.3 “Requesting 7, 14 and 30 day averages”) are not announced acoustically in Acoustic Mode, but only displayed. 7 Announcement of symbols and error messages Certain symbols that are displayed before a test or together with the test result are also announced acoustically. The acoustic warning consists of two short beeps sounded three times in succession ( - - - - - - ).
Examples: O The result is 138 mg/dL and exp is displayed. You hear the following beeps: 2 short beeps (introduction) – 2 short, 2 short, 2 short beeps (warning) – 1, 3, 8 (test result) ( - - - - - - - - – – – – – – – – – – – – ). This sequence is sounded twice more. O The result is 7.6 mmol/L and exp is displayed.
8 Checking your meter To ensure your results are always dependable, you need to periodically check the performance of your meter. Do this by running a performance check using Accu-Chek Go control solutions O whenever you open a new pack of test strips, 8 O whenever you change the battery, O whenever you clean your meter, O if your result does not reflect how you feel. Please ask your local customer support and service center where you can obtain the control solutions (see Chapter 19).
8.1 What you need To perform a performance check you need the following items: O your meter with the code chip inserted O the container of Accu-Chek Go test strips you took the code chip from O Accu-Chek Go control solutions Control G1 (low glucose concentration) or Control G2 (high glucose concentration) Note i 126 To perform a performance check you need the concentration table for the control solutions you are using. You will find this table on the label attached to the test strip container.
8.2 Performing a performance check P Read the package insert that came with the control solutions. P Take a test strip from the container and close the container again immediately. 8 P Hold the test strip so the arrows printed on it are uppermost and pointing towards the test strip guide. P Without bending it, gently push the test strip into the test strip guide until you feel it engage.
The meter first performs a standard display check lasting approx. 2 seconds. mg/dL meter mmol/L meter P Check that all the segments making up the numerals 888 (mg/dL meter) or 88.8 (mmol/L meter) are displayed. If one or more segments are missing, please contact your local customer support and service centre. Contact details are given at the end of these Instructions for use (see Chapter 19). Following the display test, the code number appears in the display (963 is just an example).
8 P Check that the same code number is printed on the label of the test strip container. If the numbers do not match: did you really insert the code chip that came with the container of test strips you are using? If the answer to this is yes, please contact your local customer support and service centre (see Chapter 19). Note i If you missed the code number, push the test strip ejector (see Chapter 5.4) down to eject the test strip, and then re-insert it.
After the code number has been displayed, you see the test strip symbol with a flashing blood drop. If the beep tone is turned on, the meter beeps at this point. The meter is ready to perform a performance check. Now allow the test strip to draw up control solution. You have 90 seconds to perform this action. Always wait for the flashing blood drop symbol to be displayed before allowing the test strip to draw up control solution. P Take a bottle of control solution.
8 P Touch the drop of solution against the tip of the test strip where the black notch is located. The test strip draws up control solution. P Move the control solution away from the test strip as soon as the hourglass symbol is displayed and the meter beeps (only when the beep tone is turned on). The test strip has then drawn up enough control solution, and testing starts. The hourglass symbol indicates that the meter is busy measuring.
Measurement is complete after approx. 5 seconds. The result is displayed and the meter beeps (only when the beep tone is turned on). The meter automatically saves the result in its memory. To enable you to distinguish this performance check at a later date from blood glucose test results, you need to flag it as a performance check. You can do this only as long the result is being displayed and you have not ejected the test strip.
P Press the < or > button repeatedly until the bottle symbol is displayed. The display cycles through the bottle symbol at bottom left, an asterisk at bottom right, or no symbol displayed. You can therefore use the < and > buttons to remove the bottle symbol.
If you subsequently eject the test strip and so turn the meter off, the result is saved together with the bottle symbol. Note i The asterisk is used to flag special test results (see Chapter 5.6 “Flagging special results”). Immediately after the result has been displayed and flagged as a performance check result: P Compare the result with the concentration table printed on the label attached to the test strip container. The concentration table has two rows and two columns.
Make sure you compare the result with the concentration data stated for the control solution you used and the unit of measurement your meter displays. ACCU-CHEK Go Control Unit of mmol/L mg/dL measurement 2,1 - 3,7 1 37 - 67 ® 2 126 - 170 7,3 - 9,4 Figures are examples. Control solution used P Subsequently hold the meter directly above a waste bin with the test strip pointing downwards. P Push the test strip ejector down as far as it will go towards the test strip guide. The test strip drops out.
After the test strip has dropped out, End is displayed twice letter by letter from left to right. The meter then turns off automatically. If the result is outside the stated concentration range, perform a second performance check.
Did you use a suspended drop of control solution? yes Did you bend the test strip either before or while it was drawing up control solution? no Did you wait for the flashing blood drop symbol to appear before allowing the test strip to draw up control solution? yes Did you bend or move the test strip while the test was in progress? no Did you compare the result with the concentration data specifically relating to the control solution you used? yes Is the concentration table on the test strip conta
Have you observed the proper storage conditions for the meter, test strips and control solution (see Chapter 12 “Measurement and storage conditions”, and the package inserts that came with the test strips and control solutions)? yes Are the test strip guide and measurement optics clean (see Chapter 9 “Cleaning your meter”)? yes Are the control solution and test strips past their expiry date (look next to the symbol on the bottle and test strip container label and look to see if exp is shown in the displ
Notes i The control solution that the test strip draws up must come from a suspended drop. Do not allow the test strip to draw up control solution that has trickled down the outside of the dropper, as this will possibly generate results that are too high. i The meter cannot differentiate between blood and control solution. If you have set a target range and the performance check result is outside the set limits, is displayed and the meter beeps (only when the beep tone is turned on).
9 Cleaning your meter Your meter utilizes an optical measuring method that relies heavily on all of its components being clean. Owing to the way the test strip works, the meter does not normally come into direct contact with blood. Regular cleaning is therefore largely unnecessary. You may need to clean the meter, however, if it becomes soiled through improper use (see error message E-4 on page 174).
9 P Lift the measurement optics cover at that point and remove it. a b P Wipe the measuring window covering the optical system and surrounding area a as well as the test strip guide b with a cotton swab lightly moistened with cold water or 70 % ethanol.
P Remove any fluff or lint that may remain. P Allow areas you have wiped time to dry thoroughly. P Place the measurement optics cover back in position and then close it, pushing it down so that it audibly clicks into place. P Perform a performance check (see Chapter 8.2, “Performing a performance check”). Notes Use only cold water or 70% ethanol to clean the meter. Any other cleaning agents may damage the meter or impair its measuring function.
Ensure that the measurement optics cover (see pages 10 and 11) is firmly and properly attached to the meter. A cover that is not properly attached can lead to incorrect results. Incorrect results can cause the wrong therapeutic decision to be taken and so lead to serious adverse health effects. Healthcare professionals using the meter to test several patients’ blood glucose must also read the directions in Chapter 11.2 relating to disinfection. Make sure that no liquid enters the meter.
10 Changing the battery The appearance of the battery symbol in the display signifies low battery power. You can perform about 50 more tests. You should, however, replace the battery as soon as possible. By then it will have run very low, and changeable conditions (e.g. a cold environment) can affect its performance even further. Turn the meter over to locate the battery compartment. Locking catch Battery compartment cover P Push the locking catch downwards and remove the battery compartment cover.
P Place the new battery (type CR 2032) in the compartment, with the + symbol facing upwards. 10 P Re-attach the battery compartment cover so the two prongs on its lower edge engage with the slots in the battery compartment. P Press the cover down so it audibly clicks into place.
Notes i When you replace the battery, your results always remain saved. The time and date settings only remain saved as long as O you take no more than one minute to change the battery, O you do not press any button without the battery inserted, O you do not insert a test strip in the test strip guide without the battery inserted, O you insert the battery the right way up only, i.e. with the + symbol facing upwards.
If you lose the date and time settings while changing the battery, all alarms are automatically turned off (0FF). All of the times you previously set, however, are retained in the meter’s memory. You then need to turn the alarms on again (0n). i A new battery has enough power for about 1000 tests or one year. If you use the meter in Acoustic Mode, the battery will not last as long. Never throw batteries into a fire. They may explode.
11 Testing blood glucose in more than one patient – Directions for healthcare professionals Only staff working in doctors’ practices, hospitals and diabetes training centres, and nurses are allowed to perform blood glucose tests on more than one patient using the same Accu-Chek Go meter. When using the meter always follow the recognized procedures for handling objects that are potentially contaminated with human material. Practise the health and safety policy of your laboratory or institution.
Notes Patients and medical staff are potentially at risk of becoming infected when the same Accu-Chek Go meter is used to test blood glucose in several patients. Any object coming into contact with human blood is a potential source of infection (see: Clinical and Laboratory Standards Institute: Protection of Laboratory Workers from Occupationally Acquired Infections; Approved Guideline – Third Edition; CLSI document M29-A3, 2005).
11.1 Testing blood glucose P Wear protective gloves. P Wash or disinfect the patient’s finger and allow it to dry thoroughly. The drop of blood does not spread so easily over dry skin. P Use only lancing devices approved for use by healthcare professionals. P Use a lancing device with adjustable penetration depth settings. P Select a penetration depth to suit the nature of the patient’s skin. Start with a shallow depth setting. P Select a puncture site along the side of a fingertip.
P Hold the meter with the test strip pointing downwards (see illustration). P Touch the drop of blood, as soon as it has formed, against the tip of the test strip where the black notch is located. The test strip draws up blood. 11 P Move the test strip away from the drop of blood as soon as the hourglass symbol is displayed and the meter beeps (only when the beep tone is turned on). The test strip has then drawn up enough blood, and testing starts.
Notes Residues of water or disinfectant on the skin can dilute the drop of blood and so produce false results. While the test draws up blood, always hold the meter so the test strip is pointing downwards. If you hold it so the test strip is pointing upwards or sideways or you lay the meter down with the test strip still in, blood can enter the meter and contaminate it. Hold the meter with the test strip pointing downwards until the result is displayed (measuring time approx.
11.2 Disinfecting the meter The following parts of the meter may become contaminated: O the case O the area around the test strip guide 11 The meter and the area around the test strip guide must be thoroughly cleaned and disinfected at least once a day after use. Carefully check all recesses, grooves and gaps.
Cotton swabs, wipes and cloths lightly moistened with disinfectant are all suitable for disinfecting the meter. Use a mixture of 1-propanol, 2-propanol and glutaraldehyde, known in some countries as Bacillol plus. Allow areas you have wiped time to dry thoroughly. Notes Make sure that no liquid enters the meter. Do not spray anything onto the meter and do not immerse it in liquid. Doing so may damage the meter’s internal components and stop it from working properly.
12 Measurement and storage conditions Pay close attention to the following points. They affect the dependability of your meter as well as the accuracy of your results. A meter that has been dropped can produce false results. 12.1 Temperature range O Without the battery the meter may be kept at between -25 °C and +70 °C. O With the battery the meter may be kept at between -10 °C and +50 °C. At temperatures above +50 °C the battery could leak and damage the meter.
O Blood glucose tests can be performed at the limits of the permitted range (between +5 °C and +10 °C or between +40 °C and +45 °C). If the temperature is within one of these ranges, the thermometer symbol flashes in the display. Do not use results obtained at the limits of the permitted temperature range as a basis for making therapeutic decisions, as they could be incorrect. Incorrect results can cause the wrong therapeutic decision to be taken and so lead to serious adverse health effects.
Never try to speed up warming or cooling of your meter, e.g. by placing it on a radiator or in a refrigerator. Doing so can damage the meter and cause it to give incorrect results. Incorrect results can cause the wrong therapeutic decision to be taken and so lead to serious adverse health effects. 12.2 Light conditions Do not test in a place where the meter and test strips are exposed to direct sunlight. Keep the meter away from very strong light sources (e.g.
12.3 Atmospheric humidity Only test blood glucose when atmospheric humidity is below 85 %. Keep the meter below 93 % atmospheric humidity. Sudden changes in temperature cause condensation to form in or on the meter. If this has occurred, do not turn the meter on. Allow the meter to return slowly to room temperature, and never keep it in a room that is likely to harbour condensation (e.g. a bathroom). 12.
13 Symbols, error messages and troubleshooting In addition to results, time and date the meter also displays other symbols and error messages. Some screens, those you see in normal use, have already been explained in previous chapters. We now present a complete list of symbols and error messages, what they mean and what actions you should take should you see one of them. Please watch out for any messages displayed when you use the meter. Every message provides you with important information.
13.
Symbol What it means 1 You are in Standard or Quick set-up. 2 When an average is displayed (from memory): the symbol is preceded by the number of days covered. 3 4 LL or LK You are in a set-up and entering target range settings. You have turned on at least one alarm or you are in a set-up and entering the alarm settings. Optical warning while the alarm sounds for 20 seconds. 5 The test strip has drawn up enough blood or control solution, and the test is in progress.
Symbol What it means 8 Now allow the test strip to draw up blood or control solution. 9 Now insert a test strip in the test strip guide. 10 Before and during testing and when the result is displayed: The test strips are past their expiry date. Change the test strips and code chip. Check the time and date settings, as the meter compares these against the expiry date encoded in the code chip. In memory: the test strip was past its expiry date when the test was performed.
Symbol 12 What it means After testing: the result is outside the target range. In a set-up: you are entering target range settings. In memory: the result is outside the target range set at the time of testing. 13 This result is a performance check result. 14 While the result is displayed: the tempe rature is outside the permitted range of +10 °C to +40 °C. Do not use the result as a basis for therapeutic decisions. Allow the meter to warm up or cool down slowly. Repeat the test with a new test strip.
Symbol What it means AA Before or during a test or in memory: at the time of testing the temperature is / was outside the permitted range. 15 The beep tone (0n1) or Acoustic Mode (0n2) is turned on. 16 or The battery is running low. When the symbol first appears in the display, you can perform about 50 more tests. When the battery is so low that no more tests can be performed, the battery symbol alone is displayed for 3 seconds. After that, the meter turns off. Insert a new battery.
Symbol What it means 18 You are in memory – either a result or an average is being displayed, or you are downloading results to a PC. 19 Displayed additionally when 12-hour time format is selected. The screen showing 888 (mg/dL meter) or 88.8 (mmol/L meter) may also include the following symbols: Symbol 20 What it means Decimal point (stands for decimal comma): displayed by mmol/L meters and is part of the result (e.g. result is 12.6 mmol/L) 13 and : there is no code chip in the meter.
Symbol AA What it means In memory: O No results are saved in memory. O Averaging is not possible because J the time and date are not set J memory only contains results without a time and date J no results were saved in the period in question, e.g.
Symbol AA What it means O You erased the result from memory. O The result has been lost from memory. You are in set-up and entering alarm settings. You have turned the meter on in order to erase the latest result from memory. In a set-up: you have reached the end of Standard set-up or the end of a group in Quick set-up. After testing: the meter is performing a self-test after you ejected the test strip. Following a data download: download complete.
Symbol What it means The result is higher than 600 mg/dL (33.3 mmol/L). The result is lower than 10 mg/dL (0.6 mmol/L). You have turned the meter on in order to download the results. The meter is downloading results. Several symbols may appear at the same time. For example, , and exp displayed together means: at least one alarm is turned on, the temperature is outside the permitted range, and the test strips are past their expiry date.
13.2 Error messages and troubleshooting If this happens ... it means: The meter will not turn on. O The battery is empty. Insert a new battery. O You have inserted the battery the wrong way round. Remove the battery and place it in the battery compartment as instructed. If the battery was placed in the meter the wrong way round, the time and date have been lost. Reenter them (see Chapter 3 “Entering settings”). O You have not removed the protective film from the battery.
If this happens ... it means: AA O Condensation has affected the electronics. Allow the meter to dry slowly. O The meter is defective. Please contact your local customer support and service centre (see Chapter 19). The meter is turned on, but the display is blank. The display is defective. Please contact your local customer support and service centre (see Chapter 19). The clock has stopped or the clock is slow.
If this happens ... it means: When the meter is turned O The meter was exposed to a temperature below -10 °C and the battery is on, the date is shown as beginning to freeze. 0- 0 and the time as 0:00 Eject the test strip or turn the meter or 0:00am. off. Move to a place where the temperature is between +10 °C and +40 °C and wait for the meter to warm up. O You have not set the time and date. Set the time and date as described in Chapter 3.2.4 “Setting the time-anddate-format, time and date”.
This error message ... means: O You bent or moved the test strip during the test. Push the ejector down to eject the test strip. Repeat the test with a new test strip. O You inserted the test strip incorrectly or did not press it right in. Push the ejector down to eject the test strip. Hold the test strip so the arrows printed on it are uppermost and pointing towards the test strip guide. Without bending it, gently push the test strip into the test strip guide until you feel it click into place.
This error message ... means: O The meter cannot read the code chip. Remove the code chip and re-insert it into the meter. If the error message appears again, you cannot use the code chip and test strips. O A code chip from another system has been inserted. The code chip does not belong to test strips from the Accu-Chek Go system. Remove the code chip and insert the one belonging to the Accu-Chek Go test strips you are currently using. O The code chip is defective or is not properly inserted in the meter.
This error message ... means: AA O You removed the code chip while testing was in progress. Re-insert the code chip into the meter. O The measuring window covering the optical system is soiled. Clean the window (see Chapter 9 “Cleaning your meter”). O The test strip drew up blood or control solution too soon, i.e. before the drop symbol was flashing. Push the ejector down to eject the test strip. Repeat the test with a new test strip.
This error message ... means: AA O You bent or moved the test strip during the test. Push the ejector down to eject the test strip. Repeat the test with a new test strip. O You inserted a used test strip. Push the ejector down to eject the test strip. Repeat the test with a new test strip. O You used a test strip that is past its expiry date. Push the ejector down to eject the test strip. Test again with test strips that have not expired.
This error message ... means: AA O After testing, you inserted a new test strip while End was still being displayed. Remove the test strip by pushing the ejector down and re-insert it. After testing, wait for the meter to turn off before inserting a new test strip. If this error message appears frequently or continuously, the meter is defective. Please contact your local customer support and service centre (see Chapter 19). O The test strip drew up too little blood or control solution.
This error message ... means: AA O You bent or moved the test strip during the test. Push the ejector down to eject the test strip. Repeat the test with a new test strip. O The test strip drew up blood or control solution too soon, i.e. before the drop symbol was flashing. Push the ejector down to eject the test strip. Repeat the test with a new test strip. Always wait for the flashing drop symbol to appear before allowing the test strip to draw up blood or control solution.
This error message ... means: AA O The battery is empty or a meter error has occurred. Remove the test strip by pushing the ejector down and re-insert it. If the error message persists, change the battery. O The meter was exposed to a strong electromagnetic field. Eject the test strip or turn the meter off. Move somewhere else or turn off the source of the field.
This error message ... means: A meter error has occurred. Remove the test strip by pushing the ejector down or turn the meter off. Start again from the beginning. If the error message appears again, the meter is defective. Please contact your local customer support and service centre (see Chapter 19). The ambient temperature or the temperature within the meter is too low or too high for a test. Remove the test strip by pushing the ejector down or turn the meter off.
14 Technical data Meter type Accu-Chek Go (Model GS) Catalogue No./Serial No. See type plate on the back of the meter Test principle Determination of glucose in fresh capillary blood by reflectance photometry. If using other specimen material please refer to the package insert that came with the Accu-Chek Go test strips. Blood glucose concentrations may be measured in whole blood or in plasma.
Sample size approx. 1.5 µL (1 µL (microlitre) = 1 thousandth of a millilitre) Measuring time approx.
Battery life approx. 1000 tests or approx. 1 year (less in Acoustic Mode owing to greater power requirement) Interface Infrared port Safety class III LED/IRED Class 1 Electromagnetic compatibility This meter meets the electromagnetic immunity requirements as per ISO 15197 Annex A. The chosen basis for electrostatic discharge immunity testing was basic standard IEC 61000-4-2 . In addition it meets the electromagnetic emissions requirements as per EN 61326. Its electromagnetic emission is thus low.
Performance analysis The performance data for the Accu-Chek Go system (Accu-Chek Go meter with Accu-Chek Go test strips) were obtained using capillary blood from diabetic patients (method comparison, accuracy), venous blood (repeatability) and control solution (reproducibility). The system is calibrated with venous blood containing various levels of glucose. The reference values are obtained using the hexokinase method.
15 Disposing of your meter The product may come into contact with blood during measurement. Used products therefore carry a risk of infection. Please dispose of used products according to the regulations applicable in your country. For information about correct disposal, please contact your local council or authority. The product falls outside the scope of the European Directive 2002/96/ EC (Directive on waste electrical and electronic equopment (WEEE)).
16 System components Only operate your Accu-Chek Go meter with Accu-Chek Go test strips. These are available from your pharmacist. Use only Accu-Chek Go control solutions to perform performance checks on your Accu-Chek Go meter (see Chapter 8). For virtually pain-free blood sampling we recommend the Accu-Chek Softclix lancing device and Accu-Chek Softclix lancets or the Accu-Chek Multiclix lancing device and Accu-Chek Multiclix lancet drums.
17 Guarantee The statutory provisions on rights in consumer goods sales in the country of purchase shall apply.
18 Patents US 5,463,467; US 5,366,609; US 6,707,554 18 Patents 187
19 Local customer support and service 19.1 Information service If you need advice on how to operate your Accu-Chek Go meter, if you seem to be obtaining implausible results, or if you suspect the meter to be defective, please contact your local customer support and service centre. Do not attempt to repair or modify the meter yourself. When you call, our staff will help you troubleshoot the problem. See the next section for contact details.
19.2 Adresses Argentina Productos Roche S.A.Q. e I. División Diagnóstica Av. Belgrano 2350, Don Torcuato Buenos Aires phone: +54 11 5129-8000/8457 fax: +54 11 5129-8105 Chile Roche Chile Limitada Avda. Quilín 3750 Macul, Santiago Tel: 56 (2) 441 3200 Fax: 56 (2) 4626687 Línea gratuita: 800 471 800 Australia Roche Diagnostics Australia Pty Ltd. 31 Victoria Avenue, Castle Hill, NSW 2154 Accu-Chek Enquiry Line: 1800 251 816 www.accu-chek.
Czech Republic Roche s.r.o. Diagnostics Division, Diabetes Care Dukelských hrdinů 12, 170 00 Praha 7 Česká Republika Informace o glukometrech na bezplatné lince 800 111 800 New Territories, Hong Kong Roche Diagnostics (Hong Kong) Ltd. Rm 1316-1325 Metroplaza Tower I 223 Hing Fong Road Kwai Chung Diabetes Hotline: 852 2485 7512 (office hours) www.accu-chek.com.hk Ecuador Roche Ecuador S.A. Av. 10 de Agosto N 36-239 y Naciones Unidas Ecuador Línea Gratuita: 1800-222824 Hungary Roche Magyarország Kft.
Indonesia PT Roche Indonesia Diagnostics Division Artha Graha Building 21st Floor Sudirman Central Business District - Lot 25 Jl. Jend. Sudirman Kav. 52 – 53 12190 Jakarta Toll-Free Number: 0 800 1 222 999 Malaysia Roche Diagnostics (M) Sdn Bhd 2A, Jalan 13/1 46200 Petaling Jaya Selangor Darul Ehsan Malaysia Tel: 60-03-7555039 Fax: 60-03-7555418 Toll-Free-Line: 1-800-88-1313 Mexico PRODUCTOS ROCHE, S.A. DE C.V Edificio Intelicorp Av. Santa Fe No. 485 – 4º Piso Col.
Philippines Roche (Philippines) Inc. Diagnostics Division 2252 Don Chino Roces Ave. 1231 Makati City phone: +63 2 893 45 67 fax: +63 2 893 06 17 Customer Assist. +63 2 89308000 Poland Roche Diagnostics Polska Sp. z o.o. ul. Wybrzeże Gdyńskie 6B 01-531 Warszawa Polska Bezpłatna infolinia 0-800 401 061 www.rochediagnostics.
South Korea Roche Diagnostics Korea Co. Ltd. 4F Seokyoung Bldg. 1000-3, Daechi-dong Gangnam-Gu 135-280 Seoul South Korea Tool-Free Line: 080-909-2222 Taiwan Roche Diagnostics Ltd. 11F, No. 35 Sec. 3 Min Quan East Road, 104 Taipei Toll-Free Line: 0800-060-333 Thailand Roche Diagnostics (Thailand) Ltd.
20 Alphabetical index A Acoustic Mode....................................................................... 14, 45, 116 AL1, AL2, AL3, AL4 (symbol)......................................................... 61, 167 Alarm clock function...................................................................... 13, 60 Alternative sites................................................................................. 185 Asterisk symbol...........................................................................
C Checking (meter)............................................................................... 125 Cleaning............................................................................................ 140 Clr (symbol)............................................................................... 106, 167 code (symbol).................................................................................... 162 Code chip......................................................................................
E E-1, E-2, E-4, E-6 (symbol)................................................................ 172 EEE (symbol)...................................................................................... 179 Electromagnetic compatibility............................................................ 182 End (symbol)...................................................................................... 167 Erasing (result)..................................................................................
I Infection risk...................................................................................... 149 Infrared port................................................................................ 11, 110 Intended use.......................................................................................... 3 L LH (symbol)................................................................................. 55, 161 Light conditions............................................................................
Q Quick set-up.....................................................................25, 27, 34, 202 S Settings Acoustic Mode............................................................................ 45 Alarm clock function................................................................... 60 Beep tone................................................................................... 45 Changing – general rules............................................................ 29 Date.............................
T Target range.................................................................................. 13, 50 Symbol......................................................................... 50, 89, 163 Technical data................................................................................... 180 Temperature.............................................................................. 155, 181 Test principle.....................................................................................
Beep tone Date Time Time & Date Starting Standard set-up Turning on the meter Off (OFF) On (On1) Day Month Year Minutes Hours Time-anddate format Acoustic Mode (On2) Press and hold down (for more than 3 seconds) Press briefly 21 Standard set-up overview Standard Set-up overview
Standard Set-up overview 201 21 AL1 AL2 AL4 Press briefly (turn off) AL3 Off Upper limit (LH) Alarm clock function Off Lower limit (LL) Target range Off Minutes Hours Value On On Value On < > change with < or > press briefly = save or scroll Þ press and held down for more than 3 seconds at anytime = save, exit set-up and turn off I Þ
22 Quick set-up overview Turning on the meter and starting Quick set-up Press and hold down (for more than 3 seconds) Time & Date Time Time-anddate format Hours Beep tone On (On1) Off (OFF) Acoustic Mode (On2) Minutes Date Year Month Day Press briefly (turn off) Þ I 202 press briefly = save or scroll Press briefly (turn off) < > change with < or > Quick Set-up overview
Target range Lower limit (LL) Alarm clock function Off On AL1 Off Value Upper limit (LH) On AL2 Hours Off On Value Press briefly (turn off) AL3 Minutes AL4 Press briefly (turn off) Press briefly (turn off) Þ press and held down for more than 3 seconds at anytime = save, exit set-up and turn off Quick Set-up overview 203 22
ACCU-CHEK, ACCU-CHEK GO, ACCU-CHEK MULTICLIX, SOFTCLIX and SAFE-T-PRO are trademarks of Roche. Roche Diagnostics GmbH 68298 Mannheim, Germany www.accu-chek.
Warranty Card Name Street City / post code Telephone No.
Accu-Chek Go Warranty Card Please let this card be completed by the dealer and preserve it carefully. If this card was not filled out at the time of purchase please submit the original receipt with your claim. The statutory provisions on rights in consumer goods sales in the country of purchase shall apply. Serial No.